Advanced tab |

|

|

|

|
|
Advanced tab |

|

|

|

|
|
|
||
On the Advanced tab you can edit the following advanced properties of the product:
•Options
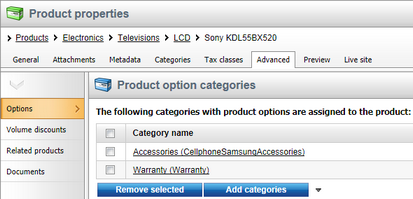
In the Options section you can specify which option categories will apply to the current product. To add option categories, click the Add categories button and check the boxes next to the appropriate categories in the displayed selection dialog. Option categories can be removed from the product at any time using the checkboxes next to the listed items, together with the Remove selected button. You can also remove all listed items at once by clicking the ![]() icon and performing the
icon and performing the ![]() Remove all action.
Remove all action.
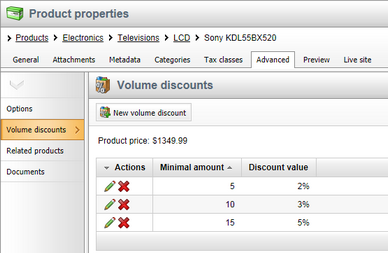
In the Volume discounts section you can see a list of volume discounts which are applied when a customer purchases a specified amount of the product. The discounts are automatically calculated and applied during the checkout process when the user adds a given amount of product items to their shopping cart. Multiple volume discount levels can be defined, allowing you to apply different discounts for different amounts of purchased items.
You can add a new volume discount by clicking the ![]() New volume discount button above the list. Properties of already defined volume discounts can be edited by clicking the Edit (
New volume discount button above the list. Properties of already defined volume discounts can be edited by clicking the Edit (![]() ) icon in the Actions column. You can also delete a volume discount by clicking the Delete (
) icon in the Actions column. You can also delete a volume discount by clicking the Delete (![]() ) icon.
) icon.
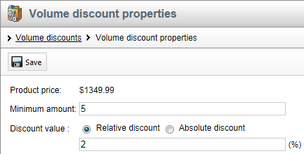
The following properties are available when creating or editing a volume discount object:
•Minimum amount - sets the minimum amount of ordered items to which the current volume discount applies.
•Discount value - here you can specify a discount for the given volume (as set in the Minimum amount property). You can choose to apply either a relative or absolute discount using the respective radio buttons.
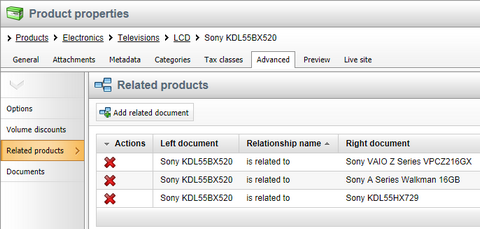
In the Related products section you can build relationships between products. The relationship names need to be defined in Site Manager -> Development -> Relationship names. Please note that only relationship names enabled for the current website can be used when building relationships between products offered in your on-line store.
New relationships can be created after clicking the ![]() Add related document button. Listed relationships can be deleted by clicking the Delete (
Add related document button. Listed relationships can be deleted by clicking the Delete (![]() ) icon in the respective row.
) icon in the respective row.
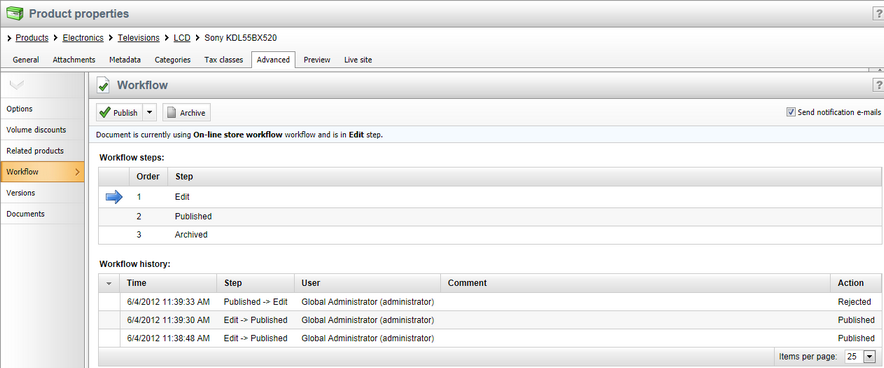
The Workflow section is available only if a workflow is defined for the product. Workflow is a sequence of steps that define the life cycle of the product. This allows to set up a reviewing and approval process to ensure quality of content and design. In such process, you can specify roles that different users play and places in the flow where the users have influence on the product.
In the initial section of the page, you can see which workflow is currently applied to the product, perform workflow actions ( ![]() Publish,
Publish, ![]() Archive, etc.) and enable sending notification e-mails. Please note that workflow notification e-mails are not sent among users who have the same e-mail address. So for example, when user1 and user2 have the same address and user1 sends a document for user2's approval, no notification e-mail is sent.
Archive, etc.) and enable sending notification e-mails. Please note that workflow notification e-mails are not sent among users who have the same e-mail address. So for example, when user1 and user2 have the same address and user1 sends a document for user2's approval, no notification e-mail is sent.
This table displays all workflow steps of the current product's workflow, while the current step is highlighted.
This list displays the current product's workflow step history, i.e. a list of all workflow status changes made throughout the product's life cycle. With each status change, you can see its exact date and time, final workflow step, the user who performed the action and the actual type of action that was performed.
|
Please note
Only basic product properties that can be accessed on the General tab are subject to workflow, with the following exceptions:
•e-product files (i.e. the Files property of the E-product representation) •products contained in a bundle (i.e. the Products property of the Bundle representation) •product image (i.e. the Image property shared by all product representations)
Besides, Attachments and Page settings (i.e. the Page title, Page description and Page keywords properties accessible on the Metadata tab) are also versioned. Other product properties are not subject to workflow, which means their changes are reflected immediately.
|
The Versions section is available only if a workflow is defined for the product. You can see here all workflow versions of the currently edited product. The history is also displayed when a particular version has been published and when it was replaced with a new one.
You can perform the following actions with the versions:
•![]() View - displays an overview of the product's content with the possibility of side-by-side comparison of versions.
View - displays an overview of the product's content with the possibility of side-by-side comparison of versions.
•![]() Rollback - rolls back any changes made since the particular version of the product.
Rollback - rolls back any changes made since the particular version of the product.
•![]() Delete - deletes the old product's version.
Delete - deletes the old product's version.
If you click the Clear history button, all product versions except the latest one will be deleted. Please note that the length of the version history can be configured in Site Manager -> Settings -> Content -> Content management -> Version history length.
Kentico CMS supports automatic version numbering:
•If you use workflow without content locking, automatic version numbering is used by default.
•If you use content locking, this option is optional and can be configured in Site Manager -> Settings -> Content -> Content management -> Use automatic version numbering.
The automatic version numbering works as shown in the following example:
•0.1 - the first version of the product when it is created.
•0.2 - the second modification of the product.
•1.0 - the first published version of the product.
•1.1 - the first modification of the published product.
•2.0 - the second published version of the product.

In the Documents section you can see a list of documents to which the currently edited product object (SKU) is assigned. Click Edit document (![]() ) to edit the given document or click Navigate to document (
) to edit the given document or click Navigate to document (![]() ) to view the document on the live site.
) to view the document on the live site.
