Module Development - Packaging
Packaging your module is an important part of the module life cycle. Read this article to learn more about the new module packaging options which are available in Kentico 9.
Hi there,
I intentionally postponed my Module development article series for a while, because I was waiting for Kentico 9 to be released with new related features. Just in case you are new to module development in Kentico, here is the whole list of my articles about this topic:
And here is a link to the official documentation for the latest version:
The next important topic I would like to cover is module packaging and deployment. In version 8, you had to use export packages to deploy a module to other instances and it was kind of limiting. In 8.2 we added support for basic packaging to NuGet, but you had to combine it with manual importing of the module’s data using export packages. Kentico 9 solves this by merging the export package and other related module aspects to the module NuGet package. All this data and code can be installed automatically, just as developers are used to when using NuGet packages.
You can read about the whole module packaging concept here:
In this article, I would just like to summarize the most important points, and give you some additional tips on how to extend the functionality.
Building modules in Kentico 9
With version 9, we provide an even more solid platform for building modules. Because modules will be packaged into NuGet packages, we need to create them with the right structure, so that only relevant content is included.
The first and most important thing is registration of your module. You need to carefully choose the module code name, because you will often use it as a prefix for other related data and code. For the purposes of this article, I will just use a simple code name “MyModule”. But in reality you may want to prefix your module names with the name of your company to avoid potential conflicts with modules from other authors. Here is an example of a prefixed name: “Acme.MyModule”.
Similar naming conventions will also be used in other parts of the process.
Module code
On the code side of things, this means a Visual Studio project with the same name as the module (or at least producing an assembly with the same name), possibly supplemented by additional class libraries. This project must be a Web application project or a class library and its content must not overlap with other projects in the Kentico installation.
For this reason, modules must be developed on Web application type installations of Kentico. Web site installations would automatically include unwanted files if you needed to add content to the web project.
It is also strongly recommended to build module projects on the lowest .NET framework version supported by Kentico to ensure that the module works with all supported versions when deployed.
Kentico libraries have a fixed version in all hotfixes of the given version, and the API never changes between hotfixes, so you don’t need to worry about them. Your module will work with any hotfix (if implemented properly).
Installation of modules can be done on both Web application and Web site installation types, because at that point the module is already compiled.
Modules automatically include the following folders when they are packaged:
- App_Data\CMSModules\MyModule
- CMSFormControls\MyModule
- CMSModules\MyModule
- CMSScripts\CMSModules\MyModule
- CMSResources\MyModule
- CMSWebParts\MyModule
MyModule is the code name of your module.
We also recommend placing any module related code to a folder matching the module name, e.g.
This code will be compiled to the module assembly if you make a module project as described in the documentation, but not included into the package as physical files.
Because my main focus in this article is on the data included into the module package, I created a module without the project file and code files. Learn more about the code part from the documentation https://docs.kentico.com/display/K9/Creating+installation+packages+for+modules, specifically the chapter Creating the module project.
Module data
As you can read in the documentation, module packages automatically include several object types which are commonly provided by modules. The list includes object types that we identified as the most important with our clients and managed to cover and test within the available development time.
The following types of objects can be automatically included:
- Module
- UI Elements
- Permissions
- Settings
- Classes
- Web parts and categories
- Form controls
- Page types
We know the list is fairly small, but it is a good start. If you are missing something important that you think should be supported by default, let us know. Read further to learn how you can extend this list through customization.
There are just two general rules you need to remember in order to include objects with a module:
- If the object has a module selector field (typically a drop-down with a list of registered modules), the system uses this field to select which objects of the type will be included when packaging modules. This approach must be used in cases where the code names of objects are somehow limited. We use it for page types for this reason. I don’t recommend using it for custom module classes as it is much more complicated to set up.
- If the object doesn’t contain a module foreign key, a naming convention is used to select module objects. The convention is a prefix made from the module code name. So in our case the convention would match code names such as “MyModule.ABC” and “MyModule.ABC.DEF”, or with the company prefix variant “Acme.MyModule.ABC” and “Acme.MyModule.ABC.DEF”. Use this variant as often as possible.
There is no simple way to include objects without a module selector field or code name but these two should suffice for the vast majority of cases.
Note that you can only include global objects to modules. Site-specific objects are not supported. If you need to distribute site-specific objects, you have to use regular export/import packages.
I mentioned custom module classes. The fact is that currently only custom class definitions can be installed together with modules. If you would also like to install some data for those classes, you would have to build your module as two modules, one with the class definition and the other with the data, and install them one after another. Or simply import the data through a regular import package.
Module packaging
If you properly follow the rules, making a NuGet package from your module is a matter of just a few clicks.
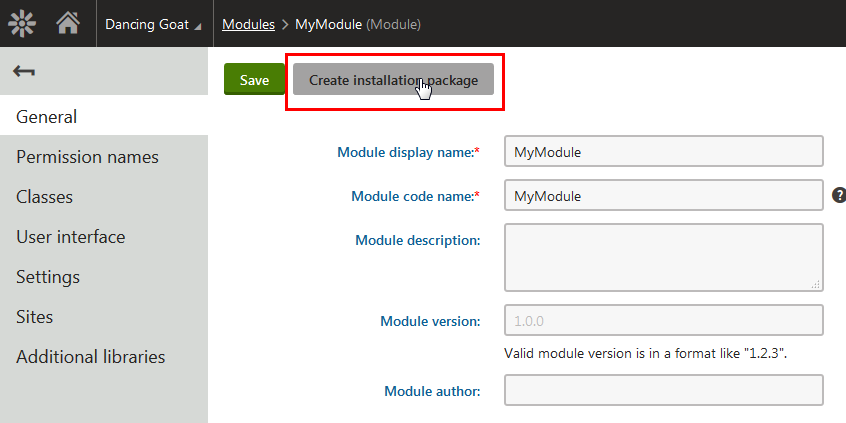
Navigate to the module properties where you will find a button called Create installation package. It gives you a dialog for reviewing what will be included with the module, and once you click Finish, it creates the module NuGet package for you.


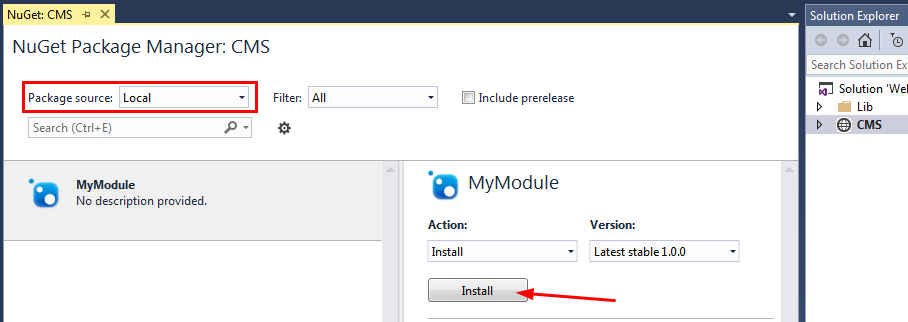
You can then submit the package to an official feed or register a local feed from your local disk in Visual Studio.
Module installation
You can install module NuGet packages the regular way just like with other NuGet packages. All you need to do is select the module in the NuGet package manager in Visual Studio and install it.
After the package is installed, it is a good practice to rebuild the solution to make sure that everything compiles correctly (but typically you don’t have to do it for the module to work), and start the web application.

What happens next is the installation of the module data. Kentico detects that there is a new module, and automatically installs its data (the object types mentioned earlier). Then the module is fully installed and can be used.
Extending support for packaging other object types
As I mentioned earlier, only a couple of object types are currently included in module NuGet packages. So I looked at some ways to allow you to include more object types in case you need them.
The module packaging and installation wraps the export/import functionality among other things, so all you need to do is leverage ImportExportEvents, and let the export know which other data the package should contain.
First create a new file defining the module entry point: ~/MyModule/MyModule.cs
Here is the code for the module class:
using System.Linq;

using CMS;
using CMS.CMSImportExport;
using CMS.DataEngine;
using CMS.Modules;
using CMS.Scheduler;
using CMS.Ecommerce;
using CMS.WorkflowEngine;
using CMS.WebAnalytics;
using CMS.PortalEngine;

[assembly: RegisterModule(typeof(MyModule))]

public class MyModule : Module
{
    public MyModule()
        : base("MyModule")
    {
    }


    protected override void OnInit()
    {
        base.OnInit();

        ImportExportEvents.Export.Before += Export_Before;
    }


    private void Export_Before(object sender, ExportEventArgs e)
    {
        var settings = e.Settings;

 // My module export
        var moduleName = (string)settings.GetInfo(ImportExportHelper.MODULE_NAME);
        if (moduleName == "MyModule")
        {
            var objectTypes = new[]
            {
                TaskInfo.OBJECT_TYPE, // Scheduled tasks
                PaymentOptionInfo.OBJECT_TYPE, // Payment options
                WorkflowActionInfo.OBJECT_TYPE, // Workflow actions
                ActivityTypeInfo.OBJECT_TYPE, // Activity types
            };

            // Select only objects that match the module code name prefix
            settings.SelectGlobalObjects(objectTypes, resourceName + ".");
        }
    }
}
This simple piece of code does the following:
- Attaches additional code before the export happens
- Detects that the export is part of the module package creation process for my specific module (the condition could be more robust but this one should suffice in most cases)
- Defines a list of additional object types that should be included within the module export
- Preselects objects of these types based on the given prefix, in my case “MyModule.”
This tells the module packaging to include the specified additional objects to the package based on the same naming conventions that we use for other objects.
I used just a few object types as an example, but you can extend this list as you wish. All you need to bear in mind is that all such objects must have a code name column and be global objects, not site-specific.
If you then examine the content of the NuGet package (the package is basically a zip file), you can easily verify that all such objects were correctly included:

Note that these additional objects won’t be visible in the module packaging dialog. You need to review them by looking at the package content.
Now when we install the module, all such objects will be installed together with the module. The installation process automatically takes everything included in the package.
If you would like to provide this same functionality for multiple modules, it may make sense to place the code into a global folder rather than a module specific folder, or simply build a simple module that just extends these possibilities for you.
Uninstalling extra object types with modules
Removing objects of the extra types added through customization may be tricky, so be careful about it. You don’t want to lose other data. Currently the only way to do this is to use an uninstall SQL script which you can add to your module.
So in my case I will create a file ~/App_Data/CMSModules/MyModule/Uninstall/before.sql with the following code:
DELETE FROM CMS_ScheduledTask
WHERE TaskSiteID IS NULL AND TaskName LIKE 'MyModule[.]%'

DELETE FROM COM_PaymentOption
WHERE PaymentOptionSiteID IS NULL
AND PaymentOptionName LIKE 'MyModule[.]%'

DELETE FROM CMS_WorkflowAction
WHERE ActionName LIKE 'MyModule[.]%'

DELETE FROM OM_ActivityType
WHERE ActivityTypeName LIKE 'MyModule[.]%'
This code is executed at the moment the module is being uninstalled from the instance, allowing me to remove all the custom data I included in the package. I used the corresponding data tables for each of the object types I included and deleted them based on the same prefix naming convention I mentioned earlier.
Be careful with these conditions and never execute delete statements without specifying and validating the where condition first. Always start by verifying the expected set of data using SELECT before you DELETE.
Wrap up
Module packaging and deployment is easy! Today, you learned about:
- Module name best practices
- Module code folder conventions
- Module data naming conventions
- Packaging and installation
- Extending the supported object types
I will get back to you soon with my next article.