Module development – Bindings
During custom development, you sometimes just need to create relationships between objects, rather than defining a child object with a full set of data fields. This article will lead you through the options you have when building M:N relationships in Kentico
Hi there,
Welcome to a new year and let me continue with my module development article series. We are still just at the beginning of all the great features Kentico can provide in this regard.
I have already covered the following topics in this module development series of articles:
Today, I would like to discuss the building of
M:N relationships, which we call
Bindings in Kentico. I will be using the Binding terminology, because that is the name we use throughout the system.
In the last articles, we built a
list of Industries and Occupations and extended Contacts to have two properties pointing to these objects.
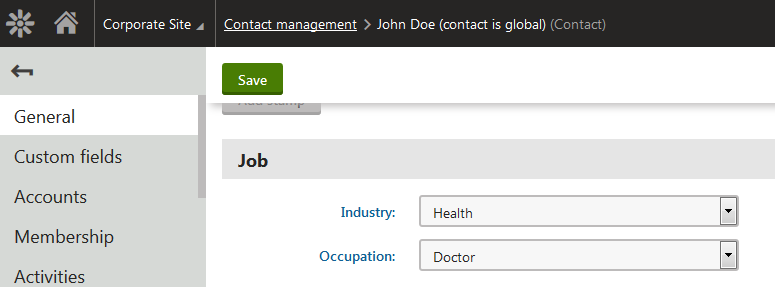
Because both the industry and occupation of a person may change and we only have one field to store the information in a contact, it may be good to store the
history of this information. Having the industry and occupation history could help when communicating with contacts during the sales or support process.
Imagine that you have a former developer who for whatever unlikely reason switched their focus to be a volunteer nurse in a hospital. If this person contacts you for advice on how to solve a critical problem with a faulty CPR machine, having knowledge of their occupation history could even save a life – you could give advice on a proper technical level rather than just suggesting turning the machine off and on. Let’s build this support using Kentico and the customizations we already have from the previous articles.
I am going to build a
binding between contacts and industries, with the relationship meaning
“this contact has worked in this industry”.
Defining data and API
We will need to store some data again, therefore we need to start by building a module class, as in the previous articles.
While Kentico technically supports bindings without a primary key for historical reasons, the current
best practice is to build bindings that
have a regular primary key. This has several advantages:
- Better performance on SQL server due to an ever increasing clustered index based on a single primary key
- Ability to later add and manage additional data for a binding, such as the role expiration date that we provide within the membership module
So start by creating a new class with just three fields – an ID as the
primary key and two additional foreign keys. Each of the foreign keys must point to one of the sides that you want to bind together. You will eventually need to decide which of the sides will be the
parent of the binding for general operations such as staging etc.
The general rule of thumb is to select the side from which the
number of bindings will be lower. The reason for this is the inclusion to parent data that I explained in my
parent/child article. In our case, we have contacts on one side, and there can be many of them, let’s say tens of thousands. On the other side we have industries, and I expect no more than several tens of them. Now imagine how the
complete parent data would look like in both scenarios. Always think about the
worst case while planning for scalability and performance.
- If the parent object is industry and each contact has a binding to each industry, the complete data of an industry will contain several tens of thousands of records for individual contacts, and the system will need to regenerate this full set of data for every new binding, making staging tasks enormously big.
- If the parent object is contact and each contact has a binding to each industry, the contact data will not include more than several tens of records for all industries belonging to a given contact. When the bindings change, the new staging task for updating the contact will always stay at a sustainable size, not causing any significant overhead. In reality, there will be no more than a few industries assigned to each contact, which makes the data even smaller.
So the choice here is clear, the
parent object of our binding is going to be
contact to keep the individual sets of parent data small enough.
Note that if the previous exercise indicates an enormous amount of data on both sides, it may be better to set up synchronization using separate staging tasks for the binding itself, instead of the default inclusion to the parent data. This is however beyond the scope of this article.
When defining your data, I suggest that you always use naming with the
parent object first so that the hierarchy can clearly be recognized from the names in in your API, allowing developers to have a clear indication of what behavior to expect. For this reason, I will create a class named
“MHM.ContactIndustry” (contact first) with fields:
- ContactIndustryID – integer, primary key (contact first)
- ContactID – integer, foreign key to contact, reference type Binding (contact first)
- IndustryID – integer, foreign key to industry, reference type Binding
Note that in this case I didn’t use prefixes such as “ContactIndustryContactID”, because it would make the API too overwhelming. I just used the regular names of the target primary keys, which is completely OK in this case, as it is unlikely that we will need to provide just these IDs in a database join with the target objects.
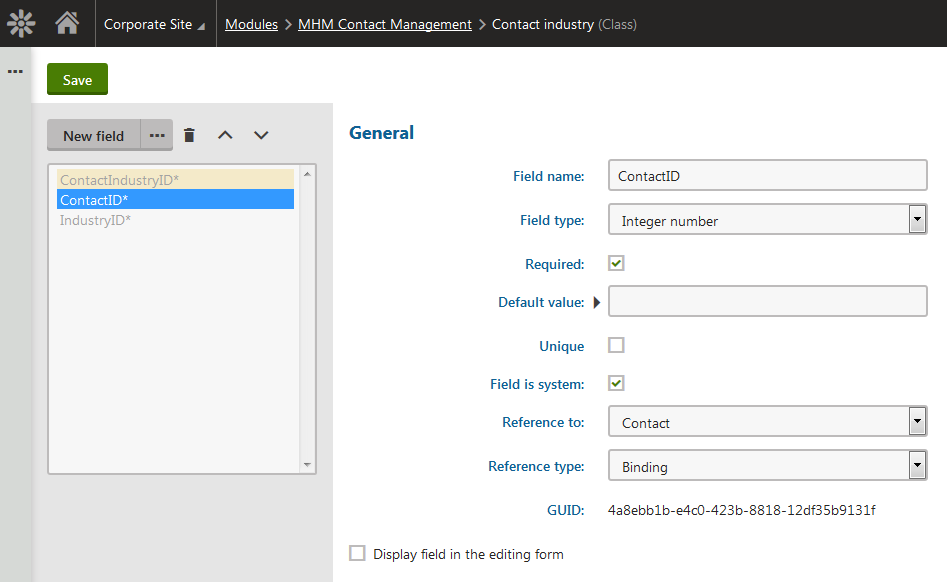
Generate the API for
ContactIndustryInfo and the corresponding provider on the Code tab. If you look at the code of the generated provider, you can see that the system recognized the binding foreign keys, and generated methods for getting objects by
both contact and industry IDs.
Because our object has a regular primary key, we need to tell the system that our object type is a binding. Set the
IsBinding property of its type info to
true as shown in this example:
public class ContactIndustryInfo : AbstractInfo<ContactIndustryInfo>
{
  ...

  public static ObjectTypeInfo TYPEINFO = new ObjectTypeInfo(...)
  {
    ...
    IsBinding = true
  };
}
Bindings are different from regular objects in this way, because you work with them using the target foreign keys that bind objects together, not the primary key. The primary key is only used internally to update potential binding data if needed. The system also automatically ensures that only one binding between two specific objects exists. Even if you attempt to create multiple bindings between two objects, the result is only one.
The code generator also automatically sets the parent object based on the first binding foreign key, and defines the second one as a foreign key. As I mentioned in my
foreign keys article, the binding configuration in the field editor is just used for code generation, so if you are not happy with it later, you can redefine everything directly in the info code.
Notice that the generated code by default uses string constants such as
“om.contact” and
“mhm.industry”. If your code has a reference to the corresponding libraries and you want to have the code cleaner (and more upgrade-proof), you can use
ContactInfo.OBJECT_TYPE and
IndustryInfo.OBJECT_TYPE constants instead.
Creating a UI for bindings
Like other general pages, even binding editing pages can be easily built using a predefined UI template. I am going to show you how to create a UI on both sides. We will create the following tabs:
- Industries tab in Contact properties with a UI element called ContactIndustries
- Contacts tab in Industry properties with a UI element called IndustryContacts
We already have tabs in both locations, so it will be very easy. If you skipped the
parent/child article and are not sure how to set up tabs, please read it first and create the tabs. In both cases, create a new UI element under the tabs using the “
Edit bindings” page template.
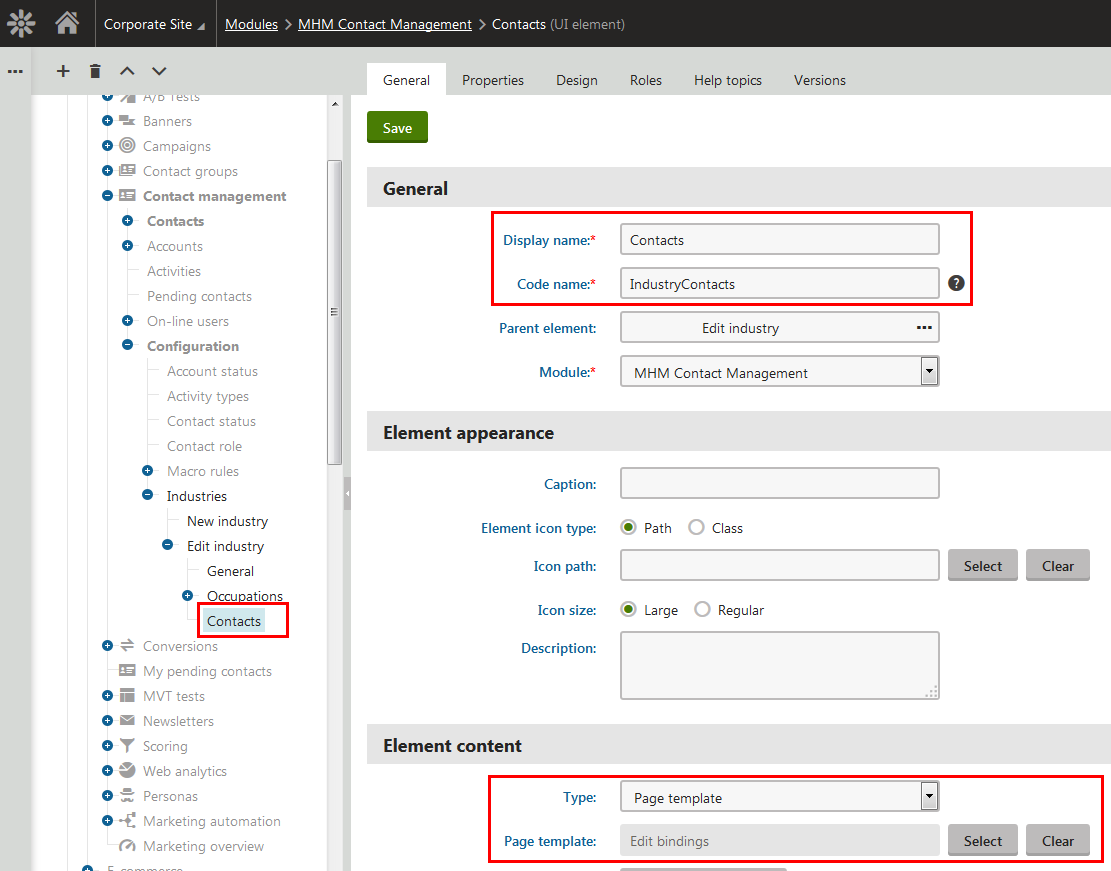
Now navigate to the
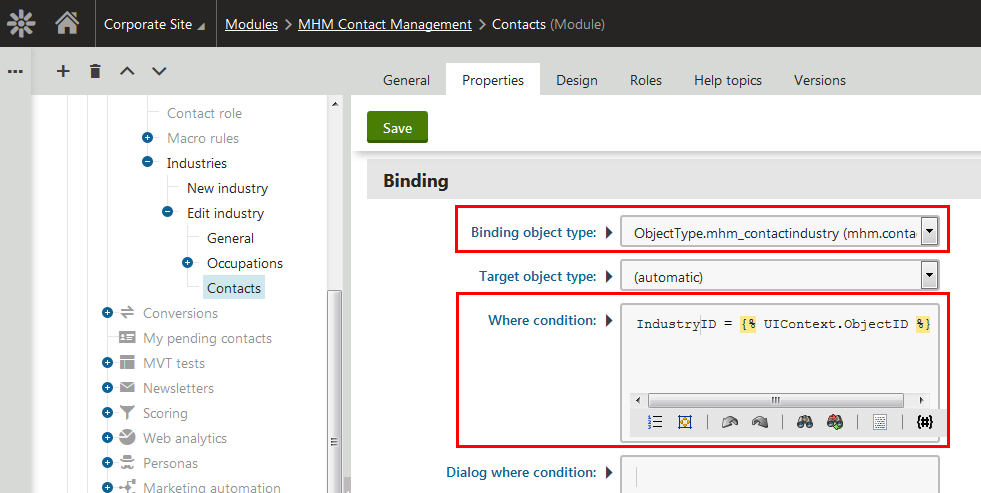
Properties tab and select our new binding object type in the
Binding object type property. Like in the previous article, the object type name is not localized by default, and you need to provide the localization. Note that if you don’t see your object type in that listing, you probably didn’t set the IsBinding property or didn’t recompile your web application project.
You also need to set a condition for the parent object as we did when we built the
parent/child relationship. As I explained in that article, bindings are technically just a special kind of child object, so the same rules that apply to child objects apply to bindings. Set the where condition to the following:
IndustryID = {% ToInt(UIContext.ObjectID) %}
Note that the target object type is recognized automatically, so we don’t need to set it. It is simply the side of the binding opposite from the currently edited object. You would only need to manually set it in more complex scenarios where the system could be confused by the context settings. If you follow my hierarchy guidelines, you don’t need to worry about that.
To make the resulting UI easier to understand, also set the
“List label” property. This text appears above the binding listing to explain to users what the purpose of the page is. I used the following text:
“The following contacts have worked in this industry:”
The resulting UI displays the following, and we are now able to manage the bindings.
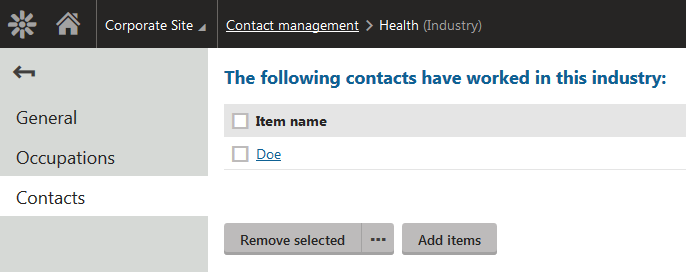
One thing I would like to mention is that the editing UI you see is a
Uni selector control in
multiple selection mode. You can see that it currently only displays the last name of contacts, since that is the display name column of the contact object type. That is not very convenient in this case. I will show you in my next article how you can leverage
extenders to customize UI page templates.
Let’s now set up the UI from the
other side. Repeat the previous steps for the UI element on the other side. To summarize:
- Create the UI element ContactIndustries under the contact property tabs.
- Configure it to use the “Edit bindings” page template.
- On the Properties tab, select “Contact industry” as the binding object type.
- Set the where condition to restrict the listing based on the parent object.
- Optionally provide a listing label to explain the context to the user.
In this case my where condition is the following:
ContactID = {% ToInt(UIContext.ObjectID) %}
And I used the following text to explain the content of my new tab:
“This contact has worked in the following industries:”
The result is the following UI that lets me easily manage the industries of contacts. My marketers can now also update this information manually based on phone conversation or other communication with clients.
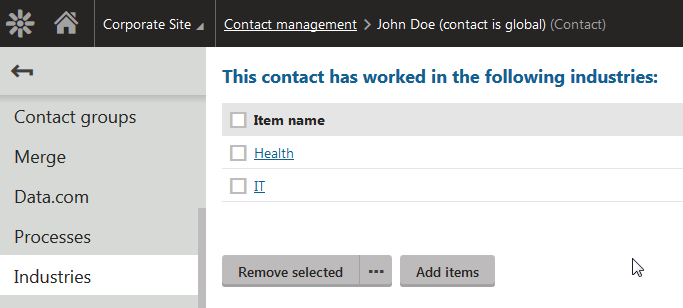
The choice on which side of the relationship you provide the editing interface is yours, you have full control over it. Imagine typical scenarios that you will need to cover, and decide based on that, or simply based on specific requirements from your clients.
Automatic population of the relationship
I mentioned that we want to keep the history of contact industries at the beginning of this article. Keeping track of the history manually would be too complicated, so we are going to write a piece of code that will handle that for us automatically.
We will leverage object event handlers. I mentioned them in my article about
handling foreign keys.
Start by creating a new class which will represent our module and define its initialization. I will create it as
~/AppCode/CMSModules/MHM.ContactManagement/MHMContactManagementModule.cs. Here is my code:
using CMS;
using CMS.DataEngine;
using CMS.Helpers;
using CMS.OnlineMarketing;

using MHM.ContactManagement;

[assembly: RegisterModule(typeof(MHMContactManagementModule))]

namespace MHM.ContactManagement
{
  /// <summary>
  /// MHM Contact management module entry
  /// </summary>
  public class MHMContactManagementModule : Module
  {
    /// <summary>
    /// Initializes module metadata
    /// </summary>
    public MHMContactManagementModule()
        : base("MHM.ContactManagement")
    {
    }

    /// <summary>
    /// Fires at the application start
    /// </summary>
    protected override void OnInit()
    {
      base.OnInit();

      ContactInfo.TYPEINFO.Events.Insert.After += InsertOnAfter;
            ContactInfo.TYPEINFO.Events.Update.Before += UpdateOnBefore;
    }

    /// <summary>
    /// Ensures that a newly inserted object ensures its binding to industry
    /// </summary>
    private void InsertOnAfter(object sender, ObjectEventArgs e)
    {
      EnsureBinding((ContactInfo)e.Object);
    }

    /// <summary>
    /// Ensures that when a contact industry field changes, the system ensures proper corresponding binding
    /// </summary>
    private void UpdateOnBefore(object sender, ObjectEventArgs e)
    {
      var contact = (ContactInfo)e.Object;
      if (contact.ItemChanged("ContactIndustryID"))
      {
        e.CallWhenFinished(() => EnsureBinding(contact));
      }
    }

    /// <summary>
    /// Ensures that the binding between the contact and its current industry exists
    /// </summary>
    private void EnsureBinding(ContactInfo contact)
    {
      var industryId = ValidationHelper.GetInteger(contact.GetValue("ContactIndustryID"), 0);
      if (industryId > 0)
      {
        var binding = new ContactIndustryInfo
        {
          ContactID = contact.ContactID,
          IndustryID = industryId
        };

        binding.Insert();
      }
    }
  }
}
Let me explain the code in more detail, in the order as the parts appear in the class code:
- The module class must inherit from the class CMS.DataEngine.Module and must be registered within the system using the RegisterModule assembly attribute. Do not forget to use the attribute, the application won’t know about the module code without it.
- The module name provided as metadata in the constructor must match the module code name defined when we registered the module.
- The module has two initialization methods: OnPreInit and OnInit. OnPreInit is always called, even for applications that aren’t yet connected to the database. OnInit is called right after the application connects to the database if the database is available. Both methods are called once at the application start and can provide module initialization code. In our case we are working with data, so it makes more sense to do these actions only when the database is available. That is why I chose OnInit.
- We attach two object event handlers, one after insert, and one before update of the object. These two event handlers ensure that the system creates corresponding bindings in the database for any industry references defined in our contacts.
- I chose after insert because that is the point where the contact is already saved and the data is consistent in the DB.
- I chose before update, because I perform the action based on detection of changes to the field “ContactIndustryID“ to keep maximum performance. This detection must always be done in the before handler. In the after handler, the object change status is already reset. I however perform the actual action after the update is finished using the CallWhenFinished method for the same reason as with the insert handler.
- Creating the actual binding is simple. You just create a new object with corresponding IDs and insert it. As I explained earlier, bindings have automatic detection of redundancy, so the system automatically performs an upsert operation to maintain only one such object.
That is all. Once you have this code present in your application, the system will automatically maintain all industry history of your contacts in the form of M:N bindings.
Bindings in macros and API
I already mentioned in my
parent/child article that bindings are available in a similar way as child objects. The only difference is that they are available in a collection named
“Bindings” under their main parent:
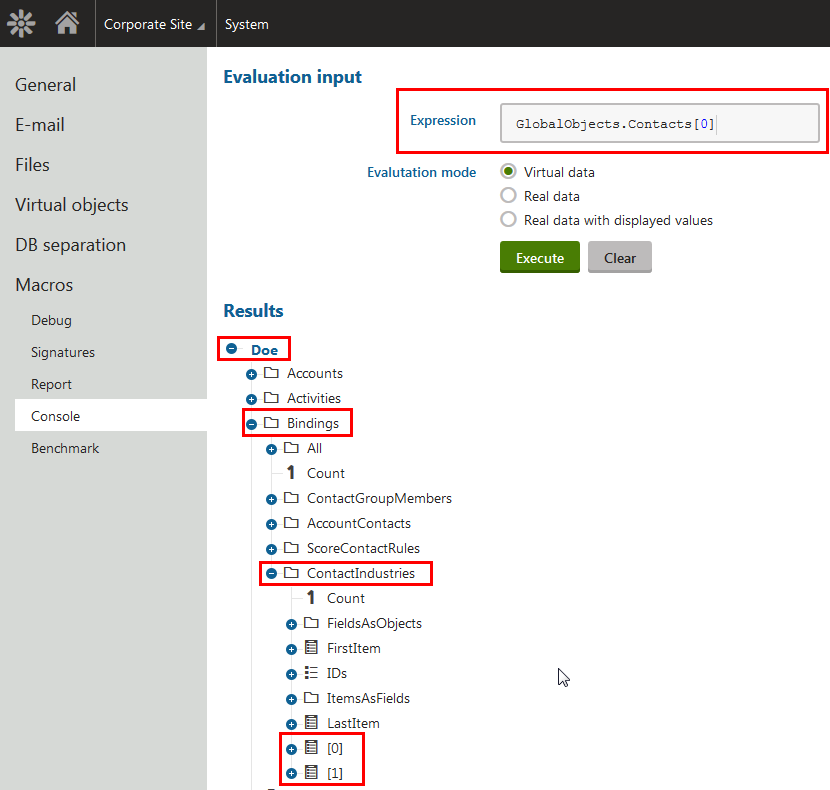
But also in a collection named
“OtherBindings” from the other target object:
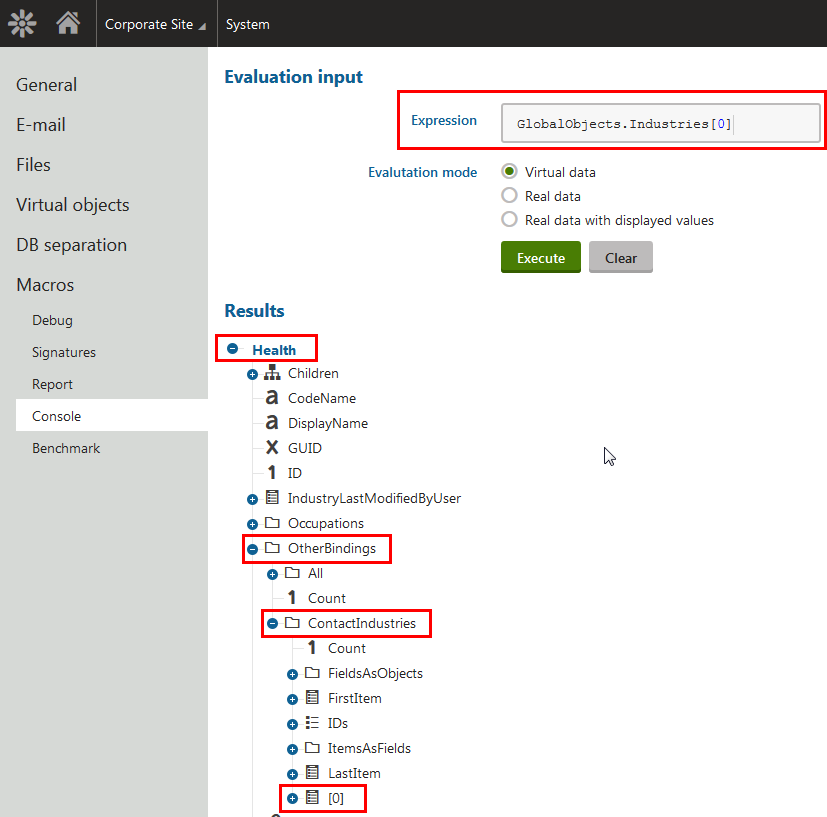
The same rules as for child objects also apply for the regular API. Use the corresponding collections to access bindings or the binding info provider directly.
Wrap up
Today, you learned how to set up an editable M:N relationship between two object types. We went through:
- Creating a binding object type and its API
- Leveraging a predefined UI template to manage bindings
- Writing module initialization code
- Attaching event handlers to automatically maintain data
- Accessing bindings in macros and the API
As I mentioned earlier in this article, I will show you how to customize UI templates using extenders in the next article.
See you next time!