Module development – Parent / Child relationships
While developing custom functionality, you quite often need to use some deeper hierarchy in your data. Most typically, to be able to group chunks of data under a single parent to extend their semantics. Read this article to learn how to properly set this up.
Hi again,
Last time, I discussed
how to leverage foreign keys within your custom module development. You don’t need to read that article as a base for this one, as they are mostly independent. You should make sure that you already went through my first article in module development series as an
introduction to module development, though.
In the introduction article, we have created a
manageable list of industries. Today, I am going to extend this list to contain some child objects to demonstrate how to build such a data hierarchy. The goal is to build a list of
occupations under each industry so we could get even more knowledge about our site visitors, should they provide us that information. To give you a more precise idea about what I plan, here is some of the sample data that I’ll want to store:
- Health (Industry)
- Doctor (Occupation)
- Nurse (Occupation)
- IT (Industry)
- Developer (Occupation)
- Tester (Occupation)
- Scrum master (Occupation)
- Sports (Industry)
Defining data and API
No matter where your object type will sit in the hierarchy, you still build it the same way. Each type of data has its own class, so we are going to create one for occupations. Go to the Modules application, navigate to your module. Switch to its Classes tab and create a new class. I will create a class called
“MHM.Occupation” with the following fields:
- OccupationID – default primary key, not visible on the form
- OccupationDisplayName – text(200), form control Text box
- OccupationCodeName – text(200), form control Code name
- OccupationGUID – unique identifier, not visible on the form
- OccupationIndustryID – integer, required, not visible on the form
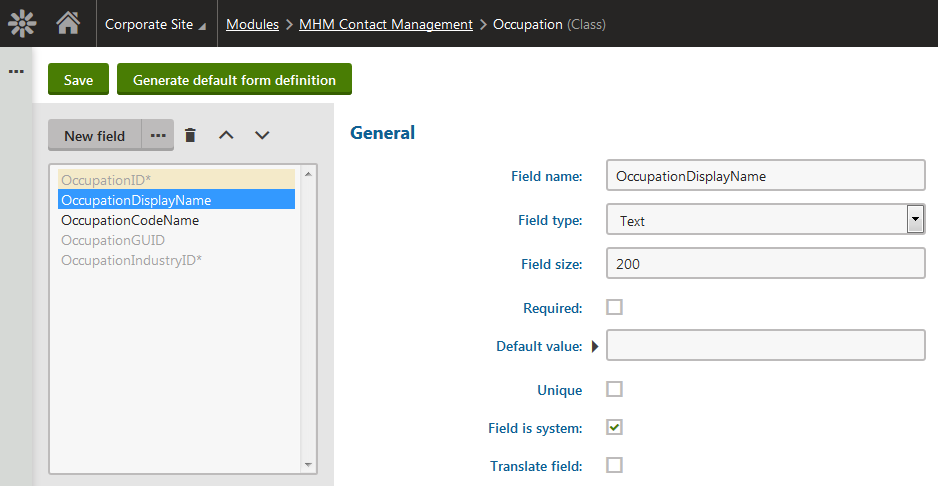
Note the differences between what I have created in the Industry class, and this one:
- I have skipped the last modified field. This is because by default child objects are shipped through general features together with their parents. For this reason, we don’t necessarily need that field. Feel free to add it if you want to track this information.
- I have added one extra integer field as a reference to the parent object. At this point, I just defined it without any information that it is a foreign key to parent, we will define that in the next step. Similar to the foreign keys in my last article, you can also optionally add a foreign key constraint on the database level for that field.
Let’s move to the generating the API code. As in the article where we created the Industry class, I’ll just enable “Use ID hashtable” and leave the other fields automatically preselected. Then, save the code to your project like you did with the Industry class in the previous article.
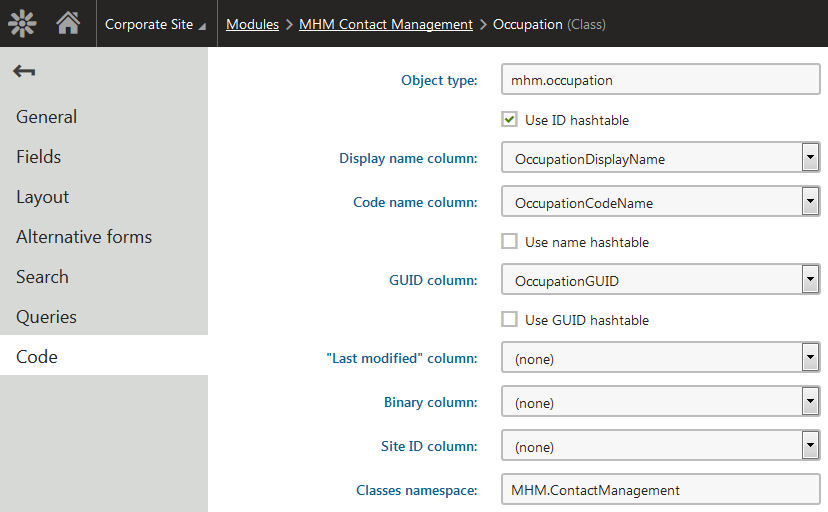
Now, we will need to set up
two additional parameters in the
ObjectTypeInfo constructor. This lets the system know that the object type you defined fits as a child object under the specific parent.
Set the last two parameters to the following values:
- parentIDColumn - Name of the column that points to the parent, we’ll set it to “OccupationIndustryID”.
- parentObjectType – Object type of the parent, we’ll set it to a constant defined in the industry info “IndustryInfo.OBJECT_TYPE”.
Here is the related piece of my code:
public static ObjectTypeInfo TYPEINFO = new ObjectTypeInfo(..., "OccupationIndustryID", IndustryInfo.OBJECT_TYPE)
This is also the
minimum configuration that ensures the following by default:
- Recognition of the object type as a child type
- Automatic treatment of the parent ID column as a foreign key with the reference type behaving as “Required” (the value must stay there and neither fallback to null or other target object is not allowed)
- Inclusion of the child data into staging / integration bus tasks of the parent object as well as export data of the parent object type
- Automatic update of the last modified column of the parent when any child object is updated
- Availability of child objects through macros
I have mentioned that child data is included into parent data. Let me discuss that a little further …
Kentico recognizes several types of objects based on how they fit to the data hierarchy:
- Main objects – These are objects that can exist in the system on their own. Basically, these are objects without a parent object. They also serve as the main entry for accessing data through macros, and as basic entities that are shipped through general features such as staging.
- Child objects – Child objects are the ones that can exist only under a parent object. This parent object can either be a main object or a child object if you have more levels in your object hierarchy.
- Bindings – Binding objects are special types of child objects, except that they are used to define M:N relationships, typically between two objects. I will discuss these in one of the next articles. As bindings technically have two parent object types (two required foreign keys to other objects), one of them is always their primary parent. As I talked about data inclusion of child objects, note that bindings are included to their primary parent.
- Other bindings – These are not object types that you would define on purpose, just a virtual access to bindings from the other side than their primary parent. This helps you manage and access the M:N relationships from both sides.
Kentico by default treats all main objects as
complete entities and includes all their children and bindings in their data. When a collection of children or bindings is updated, the parent object is “updated”. This way, the system can react to a change of the whole main object entity. Besides other actions, this also means that the parent object’s last modified field is updated. One of such actions is generating a staging task if staging is configured for that main object.
This also means that you don’t need to do any additional configuration for staging / import / export in the child object, all is already set through the parent object metadata.
Note that there are ways how you can alter this default behavior for special cases, but this is beyond the scope of this article. The best practice for vast majority of scenarios is to keep it default anyway.
Building the UI
Similar to my first article, we are going to build the UI using just the predefined UI page templates. If your project is a web application, make sure that you compiled it before you proceed. We will need to use the new object type in the UI element properties as we did in the first article.
Tabs and UI hierarchy
UI pattern defined by Kentico for editing an object with a child object is to have two tabs in the editing UI:
- General – Used to edit the properties of the object itself with a regular form
- Occupations – List of occupations under the given industry
We currently have only the editing form, so let me show you how to easily achieve that. The easiest way is to learn by example and the best existing match of what we want to achieve is in
Countries and States management. Start with navigating to
Modules > Your module > User interface and navigate in the UI elements tree to
CMS > Administration > Configuration > Countries. This is the state towards which we are going to transform what we already have.
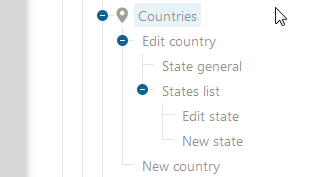
You may notice that there is an edit UI element for country, which has two child UI elements, one for the general tab and one for the state listing. State listing then contains just regular simple editing in a standard pattern that I described in the
Module development – Introduction article.
Once you learn how to build this kind of UI, you can do it from scratch but as this is a new topic for you, I will show you how to transform what we already have to the final state. We start with the basic listing and simple editing:
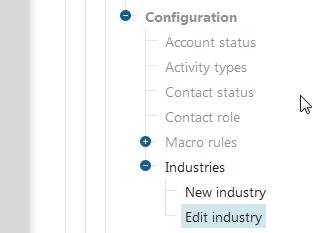
Start with renaming the code name of the
Edit industry UI element from
“EditIndustry” to “
IndustryGeneral” and change its display name to
“General”. We will want to reuse the old code name for a new UI element that defines the tabs, as it is the one that defines the editing UI as a whole.
Now, create a new UI element with the
“EditIndustry” code name, and
“Vertical tabs” page template. Move the
General UI element under the new Edit industry element by setting the parent element in the element properties.
If you enabled breadcrumbs on your editing UI element earlier, you need to perform one more step. Disable breadcrumbs in the
General UI element and enable them in the new
Edit industry UI element. This will ensure that breadcrumbs and the related functionality will behave consistently. The rule is that the UI element representing the editing UI as a whole should have the breadcrumbs enabled, and individual tabs should have the breadcrumbs disabled.
Previous steps result in the following setup of UI elements, and editing interface with a single tab:
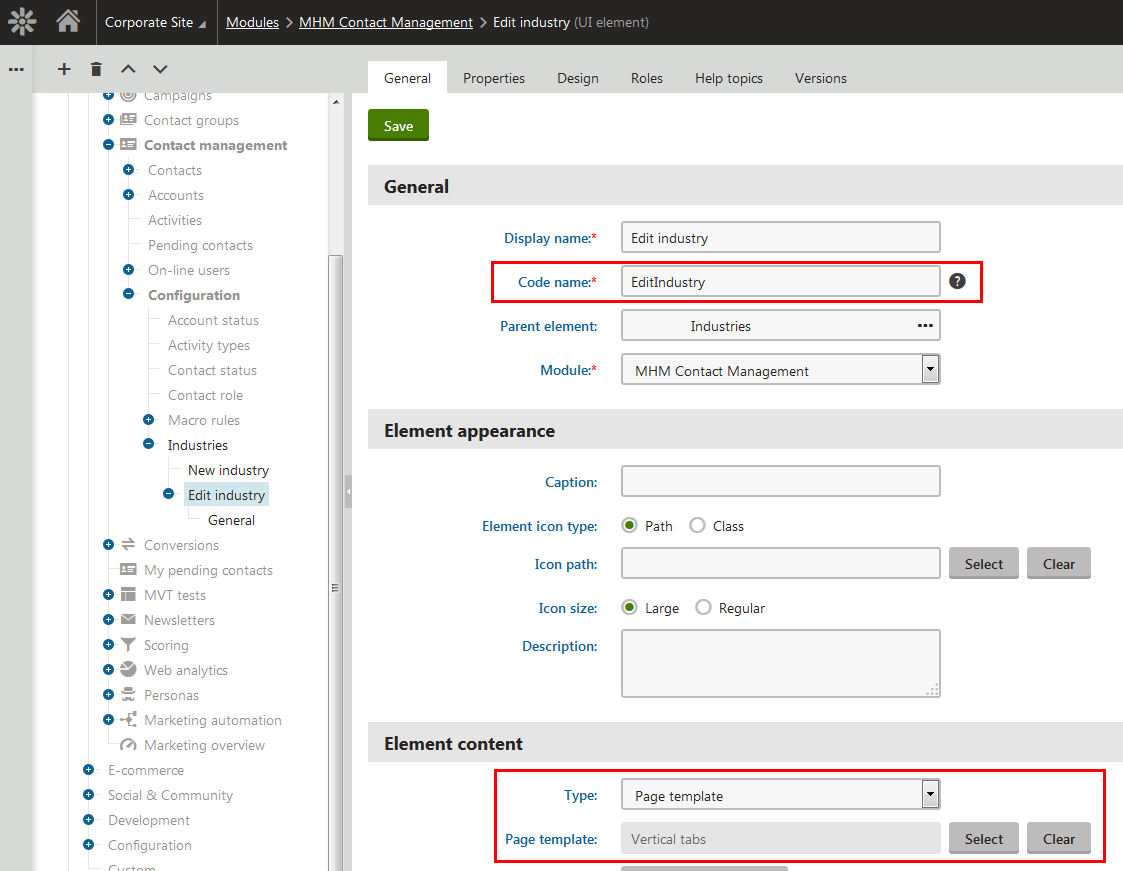

You may notice that the tabs template automatically picked up the parent hierarchy, and displayed only the necessary UI aligned with the Kentico style guide. This includes the back arrow at the top of the tabs. If you spot any suspicious behavior of the back arrow or during switching back and forth through the UI, your breadcrumbs are probably not configured correctly. Review the breadcrumbs settings in that case.
There are more possible layout UI templates that you may want to use in more advanced scenarios, but Vertical tabs should suffice most of the time.
Now is the time to finally add the
Occupations tab with management capabilities. Add a regular listing with new and edit UI elements as we did in the first module development article. To remind you, here is a brief list of steps:
- Create a new Occupations UI element with the Object listing page template
- Set the object type to Occupation (ObjectType.mhm_occupation when localization is not defined) on the Properties tab of that UI element
- Create the UniGrid definition XML, mine is the following:
<?xml version="1.0" encoding="utf-8" ?>
<grid>
  <actions>
    <action name="edit" caption="$General.edit$" fonticonclass="icon-edit" fonticonstyle="allow" />
    <action name="#delete" caption="$General.delete$" fonticonclass="icon-bin" fonticonstyle="critical" confirmation="$General.ConfirmDelete$" />
  </actions>
  <columns>
    <column source="OccupationDisplayName" caption="$general.displayname$" wrap="false" localize="true">
      <filter type="text" />
    </column>
    <column source="OccupationCodeName" caption="$general.codename$" wrap="false" />
    <column width="100%">
    </column>
  </columns>
  <options>
    <key name="DisplayFilter" value="true" />
  </options>
</grid>
- Create UI elements for new and edit with corresponding code names “NewOccupation” and “EditOccupation” with the New/Edit object page template.
This gives us a UI to edit the occupations. Let’s add some using the data I outlined at the beginning of my article:
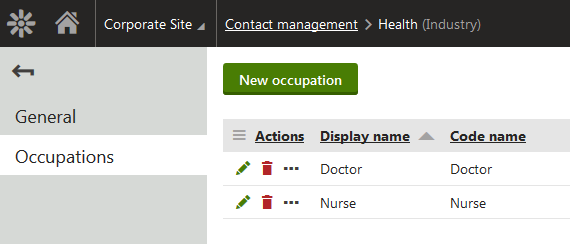
BUT … when we switch to another industry, we will see the exact same listing, which is not what we want.
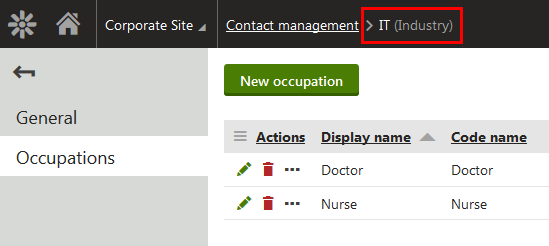
This is because Kentico by default always displays all data of the given object type in listing to allow you to cover just any scenarios with them. We actually need to perform one more step to make this filter based on the parent edited object.
Navigate to the listing UI element properties, and set the listing where condition to the following value:
OccupationIndustryID = {% ToInt(UIContext.ParentObjectID) %}
Note the following:
- UIContext – This is a general source of context specific values for UI pages. It contains much more than just this value, but I’ll cover that in another article.
- ToInt – When using macros in sections for SQL code, always make sure that you handle SQL injection properly. I handle it by casting to integer to prevent invalid values that could harm my database. Read more about security in SQL in the article from my coleague.
Now the UI properly filters the listing, and we can manage occupations of each industry independently and add the rest of the data.
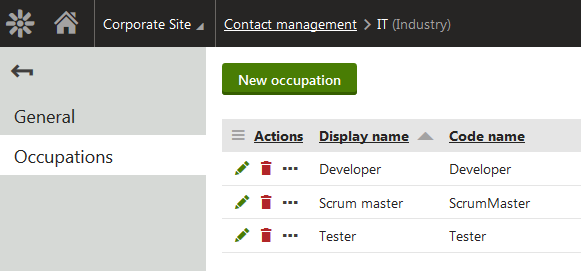
At this point we have a fully working parent / child management. If you would want to add more child types to a single parent, the process is the same. You would just add another object type configured the same way, and another tab to the UI.
Parent/child in forms
So we have got the list of industries and occupations. The next step is to get this information on an editing form of a contact. At this point, you should make sure that you read and understood my article about
foreign keys in modules because the next steps will follow up on that.
We will start by adding an extra field to contacts just as we did in the foreign key article. The field will be named
“ContactOccupationID”, and will be set up as foreign key to the occupation object type.
Configuration of its form control will be similar to what we have defined for the “ContactIndustryID” field, just with an appropriate object type.
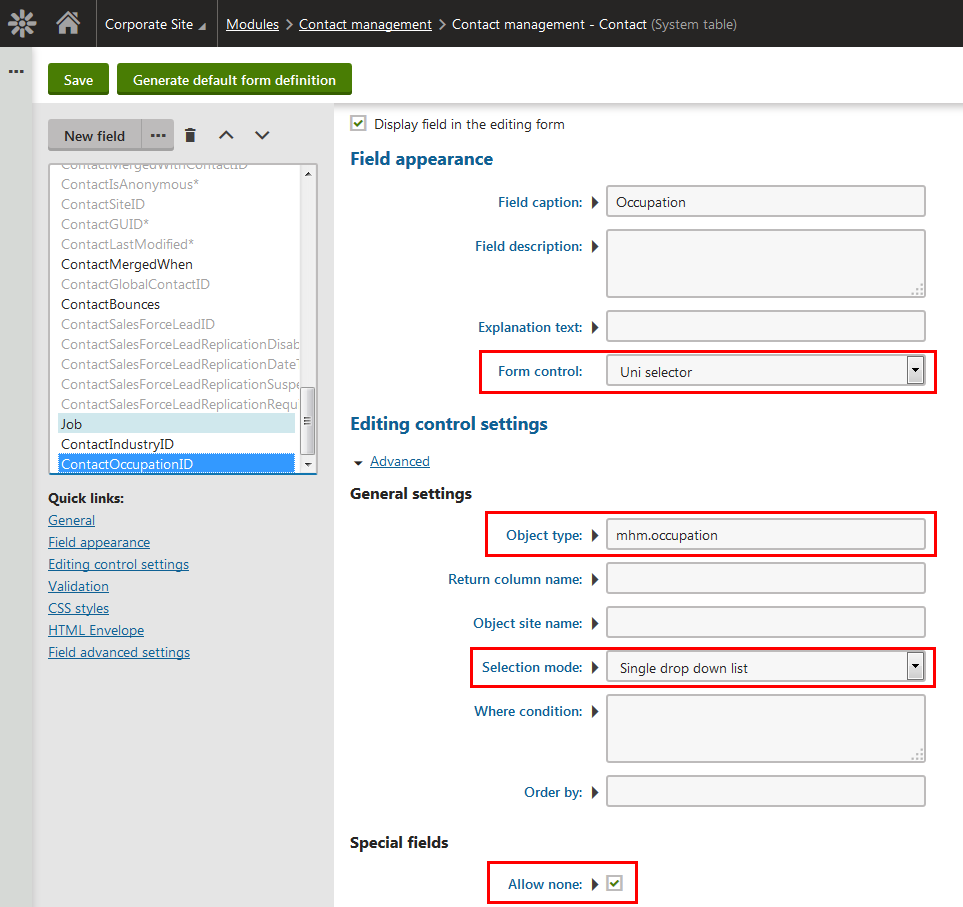
After we add this field, the editing form will look like this:
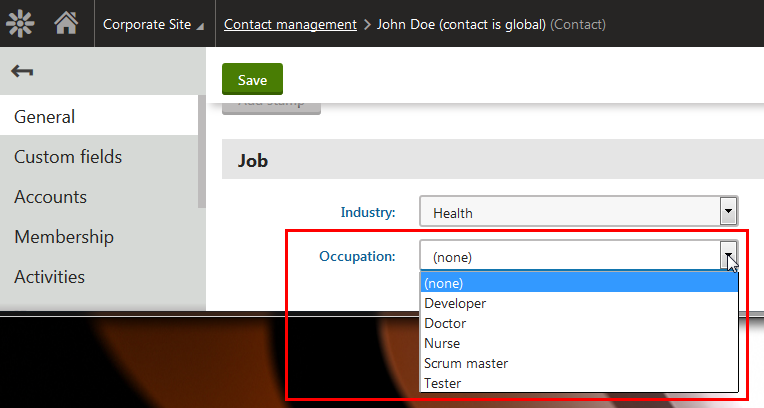
You can see that we get the exactly same full listing as we got in the first step of building the child object listing. The reason for this is similar to the previous one: to give you as much flexibility as possible.
Similar to the UI, this is something that would look quite inconsistent to the end user, so we’ll want to restrict the occupation selector only to the correct child occupations.
We will have to use a little bit of modification of the original Kentico code (not upgrade-proof), because UniSelector currently doesn’t support scenarios where it is used for nested dropdowns on a form. If you’d this scenario supported in the future, please vote
here.
Making UniSelector cascading
Apply the following two modifications to the file ~/CMSAdminControls/UI/UniSelector/UniSelector.ascx.cs
The first modification is to change
base.GetValue in the
GetValue method to call the
GetResolvedValue method:
public override object GetValue(string propertyName)
{
  ...

  return GetResolvedValue<object>(propertyName, null);
}
This will ensure that the control will resolve macros in its property values dynamically. The second modification is to add following lines to the beginning of
Reload method:
public override void Reload(bool forceReload)
{
  if ((FieldInfo != null) && FieldInfo.DependsOnAnotherField)
  {
    forceReload = true;
  }

  ...
}
This will ensure that the Uni selector will react to a change in the depending field (the parent dropdown in our case). Now, let’s go back to the original scenario.
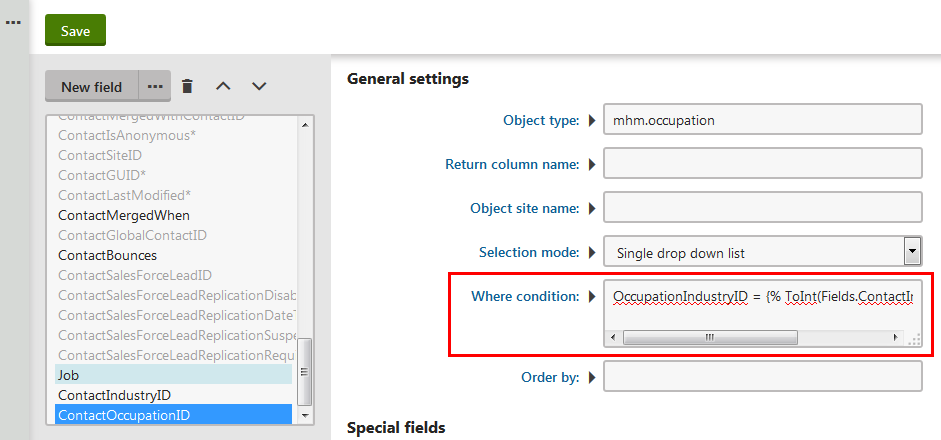
Set up the following
where condition in the occupation selector settings:
OccupationIndustryID = {% ToInt(Fields.ContactIndustryID.Value) %}
Note that you need to put it directly to the property value. If you would put it in as a macro (through the small arrow), it would be resolved earlier in the form life-cycle with the original value, not the current one. Here is a screenshot of what you should see:
Now, when we look at the contact editing form, we get the second dropdown filtered only to the children of the industry selected in the first dropdown, which is exactly what we wanted.
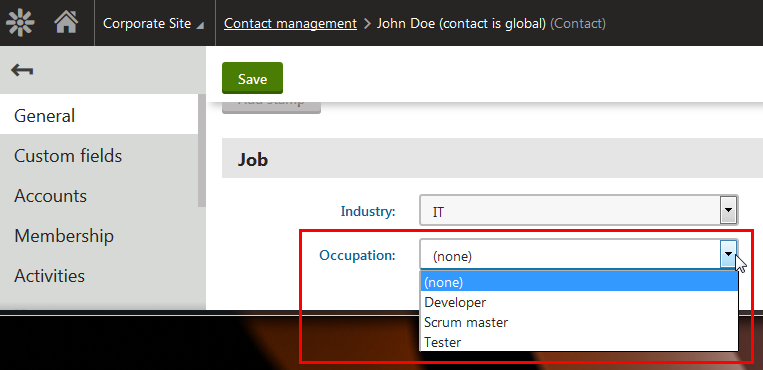
You can try to play with this and see how it will work for you.
Note that if your Kentico version is a hotfix 8.1.12 or newer, you can alternatively use the
Drop-down list form control with the following SQL query to achieve the same behavior:
SELECT NULL AS OccupationID, '(none)' AS OccupationDisplayName
UNION ALL
SELECT OccupationID, OccupationDisplayName
FROM MHM_Occupation
WHERE OccupationIndustryID = {% ToInt(Fields.ContactIndustryID.Value) %}
In this case, you won’t need to do any adjustments to the Uni selector, but the options of the Drop-down list form controls are more limited than the options of the Uni selector.
Macros and API
Let’s look at how you can work with child objects in K# macros and info object API.
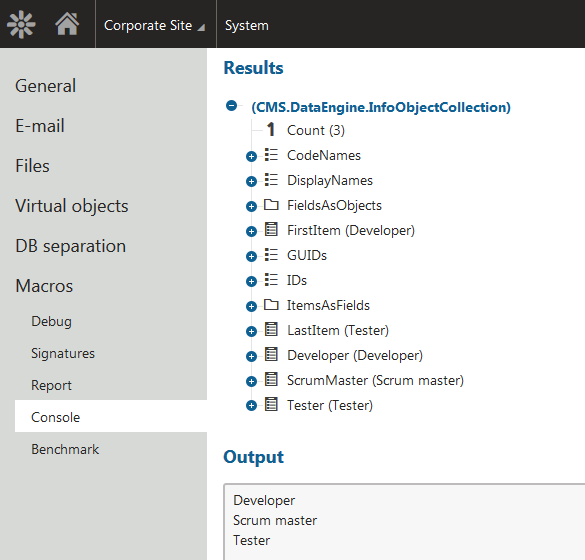
In macros, only main objects are available as a base collection. You need to access child objects through a specific parent object. All child collections are automatically registered as properties of the parent object. There’s also a collection of all child collections called “Children”.
GlobalObjects.Industries[“IT”].Occupations

GlobalObjects.Industries[“IT”].Children.Occupations
The name of each collection is derived the same way as for the main object collections, as described in my
first module development article. In my case, it is
MHM.Occupation > Occupation > Occupations.
Here is the result view from the macro console for these macros and my data:
Accessing child objects via API is similar to macros. You can access collections of child objects through the Children property of an object. Here is an example of a property that you can define in the parent info class:
/// <summary>
/// Occupations of the industry
/// </summary>
public virtual InfoObjectCollection Occupations
{
  get
  {
    return Children[OccupationInfo.OBJECT_TYPE];
  }
}
You can access the child objects externally from any object instance the same way:
var occupations = industryInfo.Children[OccupationInfo.OBJECT_TYPE];
Note that in this case, you get a general InfoObjectCollection. You can, however, still enumerate it as strongly typed, individual instances in this collection are of the right type.
foreach (OccupationInfo occupation in occupations)
{
...
}
If you‘d want to access child objects through standard provider API as object query, you can do that as well.
Here’s an example:
var occupationsQuery =
  OccupationInfoProvider.GetOccupations().WhereEquals(“OccupationIndustryID”, 1)
This should give you enough ideas on how to work with child objects. The rest of the API operations is the same as with any other object type.
Wrap up
Today, you learned how to define and work with child objects in Kentico while developing your custom functionality, we went through:
- Defining data class and API
- Differences between specific groups of object types
- Building a tab-based UI using predefined UI templates
- Altering the child listing to manage only a specific subset of objects
- Availability of child objects in macros and the API
I hope you found this article useful and that it will help you to quickly achieve your goals. I will show you how to handle many to many relationships in the next article.
See you next time …