Module development - UI Extenders
Kentico offers a rich set of options that help you easily develop the UI of your modules. Still, most current projects typically require some special adjustments to simplify the interface for non-technical end users. Read this article to learn about the concept of UI extenders in Kentico and how you can leverage them to extend the available options to your liking.
Hi there,
In my last article about developing bindings with Kentico, I ended up with a management UI for bindings. At that point, we saw only the last name in the contact selector as shown in this screenshot:
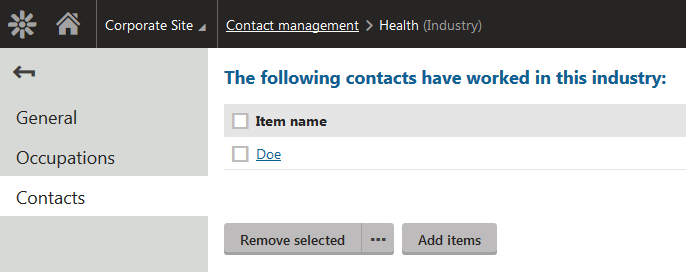
Today, I am going to leverage a UI extender to configure the selector to display more data of the contact that will provide a better user experience.
What is a UI Extender?
Simply put, a UI Extender is a class that is capable of introducing additional initialization code for a control, and therefore provides extra code which sets up the control. Typical customizations are changing the control’s properties, attaching an event handler, or adding additional controls.
You can find plenty of sample extenders in the App_Code folder of your web site. Just search for files using the file name pattern “*Extender.cs”
Extenders are always based on the ControlExtender<TControl> generic class, which is parameterized by the extended control type. Note that the extender type does not necessarily need to match the control type on which the extender is initialized. If an extender is initialized or configured on a control which does not match its type, it automatically searches the underlying control hierarchy for the first control of its matching type. This allows you to initialize a form extender for example on a user control without knowing how deep in its layout hierarchy the form is buried.
Writing extenders
Let me start with a simple example to demonstrate the extender life cycle. I am going to create a new class in ~/App_Code/CMSModules/MHM.ContactManagement/IndustryContactExtender.cs with the following code:
using CMS;
using CMS.ExtendedControls;
using CMS.UIControls;

using MHM.ContactManagement;

[assembly: RegisterCustomClass("IndustryContactsExtender", typeof(IndustryContactsExtender))]

namespace MHM.ContactManagement
{
  public class IndustryContactsExtender : ControlExtender<UniSelector>
  {
    public override void OnInit()
    {
      UniSelector selector = Control;

      selector.DisplayNameFormat = "{% ContactFirstName %} {% ContactLastName %}";
    }
  }
}
Let me explain the code:
- The extender has a single method called OnInit. This method is called ASAP in the control life cycle to let you tweak the control or attach handlers to its events. I will comment on the value I set once I show you the result.
- We are extending control type UniSelector. The Control property of the extender points to a strongly typed instance of the control that we are extending. As I mentioned in the bindings article, the underlying control under the Edit bindings page template is UniSelector.
- The general RegisterCustomClass attribute lets the system know that it can dynamically access this class and allows us to select this class in the assembly/class selector.
Having this, we are ready to use the extender for our UI element. Navigate to the binding UI element we created in the previous article, and configure the extender in its properties by selecting our new extender:
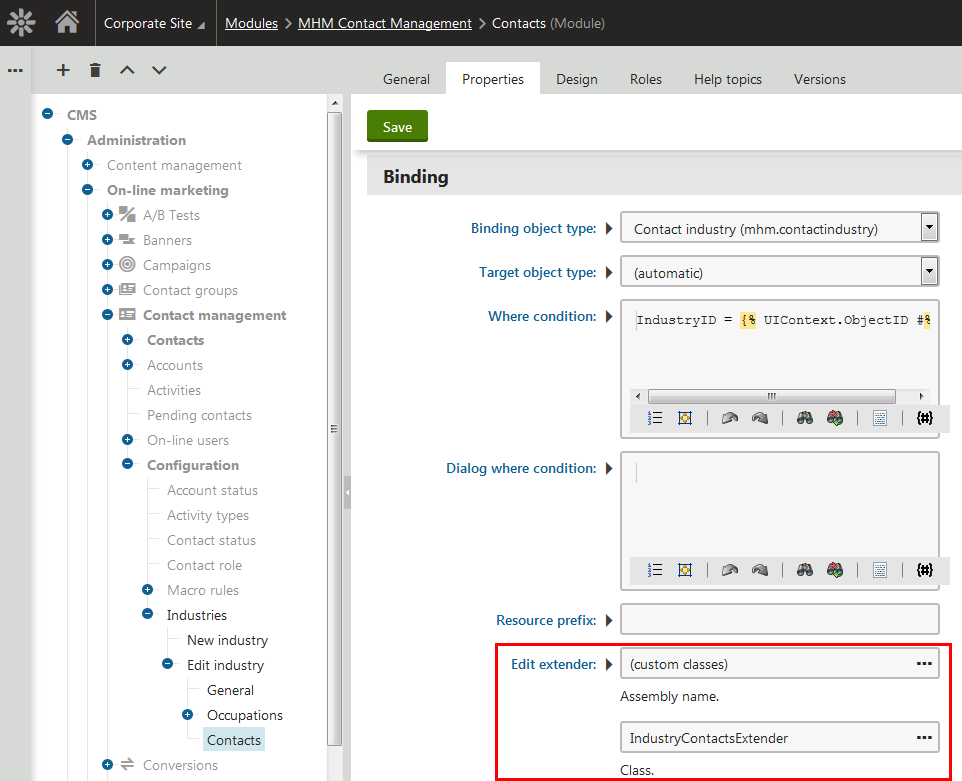
If you can’t find the extender in the listing, you either forgot the RegisterCustomClass attribute, or need to recompile your web application project.
When you now display the tab for Industry contacts, you get a much nicer view of the contact names. The same applies to the selection dialog:
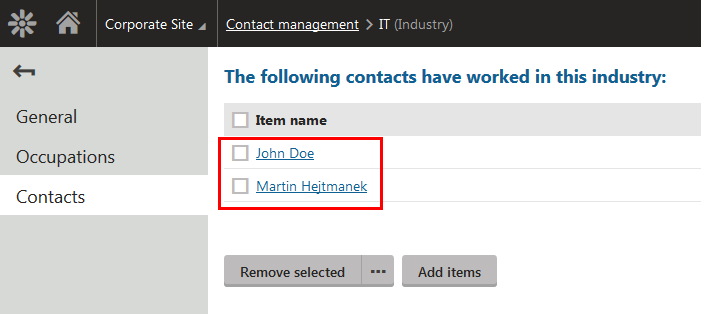
I have used the easiest way to alter what the selector displays. The UniSelector has the DisplayNameFormat property where you can use K# macros to populate the content, which gives you quite a lot of power for most basic scenarios. The selector also automatically extracts the columns queried by basic expressions and gets them from the database. If you used a more complex expression that the selector cannot recognize properly, you could use the AdditionalColumns property of the selector to include more columns in the data query.
Anyway, that was just a basic setup that you can leverage. I will go a little wilder today, and also show you a more advanced scenario that should give you a better idea on how to leverage the selector settings. Note that you can also use some of the same knowledge to alter the selection dialog of a selector set up in single selection mode.
Configuring selector grids
The result that we achieved above is much better than just last names, but probably still not enough for real-world usage. Name collisions can occur quite often, especially among family members accessing the same website, so selecting the right contact might still cause us some headaches.
To resolve this problem and allow our sales people to more efficiently manage contacts in specific industries, we are going to re-configure the selection on the Contacts tab under industries to include the contact e-mail (as something that will help us uniquely identify contacts), and also to allow navigating to the details of particular contacts straight from the listing.
We will start by adding the e-mail column. The UniSelector by default uses a listing with a single display name column for the item name. The default configuration is located in the ~/CMSAdminControls/UI/UniSelector/ControlItemList.xml and DialogItemList.xml files, so you can look at them to see what the baseline for the selector is.
Because we want a different view, we will need to define a custom grid configuration. Since the underlying control is UniGrid, the configuration works exactly the same way as when building a regular listing.
Create a new XML file ~/App_Data/CMSModules/MHM.ContactManagement/UI/Grids/industryContacts.xml with the following content:
<?xml version="1.0" encoding="utf-8" ?>
<grid>
  <columns>
    <column source="##ALL##" externalsourcename="Select" wrap="false" text-align="center" />
    <column source="##ALL##" externalsourcename="#mhm.contactname" wrap="false" />
    <column source="ContactEmail" caption="Email" wrap="false" />
    <column cssclass="filling-column" />
  </columns>
</grid>
Let me explain the content:
- The first column defines the checkboxes that the selector needs to be able to function properly. No rocket science, just use the given code.
- The second column will provide the full name of the contact. I will get back to it in a moment.
- The third column will display the contact’s e-mail address.
- The last column is just padding to fill 100% of the available page width.
Let me now comment on the full name column. Since we’re not using the default listing configuration, we can’t use the DisplayNameFormat property. Instead, we need to use other means of transforming raw values into a proper display name.
You would essentially have two options with a regular listing:
If you wanted to customize only the main listing, you could use either option, but in our case we need to customize both the main listing and the selection dialog (which is basically a separate page where we aren’t able to pass the event delegate). For this reason, the only option is using a registered transformation that is available throughout the whole application.
Add the following code to your module class and to its initialization:
namespace MHM.ContactManagement
{
  public class MHMContactManagementModule : Module
  {
    ...

    protected override void OnInit()
    {
      ...

      UniGridTransformations.Global.RegisterTransformation("#mhm.contactname", GetContactName);
    }

    private object GetContactName(object o)
    {
      var dr = o as DataRowView;

      return dr["ContactFirstName"] + " " + dr["ContactLastName"];
    }

    ...
}
This code registers a custom grid transformation in your application. If we had set a specific column name in the column definition above, the incoming value would have been that column’s value. But because we needed more data than just a single column and used the special ##ALL## macro, we get the full data row for that record. Actually not exactly full, but only the columns that the selector control used when loading the data.
The only thing left is to configure the selector itself and point it to our configuration. Modify the OnInit method of our extender to the following:
namespace MHM.ContactManagement
{
    public class IndustryContactsExtender : ControlExtender<UniSelector>
    {
        public override void OnInit()
        {
            UniSelector selector = Control;

            selector.GridName = "~/App_Data/CMSModules/MHM.ContactManagement/UI/Grids/industryContacts.xml";
            selector.DialogGridName = "~/App_Data/CMSModules/MHM.ContactManagement/UI/Grids/industryContacts.xml";

            selector.AdditionalColumns = "ContactFirstName, ContactEmail";
        }
    }
}
You can see here that the code just points the selector to specific configuration files (same for both the dialog and main listing), and also configures additional columns to get from the database, because as I said, the selector queries only the display name and ID columns by default. Having all these bits in place, we now get the following result:
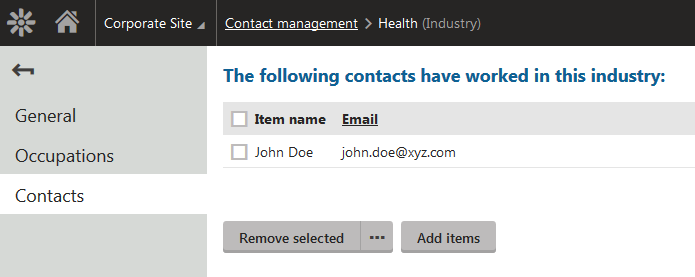
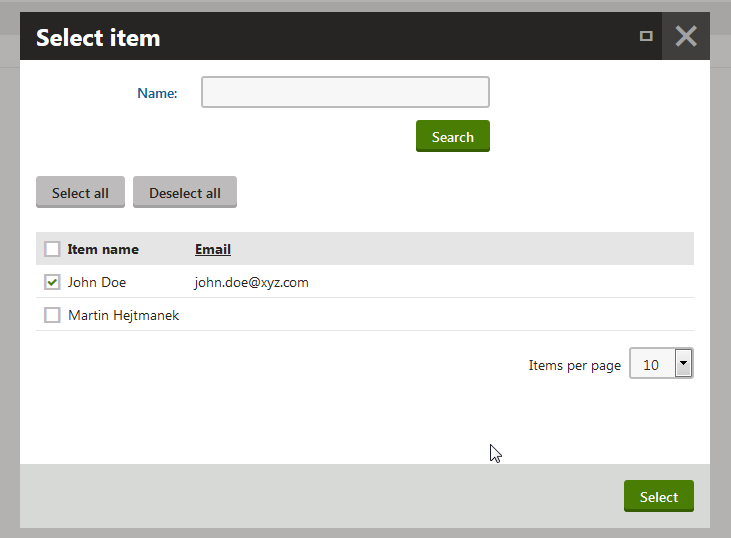
So the first goal is achieved. Now is the time to provide the ability to open the details of specific contacts in a dialog, so that sales personnel can keep the listing intact while working with a contact.
Using modal dialogs
I don’t recommend opening additional modal dialogs from an already open modal dialog. That is why we will apply our new code only to the main listing. Copy your new grid configuration XML to a new file named industryContactsMain.xml in the same location as the original file and just change the contact name column to the following:
<column source="##ALL##" externalsourcename="#mhm.editablecontactname" wrap="false" />
And update the grid paths in the extender correspondingly:
selector.GridName = "~/App_Data/CMSModules/MHM.ContactManagement/UI/Grids/industryContactsMain.xml";
selector.DialogGridName = "~/App_Data/CMSModules/MHM.ContactManagement/UI/Grids/industryContacts.xml";
Like in the previous grid definition, we will register the following custom transformation:
namespace MHM.ContactManagement
{
  public class MHMContactManagementModule : Module
  {
    ...

    protected override void OnInit()
    {
      ...

      UniGridTransformations.Global.RegisterTransformation("#mhm.editablecontactname", GetEditableContactName);
    }

    private object GetEditableContactName(object o)
    {
      var dr = o as DataRowView;

      var contactId = ValidationHelper.GetInteger(dr["ContactID"], 0);
      var dialogUrl = UIContextHelper.GetElementDialogUrl(ModuleName.ONLINEMARKETING, "EditContact", contactId);
      var dialogScript = ScriptHelper.GetModalDialogScript(dialogUrl, "ContactDetail");

      var html = String.Format("<a href=\"#\" onclick=\"{2}\">{0} {1}</a>", dr["ContactFirstName"], dr["ContactLastName"], dialogScript);

      return html;
    }

    ...
  }
}
This code provides the contact name as a link that opens the contact editing UI element in a modal dialog. You should always avoid using hardcoded URLs to UI elements or general scripts and instead let Kentico generate them for you.
Note that UI pages based on predefined portal templates are able to automatically recognize that they are opened as dialogs, and provide additional necessary accessories (dialog title, cancel button). You may need to provide extra code when doing this with a custom coded page.
Here is the result that you get and the corresponding modal dialog which opens when you click on the contact name:
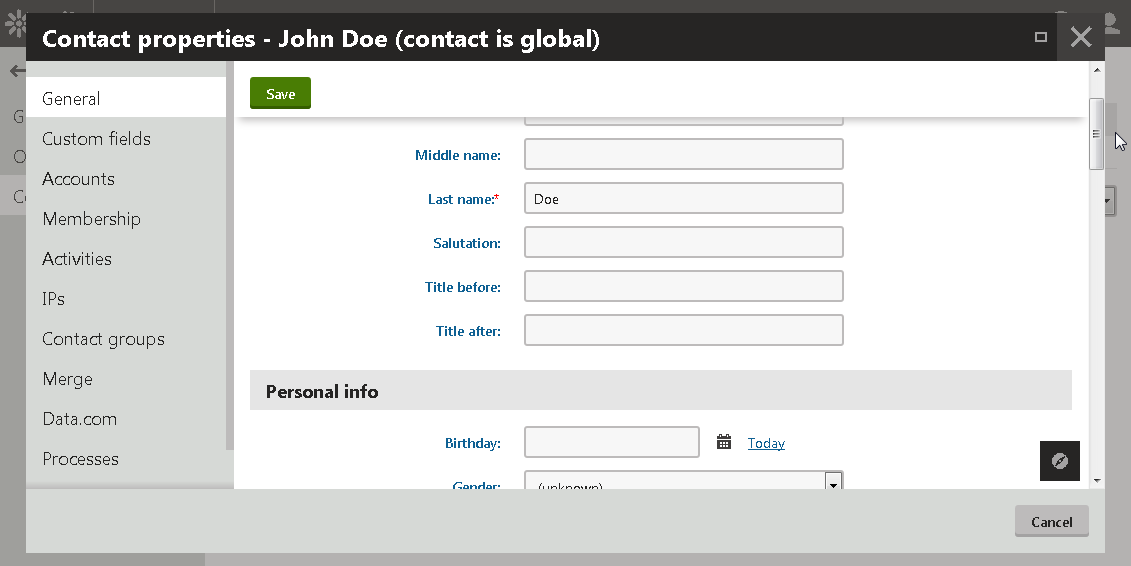
Note that I intentionally implemented the contact editing functionality as a link. While it is generally possible to provide a regular column with actions like in other listings, it is not as easy in the UniSelector due to its original configuration and the way it works with selection. If you ever need custom actions for some reason, it may be easier to use a regular listing and implement actions for adding or removing items. I may cover such an example in one of my next articles.
Gotcha, you are hacked!
Take the following lines as a warning of how easy it is to make a security hole in any code you write regardless of whether it is in Kentico or another project. Those of you who carefully read articles from my colleague on XSS and SQL injection and use that knowledge heavily now probably realize what is wrong. For the rest of you, make sure you read those articles and leverage that knowledge in your daily job.
I made a trivial mistake in my code on purpose to show you a real-world example of how your website can become vulnerable. Let’s add a new contact with the following properties:
- First name – “Hacker”
- Last name – “Joe<script>alert('gotcha!')</script>”
This is data that anyone can add to your database through an on-line form. Once this contact is displayed in your binding selector, you suddenly get this surprise:
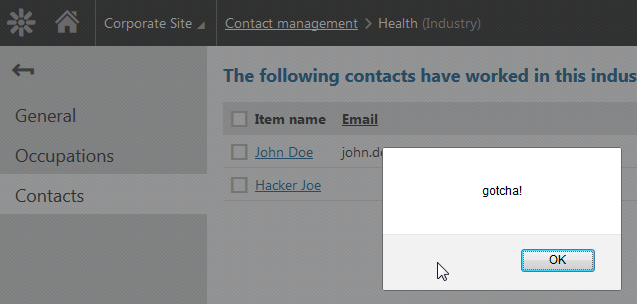
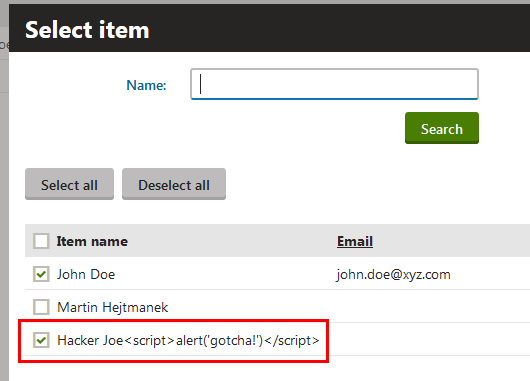
Even when you close it, you get the same surprise later in the selection dialog:
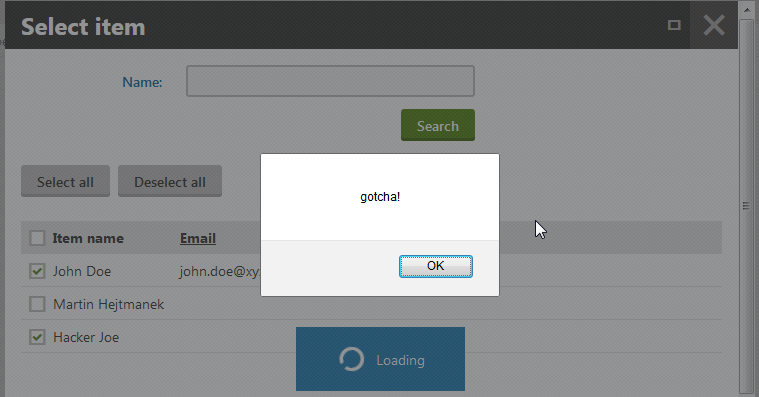
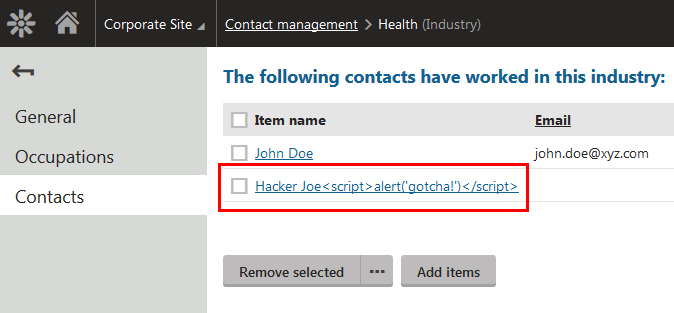
This is a typical example of a persistent XSS attack where you basically allowed the hacker to execute their custom scripts. Note that the name of the contact looks normal in the listing, so if there wasn’t an alert, you wouldn’t even notice that something like that was executed in the background!
Let’s fix this problem. I am not going to explain the details here, they are all described in the XSS article. We have two problematic pieces of code that we need to sanitize, as we are generating raw HTML in both cases. The goal is to present encoded plain text rather than HTML.
First, change the following line in the code of the #mhm.editablecontactname transformation:
var html = String.Format("<a href=\"#\" onclick=\"{2}\">{0} {1}</a>", dr["ContactFirstName"], dr["ContactLastName"], dialogScript);
To the following:
var name = HTMLHelper.HTMLEncode(dr["ContactFirstName"] + " " + dr["ContactLastName"]);
var html = String.Format("<a href=\"#\" onclick=\"{1}\">{0}</a>", name, dialogScript);
This sanitizes the output of the main listing with the contact link and ensures that the name is just plain text, not HTML:
Secondly, change the following line in the code of the
#mhm.contactname transformation:
return dr["ContactFirstName"] + " " + dr["ContactLastName"];
To the following:
return HTMLHelper.HTMLEncode(dr["ContactFirstName"] + " " + dr["ContactLastName"]);
Which has the same effect on the selection dialog:
Now make sure you planned some
review time for all the
code you have written so far. Also, make sure that you carefully evaluate all sample code that you copied from the internet or a presentation, including mine. Most of these
examples are meant to demonstrate concepts, not to give you production code.
It is always better to be safe than sorry …
Extending other predefined UI templates
I showed you an example of configuring the UniSelector because that is the main control used by the “Edit bindings” page template. Let me give you a list of the most typical UI templates and their main controls, so you know what types of extenders you should write:
- New/Edit object template – UIForm control
- Object listing template and other listings – UniGrid control
- Edit bindings template – UniSelector control
- Vertical tabs template and other tab templates – UITabs control
- Custom control template – Any base class of the assigned user control
If you want to go deeper, these main controls typically expose their underlying controls using properties. Alternatively you can use the method ControlsHelper.GetChildControl to find the appropriate nested control in a similar way as is done by the extender.
Note that predefined UI templates may have multiple configuration options for extenders. Typically one for the whole page and one for its main control.
Applying extenders programmatically
Sometimes you may need to apply multiple extenders to a single element, or reuse the extender within a subset of some other functionality. Here is an example of code that you can use to apply an extender to an existing control programmatically from code behind:
BadWordsListControlExtender extender = new BadWordsListControlExtender();
extender.Init(gridControl);
As I mentioned, the control you use does not have to be of the type matching extender. If it doesn’t match, it searches for the control of the right type among the child controls.
Wrap up
Today you learned how to leverage extenders for customizing portal engine driven UI pages. We discussed the following:
- Extender basics
- Writing a simple extender to customize a UI element based on the Edit bindings page template
- Fixing an XSS vulnerability
- Applying extenders programmatically
I will show you how to leverage native Kentico support for ordering and priorities in the next article.
See you next time!