Kentico 8 Technology - Checkout Process Customization
Kentico 8 introduces a highly customizable way to build your checkout process from web parts. Basic web parts are already shipped out-of-the-box, and as a developer, you can create your own feature-specific ones. Read this article to learn how.
Every e-shop is unique, and so is its checkout process. During the development of Kentico 8, we looked at the ways in which we can make the checkout process adaptable for any kind of business. As a result, we have rebuilt the core of the old checkout process to give you a tool for designing flawless user interaction from the Shopping cart to Thank you for your order page.
“Checkout process customization in Kentico 8 is no longer about coding but about using documents, templates and web parts.”
You can already read about this in Peter's article about E-commerce solution improvements. Basically, there is one step for one document, and one whole checkout process is a series of these documents that have been created in a specified order.
Now, each element of the checkout process is an individual preconfigured web part. All you need to do is lay out the set of pages to function as checkout steps and drag and drop your desired web parts to assemble your very own custom checkout process. Tweak the settings to make the web parts work the way you want them to, and that should cover most of the use cases. If you are up to a more specific design, you can create your own web part that will communicate with the rest of the checkout process web parts.
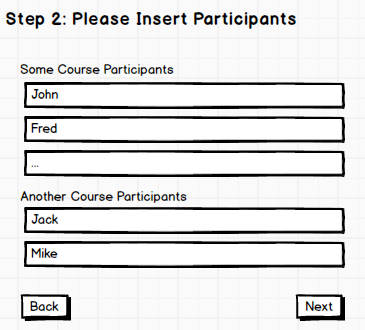
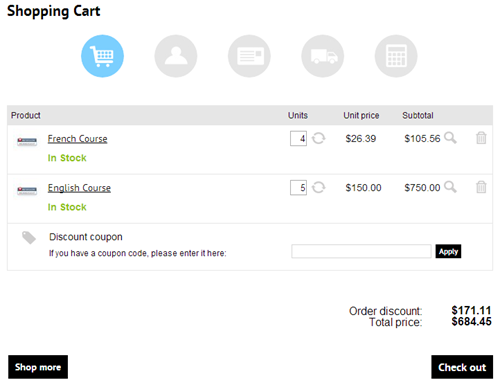
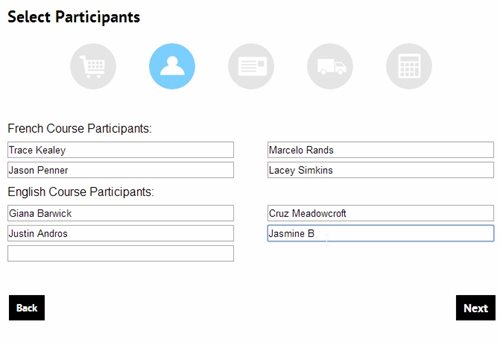
Let's say that you're building a site for a language school with an e-shop where customers can buy language courses. You already have the default 5-step checkout process but want to add one step where the customer registers course participants. This information will be validated and stored in the database. The customer adds chosen courses into their cart and proceeds to the next step. At this point, the system should prompt the customer to fill in participants' names for each course. The customer buys one course three times, another course two times, and therefore, they have to enter five names total. The registration form could look like this:

Creating a custom checkout process step with a registration web part
-
Add a blank step to your existing process, see our checkout process documentation for more details
-
Extend the ShoppingCartItemInfo class (in Modules->E-commerce->Classes edit "Shopping Cart Item" and go to fields tab) with a custom text field to store participants' names. In this example, I will call the field ParticipantsNames
-
Create a new web part, which will be used in your new step. The web part must inherit from CMSCheckoutWebPart. This way you can take advantage of the new concept of web part-based checkout.
-
Go to the design tab of your newly created step and place this web part on a step page using the drag and drop from the list with all of the web parts.
The web part's code behind should look like this:
public partial class ParticipantSelectionWebPart : CMSCheckoutWebPart
{
    protected void Page_Load(object sender, EventArgs e)
    {
    }
}
The markup will contain only an error label and an empty panel for text boxes.
<cms:CMSPanel runat="server" ID="pnlParticipantSelectors" CssClass="pnlParticipantSelectors"/>
<asp:Label runat="server" ID="lblError" Visible="false" CssClass="ErrorLabel" />
Every course in the shopping cart must have its own text box. Each shopping cart item has a property that stores quantity, so we can have four English courses in the shopping cart represented by one ShoppingCartItemInfo object. What we need to remember is which group of text boxes is assigned to which ShoppingCartItemInfo. We will use a variable to do the dirty work:
List<Tuple<ShoppingCartItemInfo, List<CMSTextBox>>> textboxes = new List<Tuple<ShoppingCartItemInfo, List<CMSTextBox>>>();
Courses are classic membership SKUs. The following code demonstrates how to generate text boxes for each of them. The ShoppingCart object is available thanks to CMSCheckoutWebPart inheritance and represents the current ShoppingCartInfo object. The code iterates through cart items and generates a text box for every item.
protected void Page_Load(object sender, EventArgs e)
{
    ShoppingCart.CartItems.ForEach(HandleInputTextBox);
}


private void HandleInputTextBox(ShoppingCartItemInfo item)
{
    if (item.SKU.SKUProductType != SKUProductTypeEnum.Membership)
    {
        return;
    }

    var inputs =  new List<CMSTextBox>();

    for (int i = 0; i < item.CartItemUnits; i++)
    {
        var textBox =  new CMSTextBox
        {
            ID =  string.Format("tb{0}_{1}", item.GetHashCode(), i),
            Width = 540,
        };

        pnlParticipantSelectors.Controls.Add(textBox);
        inputs.Add(textBox);
    }

    textboxes.Add(new Tuple<ShoppingCartItemInfo, List<CMSTextBox>>(item, inputs));
}
The customer fills in the names and clicks Next. Now is the perfect time to save our data. The CMSCheckoutWebPart class has specific methods for that: ValidateStepData and SaveStepData. Your web part automatically calls these two methods immediately after clicking the Next button. Validation comes first and saving comes second. Override SaveStepData and put your saving code in the overridden method. In the following code, save the participants' names separated with commas to the custom field called ParticipantsNames.
protected override void SaveStepData(object sender, StepEventArgs e)
{
    foreach (var pair  in textboxes)
    {
        var names = TextHelper.Join(",", pair.Item2.Select(i => i.Text));
        pair.Item1.SetValue("ParticipantsNames", names);
    }
}
Validation is also a necessary component in checkout process web parts. You can place your validation code into the ValidateStepData method. To prevent moving to the next step if the validation does not pass, set the CancelEvent property of StepEventArgs to true. For example, you can validate that every name is used only once per course, as shown in the following code:
protected override void ValidateStepData(object sender, StepEventArgs e)
{
    foreach (var pair  in textboxes)
    {
        var usedNames =  new HashSet<string>();

        foreach (var textBox  in pair.Item2)
        {
            if (usedNames.Contains(textBox.Text))
            {
                e.CancelEvent =  true;
                HandleError(textBox.Text);
                return;
            }

            usedNames.Add(textBox.Text);
        }
    }
}
Communicating with other web parts on the page
Usually, there is more than one web part per page. You have a slick way to send messages and data from one to another by means of ComponentEvents (see this video about event handling from our YouTube channel to learn more about it).
The following example shows you how to use it.
private void HandleError(string text)
{
    var args =  new CMSEventArgs<string>();
    args.Parameter = "The name " + text + " is used twice.";
    ComponentEvents.RequestEvents.RaiseEvent(this, args, MESSAGE_RAISED);
    // If Message Panel web part is not present (Parameter is cleared by web part after successful handling), show error message in error label
    if (!string.IsNullOrEmpty(args.Parameter))
    {
        lblError.Visible =  true;
        lblError.Text = args.Parameter;
    }
}
You can show a validation message in an error label or in a separate web part called the Message panel. The web part is useful when it is undesirable to show the warning within the current web part, or when you just want one central place for this kind of messages. It's possible to send various data through component events. Each web part can be registered for any number of events and other web parts could raise these events to achieve some reactions. The Message panel is registered for the MESSAGE_RAISED event. The message is stored in the CMSEventArgs parameter. The Message panel web part will clear this parameter after successful handling. You can always have a backup plan and show a message in an error label if the message panel is not present.
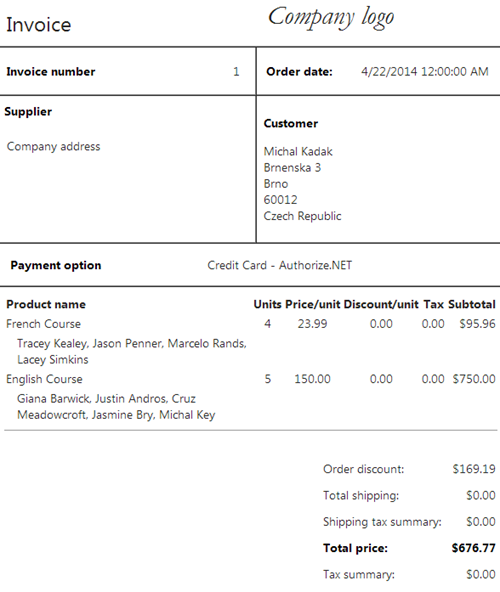
And that's it! The last thing you have to do is place your new web part on a step page. Participants' names will be stored in the shopping cart item object. You can customize ShoppingCartInfoProvider’s SetOrder method to process this data and show it to them on the invoice. The result could look like this:

Step 1

Step 2

Invoice
I hope that I was able to show you the main principles of creating custom checkout process web parts and the power of this concept. This is only the tip of the iceberg. We have managed to shift the limits of customization far beyond the original design.
Do you plan to customize your shopping cart anytime soon? Let us know about your challenges in the comments.