Kentico 12 MVC Design Patterns - A Primer
“O brave new world, That has such people in't.” - William Shakespeare talking about Kentico developers building Kentico 12 MVC sites.
Cha-cha-cha-changes
A lot has changed in the world of Kentico over the past several years. Kentico 8 saw the refresh of the Portal UX, Kentico 9 saw increased support of MVC and the Continuous Integration feature.
Now, in Kentico 12, ASP.NET MVC has become the recommended development framework for delivering all the content managed in Kentico CMS.
I find this all very exciting, but also intimidating!
The Web Forms approach we’ve been using for years doesn’t easily translate to the patterns behind MVC. There’s a lot of new stuff to learn, both for developers with years of Kentico experience, and for those learning Kentico for the first time.
My goal here is to introduce some helpful design patterns, tips, and tricks you can use to jump-start your Kentico 12 MVC site development.
Many of these ideas are possible when building Kentico CMS Portal Engine (Web Forms) sites but require developers to jump through hoops or fight the Web Forms framework. MVC was developed with different goals and makes all of this much easier, even encouraging it in some cases!
Let’s begin!
Writing Testable Code
The productivity enabled by Kentico’s C# APIs can’t be argued. If you want to retrieve all the users from the CMS, just call UserInfoProvider.GetUsers().
There’s no need to establish or manage a database connection, figure out what table to query, or deserialize the results into UserInfo instances.
The same benefits apply to using Kentico’s static “Context” classes.
However, this increased productivity comes at a cost - these APIs assume they are executed in the context of a live site executing an HTTP request.
This assumption complicates developers’ abilities to unit test their code when they use these APIs, because unit tests should run quickly, with the execution context faked, stubbed, or mocked for the test case.
We cannot replace SiteContext.CurrentSiteName in a unit test with something that works while testing.
My recommended solution is to rely on abstractions in your code, using the “real” SiteContext at runtime.
We can accomplish this through an interface, which follows the “D” in SOLID design principles - “One should "depend upon abstractions, [not] concretions.” (https://en.wikipedia.org/wiki/SOLID)
Anywhere in your code that you would normally use SiteContext, replace it with an ISiteContext interface that is provided through a class constructor as a dependency. ISiteContext can supply the same properties as SiteContext.
public interface ISiteContext
{
    string CurrentSiteName { get; }
    int CurrentSiteID { get; }
}

public class KenticoSiteContext : ISiteContext
{
    public string CurrentSiteName => SiteContext.CurrentSiteName;
    public int CurrentSiteID => SiteContext.CurrentSiteID;
}
When unit testing our class that takes a dependency on ISiteContext we can supply a “fake” version that returns a pre-defined value for CurrentSiteName.
When running our site, an Inversion of Control container library, like Autofac, can supply an instance of KenticoSiteContext which will use SiteContext as the source of CurrentSiteName.
We get all the benefits of testable code and Kentico’s easy-to-use data access APIs.
Writing Unit Tests
If we are going to design our code to be more testable, then we should probably take advantage of it and write some tests!
Kentico provides a library, CMS.Tests, to help write unit and integration tests. It can be installed in your test project through the Kentico.Libraries.Tests NuGet package.
<blockquote>Read more about setting up a unit test project for Kentico in the docs (https://docs.kentico.com/k12sp/custom-development/writing-automated-tests/creating-automated-test-projects) </blockquote>
To test your code that integrates with Kentico we first need to create a test class, using NUnit.
public interface ISiteContext
{
    string CurrentSiteName { get; }
    int CurrentSiteID { get; }
}

public class UserAccessProvider
{
    private readonly ISiteContext siteContext;
    public UserAccessProvider(ISiteContext siteContext) => this.siteContext = siteContext;
    public bool HasAccess(int userID)
    {
        var userSiteInfo = UserSiteInfoProvider.GetUserSiteInfo(userID, siteContext.CurrentSiteID);
        return userSiteInfo is object;
    }
}

[TestFixture]
public class UserAccessTests : UnitTests
{
    [Test]
    public void HasAccess_Will_Return_True_For_Users_From_The_Current_Site()
    {
        var fixture = new Fixture();
        int userID = fixture.Create<int>();
        int siteID = fixture.Create<int>();
        int userSiteID = fixture.Create<int>();

        var siteContext = Substitute.For<ISiteContext>();
        siteContext.CurrentSiteID.Returns(siteID);

        Fake<UserSiteInfo, UserSiteInfoProvider>()
            .WithData(new UserSiteInfo
            {
                UserID = userID,
                SiteID = siteID,
                UserSiteID = userSiteID
            });

        var sut = new UserAccessProvider(siteContext);
        bool hasAccess = sut.HasAccess(userID);
        hasAccess.Should().BeTrue();
    }
}
Taking a look at the above test, there are some key things to point out.
-
new Fixture() creates an AutoFixture instance (https://github.com/AutoFixture/AutoFixture) that reduces the need for hardcoded values in our tests. The test passes not because of the exact value that userID has, but instead because that value is used consistently throughout the test.
-
Substitute.For<>() comes from the NSubstitute library (https://nsubstitute.github.io/) which helps with providing default implementations of types we want to stub or mock.
-
We call Fake<UserSiteInfo, UserSiteInfoProvider>().WithData() which allows Kentico to return pre-defined values when the specific Provider’s methods are called.
-
Should().BeTrue() are extension methods supplied by the FluentAssertions library (https://fluentassertions.com) which I find are easier to read and compose than traditional Assert calls.
Using the above test libraries and patterns can help you write effective automated tests for both your business logic and Kentico integration code.
What’s that you say? You’ve never written automated tests before? Well with Kentico 12 MVC, you now have the perfect opportunity to try it out - who knows, you might even enjoy it!
MVC Application Structure
The freedom we now have in designing our applications is nowhere more apparent than the process we use to create a new Kentico 12 MVC project.
Of course, we have to add the integration pieces that bring us the benefits of build on top of Kentico CMS, but the way we structure our MVC code base is ours to choose.
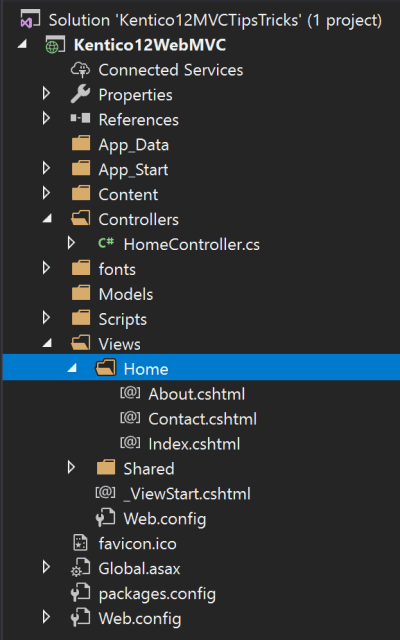
If you open Visual Studio and click through “File -> New -> Project -> ASP.NET Web Application (.NET Framework) -> MVC”, here’s what you probably see:
So, now I have a recommendation for you, not based on Kentico’s documentation, but based on my personal experiences building sites with MVC and Web API.
Don’t use the structure given to you by Visual Studio’s “File -> New” MVC project template. It works great for demos but it won’t scale and doesn’t align with the goals of your company, clients, or development team. This is because the default project template structure takes a “Framework” focused approach.
We should, instead, take a “Feature” focused approach to structuring our application code:
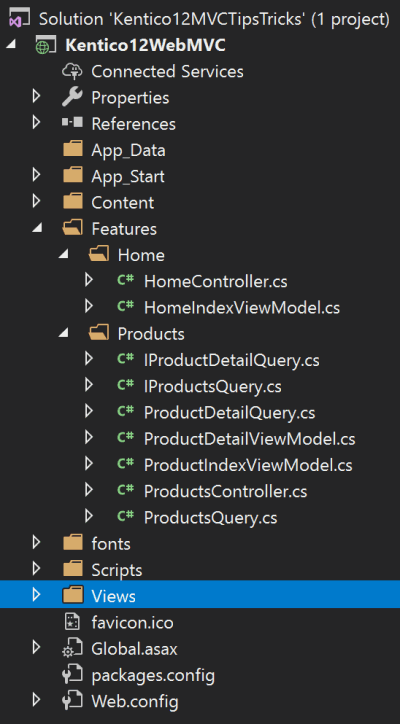
Is there really that big of a difference between the two? Definitely!
-
Developers don’t work on just Controllers, or Models - they work on Features, and those features span multiple layers and parts of a code base. The framework is important, it helps us be productive and follow good design patterns, but as our application grows the framework code fades to the background and most of our work will be in fulfilling business requirements with standard C# code.
-
Co-location, the concept of keeping related things close to each other, is important for developers new to a project. They need to be able to see what classes and files work together and change together. A Feature focused approach aligns with this goal of co-location. Our HomeController will be right next to our HomeViewModel because HomeViewModel has more in common with the HomeController than with View Models from other Features.
-
Co-location is also important as your code grows in size and complexity. If you need to make major changes to a Feature, it’s very helpful to be able to quickly identify all the classes you might have to change. When you make those changes it’s also helpful to not constantly be running into merge conflicts with your source control. If other developers are working on other Features, and your code based is Feature-aligned, you will be much less likely to change the same files at the same time.
-
Feature focused code organization also encourages more single-purpose classes, and less of a knee-jerk impulse to consolidate or pre-emptively DRY up code. This aligns well with the Single Responsibility Principle and Domain Driven Design concepts.
In the end, this approach, compared to the “Framework” focused approach, only requires some slightly different namespaces for your classes - no configuration changes - so it’s pretty easy to reverse if you find it doesn’t suit your needs.
On the topic of application structure, I’d also recommend keeping that new MVC framework type, the Controller, as simple and thin as possible.
The thing to note here is that Controller classes are really part of the presentation layer of your application (all of MVC’s namesake types - Models, Views, and Controllers - are presentation based!). Some of the same issues with automated tests and maintainability on large Web Forms applications can sneak their way into MVC projects when we put all of our business logic in the presentation layer.
Move your data querying, validation, and service integration into other classes. Then, use a library like MediatR (https://github.com/jbogard/MediatR) to pass a request from a Controller to another part of your code base that is abstracted away from presentation-layer concerns.
On small projects some of this abstraction and layer might feel like a lot of extra busy work, but on larger projects it can save a lot of pain in the long run - and we all know how small projects can, unexpectedly, turn into large ones!
Summary
There are many things about ASP.NET MVC that set developers up for success, and Kentico CMS’s integration with the framework is strong and well supported - it’s definitely ready for production!
Following the path of best practices and design patterns when building on top of this foundation will ensure your projects scale well and stay maintainable, adapting to changes in requirements and technologies.
We covered several ways to set ourselves up for success when building our Kentico 12 MVC applications:
-
Design your code with testability in mind with Dependency Inversion and the other SOLID design principles.
-
Write automated tests to ensure correct behavior of your code, using libraries to help clarify the goals of your tests.
-
Focus on the Features of your application, and less on the Framework. Also remember that MVC is all about the presentation layer, so keep that part of your code focused on presentation and not business logic.
I look forward to learning about your recommended design patterns for building great Kentico 12 MVC sites. I hope we can all grow our knowledge and skills together, making Kentico the best Content Management platform technology and community.
If you want to dive deeper into any of these topics, and stay up to date with everything I’m writing about Kentico 12 MVC, follow me on Twitter (https://twitter.com/seangwright), checkout my Kentico 12 Design Patterns series or the Kentico tag over on Dev.to.