Converting a Portal Engine Widget to an MVC Widget
In a previous article, we learned how to build a basic MVC widget. However, there are more advanced tools in Kentico 12 that can make life even easier for your content editors. Let's recreate a more complex Portal Engine widget in MVC while making it as simple as possible for your editors to configure!
The move from Portal Engine to MVC is a big one - the development approach, functionality, and design of your site will change. However, one thing is constant: content editors will need to have an easy way to edit content from the Pages application. As you know, in the MVC development model, much of your page structure is defined by you, developers. Kentico Page Builder Widgets provide an easy way for editors to affect the live site's appearance without any coding knowledge at all.
Planning Your MVC Widget
Before we start giving editors a bunch of widgets to add to pages, let’s pause for a moment to consider when this is actually needed. Developing an MVC Page Builder Widget is an easy task, but the functionality you need may not match the widget's purpose. For example, if you have an "inbox" where live-site visitors can see some personalized messages, it will probably be used only a few times throughout the site. In that case, it's better to implement it as a separate partial view, which makes it a trivial task to add it to a new page by a developer. Content editors can then focus more on content than defining the structure of your pages.
For the sake of this article, we've decided that we'd like to have a carousel MVC widget that can display text, an image, and a link. We will be converting the Portal Engine widget from our Marketplace: https://devnet.kentico.com/marketplace/web-parts/image-text-carousel-widget. Let's look at what editors can configure for this widget in the Portal Engine:
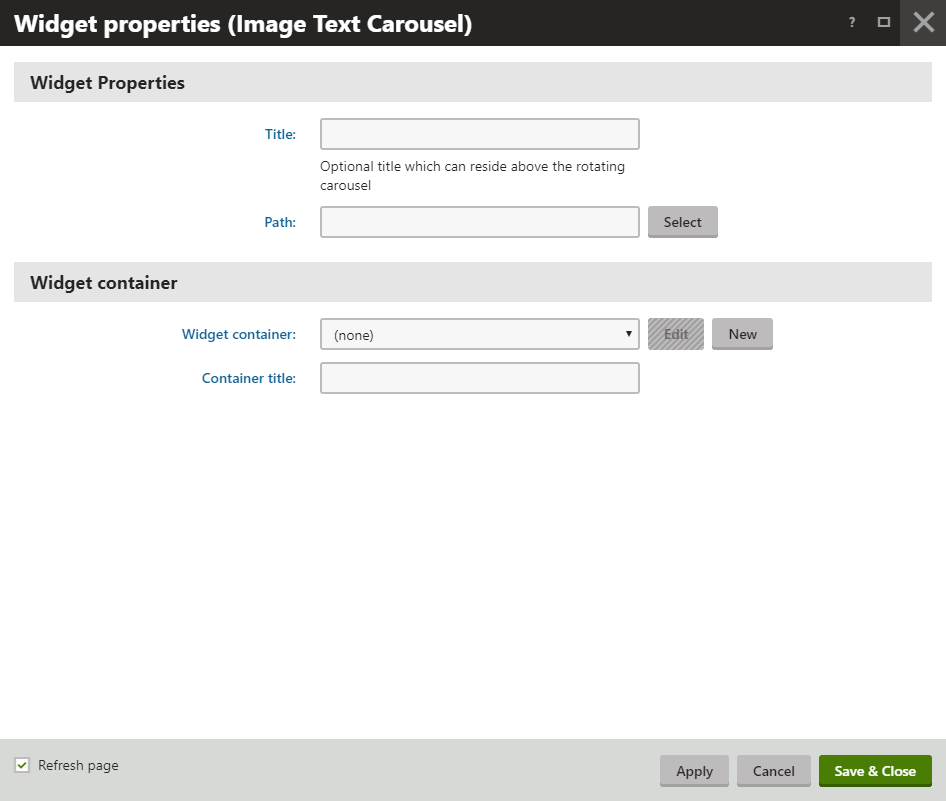
Editors must select a path to load pages from the content tree, and there is an optional Title property. The widget loads pre-defined custom page type fields from one specific page type under the chosen path, and uses a CMSRepeater and slick JavaScript to create a carousel:

Our MVC widget will need a Path property for sure, but let's give our editors more control over the behavior of the widget. After all, we're looking to make it as easy as possible to configure this carousel without the help of a developer. Looking at the options available in slick, there are some useful things that the editor could configure directly from the widget - here's a list of potential widget properties:
- Path (string)
- Page type (string)
- Autoplay (bool)
- Draggable (bool)
- Delay (int)
- Rows (int)
- Items per row (int)
- Container ID (string)
Getting Started
By now, you should know the basics of developing an MVC widget - if you don't, please check out this article. Start developing the MVC widget by implementing basic functionality: create the IWidgetProperties class with the above properties, a basic ViewModel and a controller that populates the ViewModel from the widget properties, and a View which outputs some sample text. I recommend starting very basic to ensure everything is working properly, then adding the more complex functionality.
This is also a good time to determine what properties will use an inline property editor. Inline editors are a great way to help speed up the content editing process for your users. Normally, widget properties can be edited by clicking the "gear" icon, which opens a separate dialog window. With inline editors, users can alter the more critical widget properties directly from the Page tab and view the changes immediately, saving time and mouse clicks. They are entirely optional, but by using a few inline editors, your content editors will be able to work more efficiently and have a better user experience.
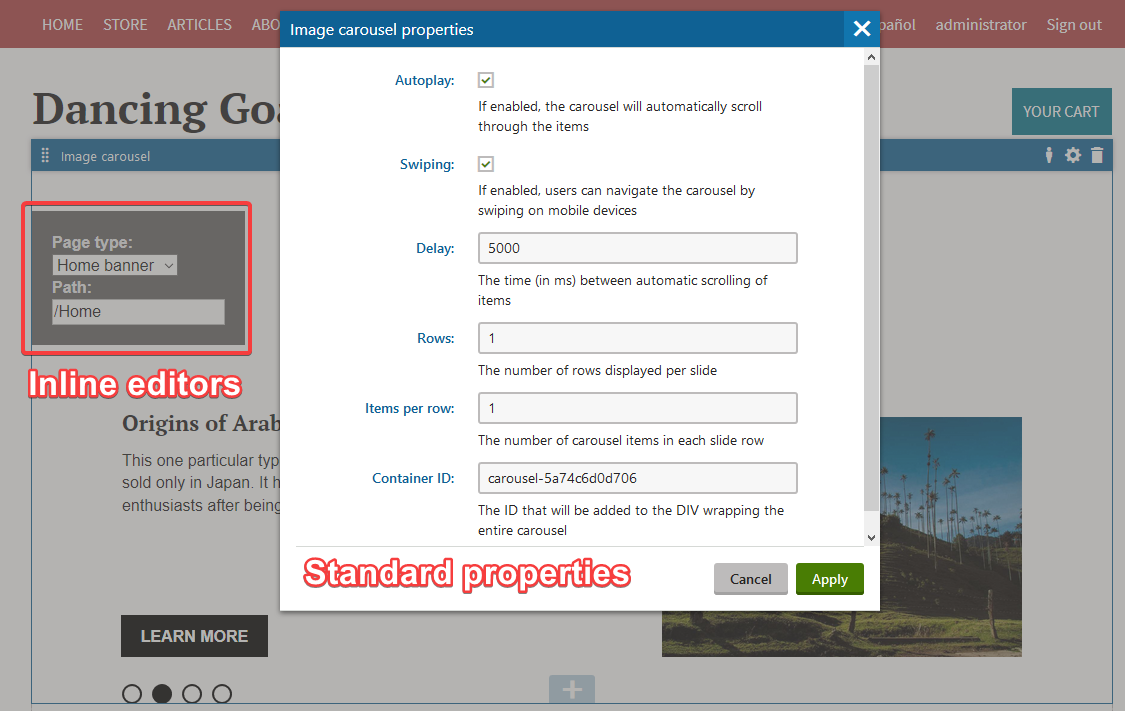
In our widget, the Path and PageType properties will use inline editors, since the other properties can remain at their default values for most pages. Before you continue, ensure that you have the basics set up - the properties with defined EditingComponent attributes, the ViewModel with default getters/setters, the Controller which loads the properties into the ViewModel, and a basic View with some test HTML. In this example, we are registering the widget with the identifier "CarouselWidget," which will be important later when we create folders that must match the identifier.
[assembly: RegisterWidget("CarouselWidget", typeof(DancingGoat.Controllers.Widgets.CarouselWidgetController), "Image carousel", IconClass = "icon-w-content-slider")]
public class CarouselWidgetController : WidgetController<CarouselWidgetProperties>
{
   public ActionResult Index()
   {
       var properties = GetProperties();
       List<TreeNode> pages = new List<TreeNode>();
       if (DocumentTypeHelper.GetDocumentTypeClasses().WhereEquals("ClassName", properties.PageType).TypedResult.Count() >= 1)
       {
           pages = DocumentHelper.GetDocuments()
               .Type(properties.PageType)
               .Path(properties.Path, PathTypeEnum.Children)
               .OnCurrentSite()
               .TypedResult
               .ToList();
       }

       return PartialView("Widgets/_CarouselWidget", new CarouselWidgetViewModel
       {
           CarouselItems = pages,
           Path = properties.Path,
           Delay = properties.Delay,
           Swiping = properties.Swiping,
           Rows = properties.Rows,
           ContainerID = properties.ContainerID,
           ItemsPerRow = properties.ItemsPerRow,
           DoAutoplay = properties.DoAutoplay,
           PageType = properties.PageType
       });
   }
}
Creating Inline Property Editors
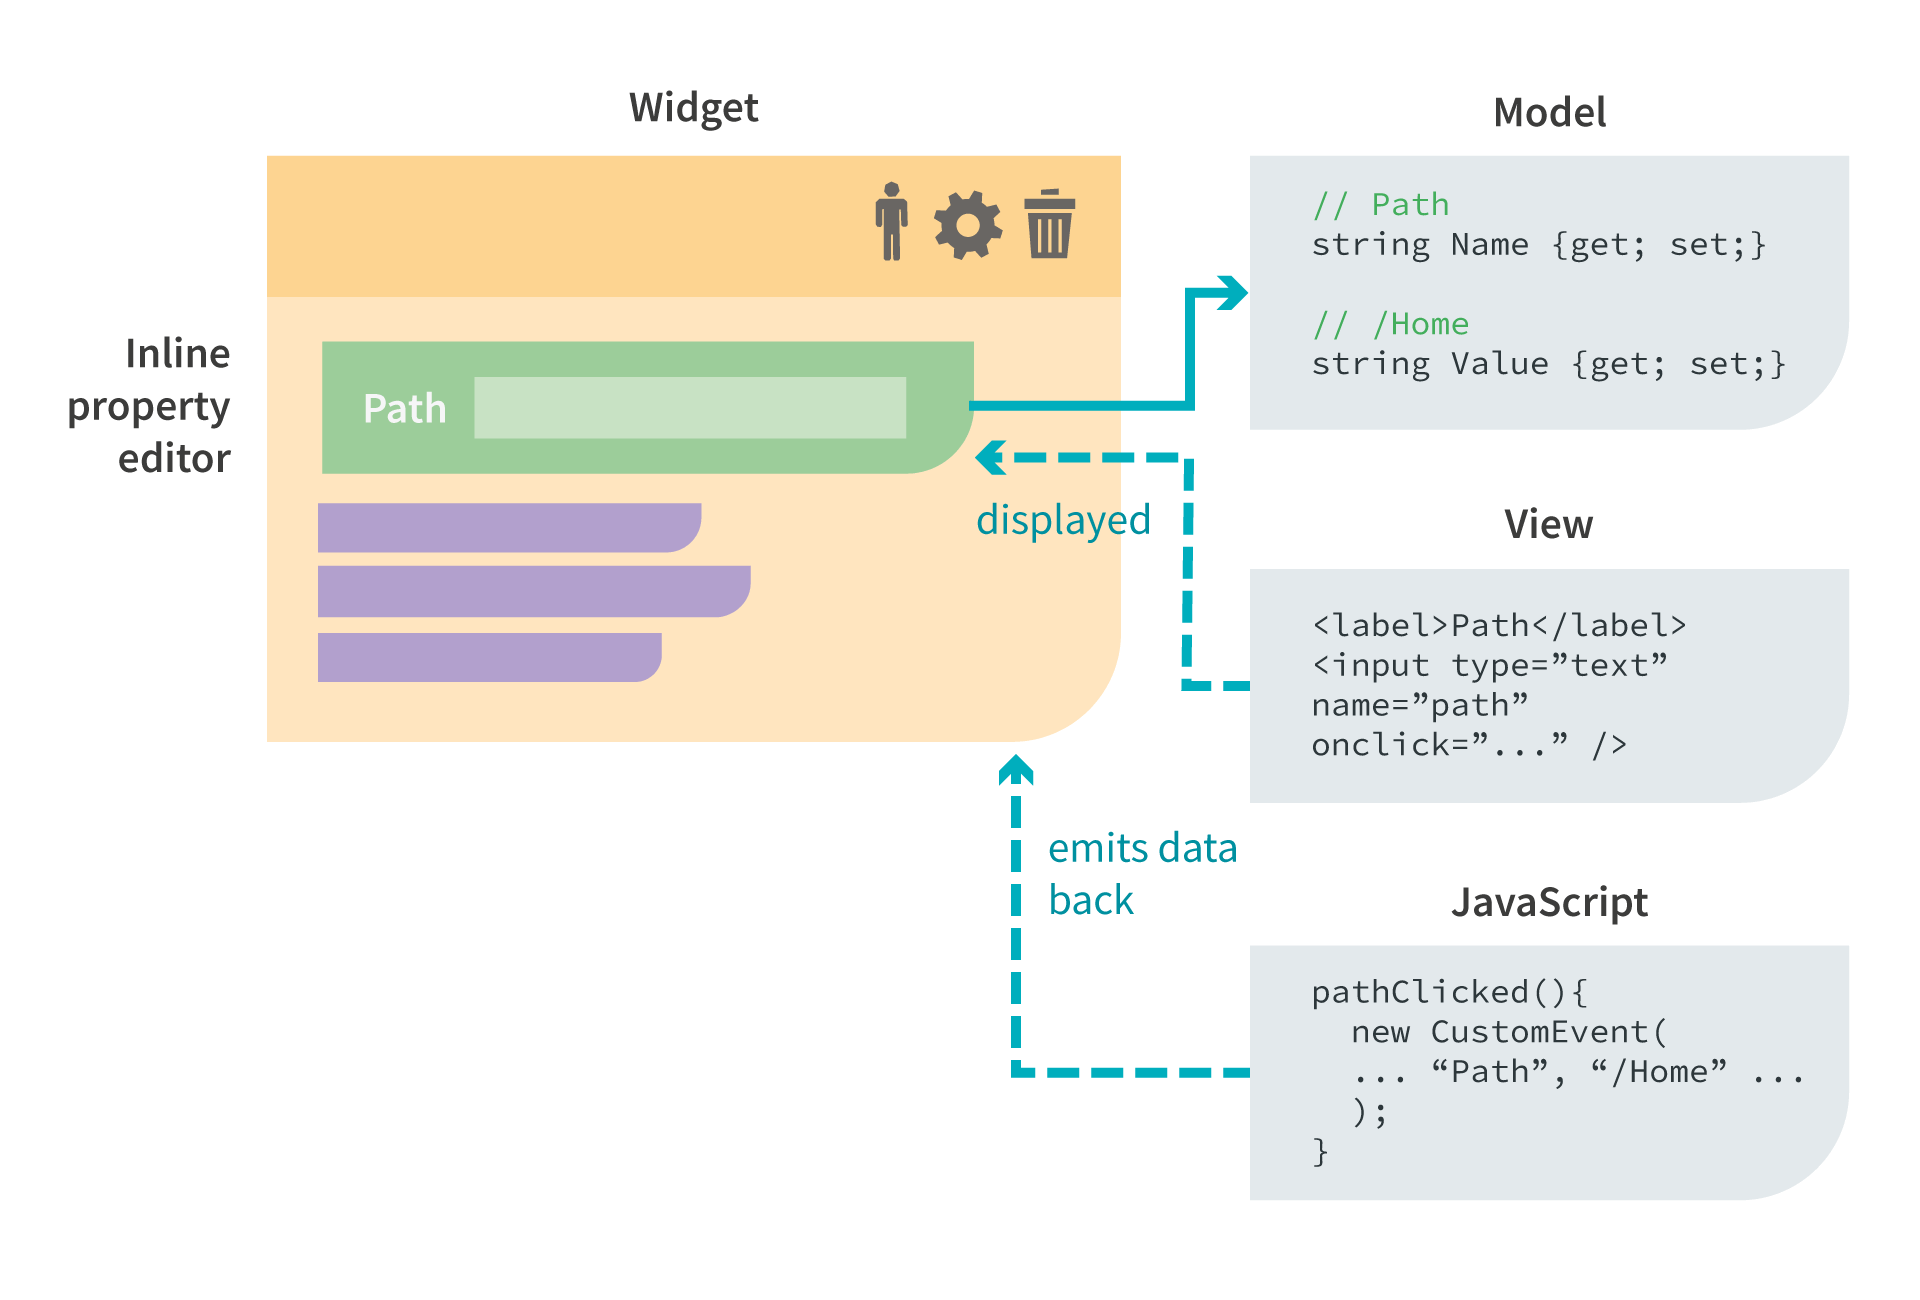
I mentioned we want to use inline property editors for the Path and PageType properties, so we need to create a few files for each inline editor. Firstly, you must create a Model which contains at least two properties: the name of the property the editor is being used for, and the value of the property. The inline property editor sends the data back via JavaScript so it needs to know which property to set. The value sets the initial value of the editor (if it exists).
You then need to create a partial view that will only appear in the administration interface's page builder and provide a way for the content editor to set the value of the property, such as a text box. Finally, a JavaScript file is required to register the Inline Property Editor with the Page Builder and to emit the property value back to the widget when it gets updated.
Path Editor
The PathTextBoxEditor will be a simple text box, so we start by creating the Model:
public class PathTextBoxEditorModel
{
    public string PropertyName { get; set; }
    public string Value { get; set; }
}
Our partial view will simply render a text box with a unique ID that will be visible in the administrative interface. You can see an example of our completed inline editors in comparison to standard widget properties in the above "Getting Started" section.
Here's what the partial view looks like:
@model PathTextBoxEditorModel
@using (Html.Kentico().BeginInlineEditor("path-text-box-editor", Model.PropertyName))
{
    <span style="color: #eee">Path:</span><br />
    @Html.TextBox("path-box", Model.Value);
}
Finally, we need to register the Inline Property Editor via JavaScript and emit an event to update the widget property when the user leaves the text box. Place this file in ~/Content/InlineEditors/PathTextBoxEditor:
(function () {
   window.kentico.pageBuilder.registerInlineEditor("path-text-box-editor", {
       init: function (options) {
           var editor = options.editor;
           var box = editor.querySelector("#path-box");
           if (box !== null) {
               box.addEventListener("blur", function () {
                   var event = new CustomEvent("updateProperty", {
                       detail: {
                           value: box.value,
                           name: options.propertyName
                       }
                   });
                  editor.dispatchEvent(event);
              });
          }
      }
   });
})();
The inline editor is complete, but we need to add it to the widget's main View:
@if (Context.Kentico().PageBuilder().EditMode)
{
   <div style="padding: 20px; background-color: #666; display: inline-block; width: auto;">
       @{
           Html.RenderPartial("InlineEditors/_PathTextBoxEditor", new PathTextBoxEditorModel
           {
               PropertyName = nameof(Model.Path),
               Value = Model.Path
           });

        }
   </div>
}
Note the "if" statement at the beginning - this ensures that the inline editor only appears on the Page tab in the Kentico administration interface.
As the Path property is now using an Inline Property Editor, ensure it has no EditingComponent attribute in the widget properties. Otherwise, Kentico would render the property in the configuration dialog as well. Test your new Inline Property Editor in the page builder by adding some text and saving the page.
Page Type Selector
Let's create the inline editor for the PageType property. This one will be a bit more complex, as we need to get a list of page types from Kentico and display them in a drop-down. So, our Model for this Inline Property Editor will contain an additional property:
public class PageTypeSelectorModel
{
   public string PropertyName { get; set; }
   public string Value { get; set; }
   public List<SelectListItem> Types { get; set; }
}
The list of available page types comes from Kentico's API, but you should not invoke it from the view directly. Data for view should primarily come from the widget's Controller. Therefore, we can add a property for the data to the CarouselWidgetViewModel:
...
public List<SelectListItem> AvailableTypes { get; set; }
...
And populate the list in the Controller:
var types = DocumentTypeHelper.GetDocumentTypeClasses()
   .WhereEquals("ClassIsContentOnly", true)
   .TypedResult
   .ToList()
   .Where(t => {
       var formDefinition = new FormInfo(t.ClassFormDefinition);
       return formDefinition.FieldExists("Title") &&
           formDefinition.FieldExists("Text") &&
           formDefinition.FieldExists("Image");

    })
   .Select(new SelectListItem {
       Text = type.ClassDisplayName,
       Value = type.ClassName,
       Selected = (type.ClassName == properties.PageType)
   });
   return PartialView("Widgets/_CarouselWidget", new CarouselWidgetViewModel
{
   AvailableTypes = types,
   CarouselItems = pages,
   Path = properties.Path,
   Delay = properties.Delay,
   Swiping = properties.Swiping,
   Rows = properties.Rows,
   ContainerID = properties.ContainerID,
   ItemsPerRow = properties.ItemsPerRow,
   DoAutoplay = properties.DoAutoplay,
   PageType = properties.PageType
});
Like the previous Inline Property Editor, we need to add it to the widget's main view. With this editor, we need to also provide data for the AvailablePageTypes property. Here are both Inline Property Editors added to the widget's View:
@if (Context.Kentico().PageBuilder().EditMode)
   {
       <div style="padding: 20px;background-color: #666;display: inline-block;width: auto;">
       @{
           Html.RenderPartial("InlineEditors/_PageTypeSelector", new PageTypeSelectorModel
           {
               PropertyName = nameof(CarouselWidgetProperties.PageType),
               Types = Model.AvailableTypes,
               Value = Model.PageType
            });
            Html.RenderPartial("InlineEditors/_PathTextBoxEditor", new PathTextBoxEditorModel
            {
                PropertyName = nameof(CarouselWidgetProperties.Path),
                Value = Model.Path
            });
        }
   </div>
}
Create the Inline Property Editor's partial view now, using the Types property to populate a drop-down list. Note that we can also display some helpful error message if no page types are found:
@model PageTypeSelectorModel
@using (Html.Kentico().BeginInlineEditor("page-type-selector", Model.PropertyName))
{
   if(Model.Types.Count == 0)
   {
       <span><b>Error</b> - No page types found which contain the following fields:</span>
       <ul>
           <li>Title</li>
           <li>Text</li>
           <li>Image</li>
           <li>CtaText (optional)</li>
           <li>CtaUrl (optional)</li>
       </ul>
   }
   else
   {
       <b style="color:#eeeeee">Page type:</b><br/>
       @Html.DropDownList("selector-drop-down", Model.Types)
   }
}
The last piece missing is the JavaScript, which registers the Inline Property Editor with the Page Builder and updates the property when the drop-down list selection changes. Place this file in ~/Content/InlineEditors/PageTypeSelector:
(function () {
   window.kentico.pageBuilder.registerInlineEditor("page-type-selector", {
       init: function (options) {
           var editor = options.editor;
           var ddl = editor.querySelector("#selector-drop-down");
           if (ddl !== null) {
               ddl.addEventListener("change", function () {
                   var event = new CustomEvent("updateProperty", {
                       detail: {
                           value: ddl.value,
                           name: options.propertyName
                       }
                   });
                   editor.dispatchEvent(event);
               });
           }
       }
   });
}) ();
Building the View
We're nearly done! Now that our View has all the information it needs to display the content, let's put the finishing touches to it. We can take inspiration from the Portal Engine widget's ASCX file to see how it was originally developed, then adjust the code for MVC.
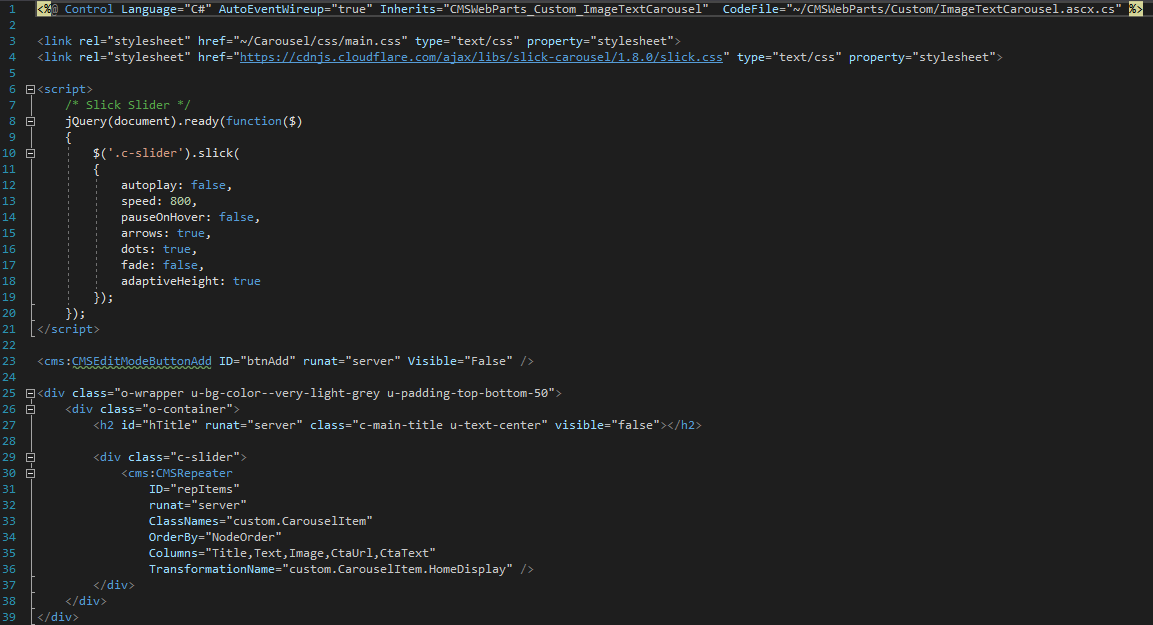
The first thing we see is that the widget is calling some inline JavaScript to initialize the carousel. We can do the same in our MVC widget's View by copying the JavaScript, but replacing some of the variables with our widget properties:
@model DancingGoat.Models.Widgets.CarouselWidget.CarouselWidgetViewModel
<script>
   /* Slick Slider */
   $(document).ready(function() {
       $('#@Model.ContainerID .c-slider').slick({
          autoplay: @Json.Encode(Model.DoAutoplay),
          speed: 1200,
          autoplaySpeed: @Model.Delay,
          pauseOnHover: true,
          draggable: @Json.Encode(Model.Swiping),
          rows: @Model.Rows,
          slidesPerRow: @Model.ItemsPerRow,
          arrows: false,
          dots: true,
          fade: false,
          adaptiveHeight: true
      });
  });
</script>
On the topic of JavaScript, we also need the slick JavaScript file and CSS. As described in the documentation here, you can place JS and CSS assets in ~/Content/Widgets/<widget name> and the system will automatically bundle the files and provide them on pages. In the slick archive, copy ~/slick-1.8.1/slick/slick.css and ~/slick-1.8.1/slick/slick.js into ~/Content/Widgets/CarouselWidget. This library requires jQuery, so ensure that you are loading jQuery in the HEAD section of your site.
Next up in the View, we need to loop through the ViewModel's CarouselItems property and output the custom fields of the TreeNodes in a format that the slick JS understands. Again, we can re-use much of the original widget's ASCX file and adjust it for MVC. Here is the final View, including the JavaScript code and inline editors we created previously:
@model DancingGoat.Models.Widgets.CarouselWidget.CarouselWidgetViewModel
<script>
   /* Slick Slider */
   $(document).ready(function() {
       $('#@Model.ContainerID .c-slider').slick({
           autoplay: @Json.Encode(Model.DoAutoplay),
           speed: 1200,
           autoplaySpeed: @Model.Delay,
           pauseOnHover: true,
           draggable: @Json.Encode(Model.Swiping),
           rows: @Model.Rows,
           slidesPerRow: @Model.ItemsPerRow,
           arrows: false,
           dots: true,
           fade: false,
           adaptiveHeight: true
       });
   });
</script>

<div id="@Model.ContainerID" class="o-wrapper u-bg-color--very-light-grey u-padding-top-bottom-50">
   <div class="o-container">
   @if (Context.Kentico().PageBuilder().EditMode)
   {
       <div class="slider-inline-editors">
           @{
               Html.RenderPartial("InlineEditors/_PageTypeSelector", new PageTypeSelectorModel
               {
                   PropertyName = nameof(CarouselWidgetProperties.PageType),
                   Types = Model.AvailableTypes,
                   Value = Model.PageType
               });
               Html.RenderPartial("InlineEditors/_PathTextBoxEditor", new PathTextBoxEditorModel
               {
                   PropertyName = nameof(CarouselWidgetProperties.Path),
                   Value = Model.Path
               });
           }
       </div>
   }


   <div class="c-slider">
       @foreach (TreeNode item in Model.CarouselItems)
       {
           string title = item.GetStringValue("Title", ""),
           text = item.GetStringValue("Text", ""),
           ctaText = item.GetStringValue("CtaText", ""),
           ctaUrl = item.GetStringValue("CtaUrl", ""),
           image = item.GetStringValue("Image", "");
           <div class="c-banner-content">
               <div class="content">
                   <h3>@title</h3>
                   @text
                   @{
                       if (!String.IsNullOrWhiteSpace(ctaText) && !String.IsNullOrWhiteSpace(ctaUrl))
                       {
                           <a href="@ctaUrl" class='c-btn'>@ctaText</a>
                       }
                   }
               </div>
               <br />
               <div class="img">
                   <img src="@URLHelper.GetAbsoluteUrl(image)" alt="@title">
               </div>
           </div>
       }
       </div>
   </div>
</div>
The Final Product
You're now ready to test the widget - create a page type in Kentico that contains the required fields (Title, Text, Image, and optionally CtaText and CtaUrl). Add the carousel widget to a page, select your carousel item page type, its parent page, and save the widget.
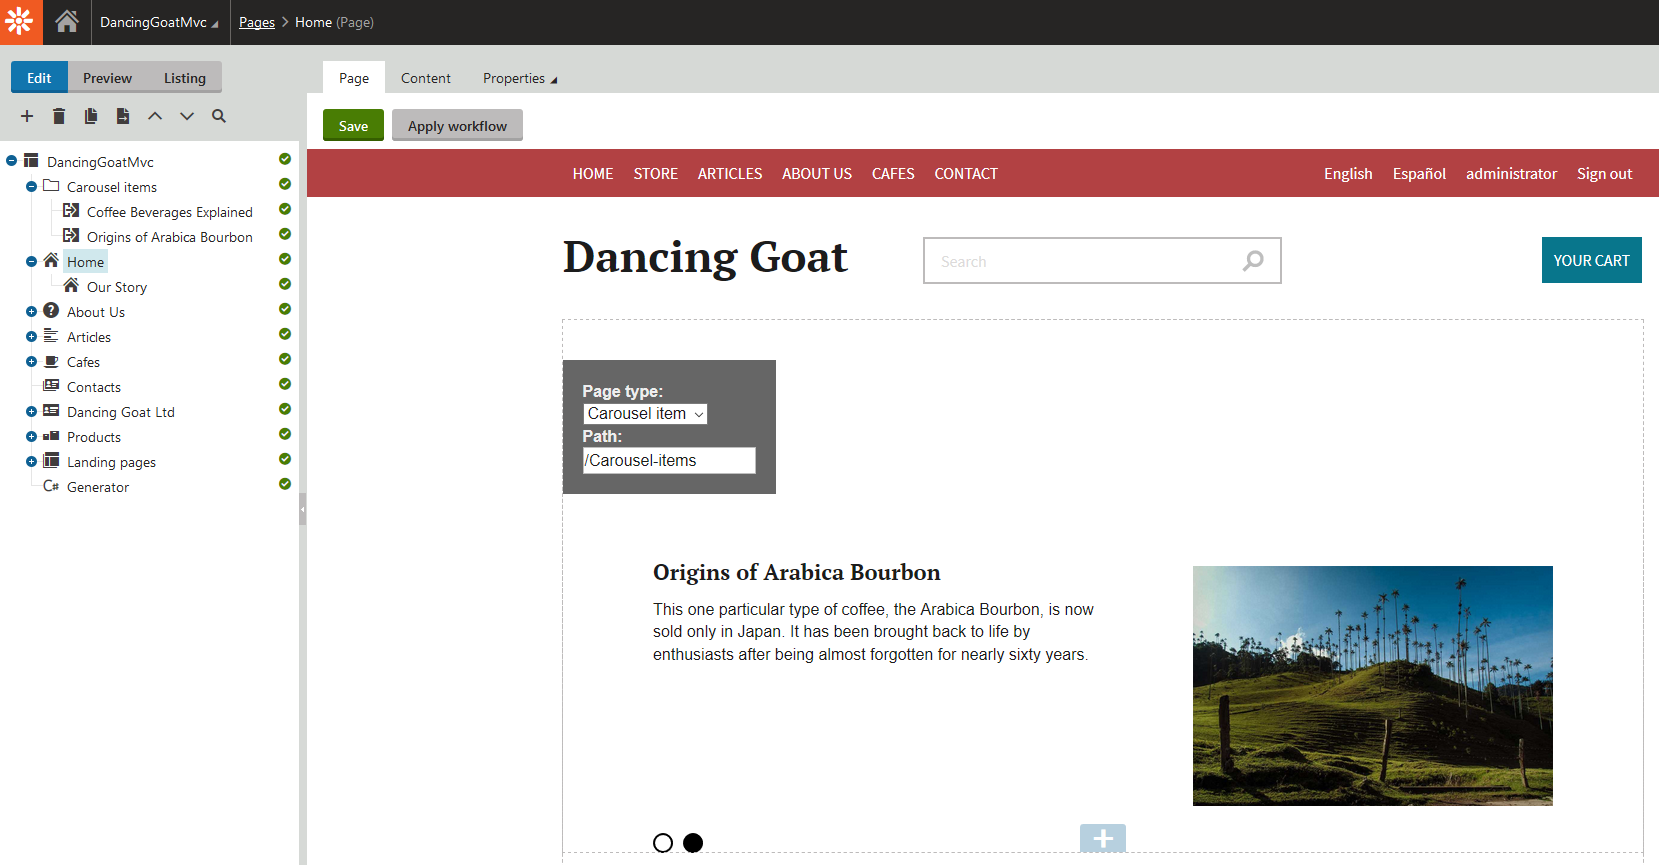
You should see your beautiful new carousel on the MVC live site!

Mission Accomplished
In this article, we've learned how to create an advanced MVC widget based on an existing Portal Engine widget. We highlighted Inline Property Editors - an optional widget component that can dramatically improve the quality-of-life for your content editors, allowing them to easily configure widgets and preview the changes in real-time.
The widget also showcased a custom JS library and CSS files, which were a breeze to include in the project! And because the development process requires only physical files and no database objects, it's easy to package it all up in an archive for portability, or you can include it in a source control system.
You can view and download the full source code for this widget on GitHub here: https://github.com/kentico-ericd/kentico-widgetmvc-image-carousel.