Build a Portal Engine widget in MVC
Have you ever used a Portal Engine web part that did almost the thing you wanted, but not quite? Do you remember the CSS list menu generating all kinds of CSS classes except the ones your front-end designer wants? Or all the sleepless nights trying to fine-tune Repeaters? Will MVC make this easier for you?
In this article, I want to show you a little comparison between the old and new ways of composing pages in Kentico. With MVC coming and Kentico telling you to start your new projects using that development model, I believe such comparison comes in handy. In the end, it's all about how long it takes you to build a site and how much effort you need to put into maintenance.
Use Case: Enhance Contact Page
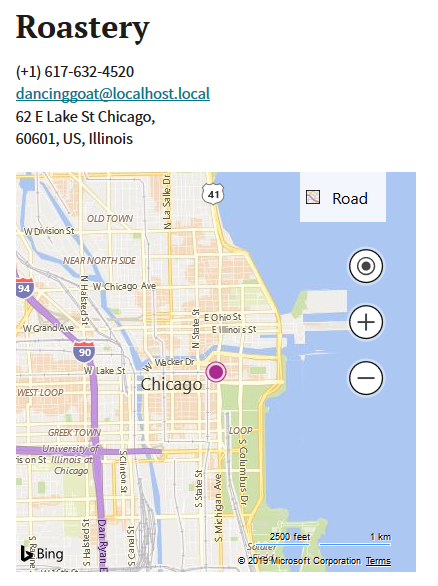
I want to add an interactive map to a page. I intentionally left out Dancing Goat from the title to make sure you won't skip this paragraph. But don't worry. I'll just use a single page from it - the Contact page. My goal is to add a section called Roastery with an address and a map. Something that editors do on a daily basis.
So how would I do it on Portal Engine? There are a few steps I'd need to do:
- Add a new widget zone to the used template
- Go to Page tab and locate the new widget zone
- Add the widget Bing Maps to the appropriate widget zone
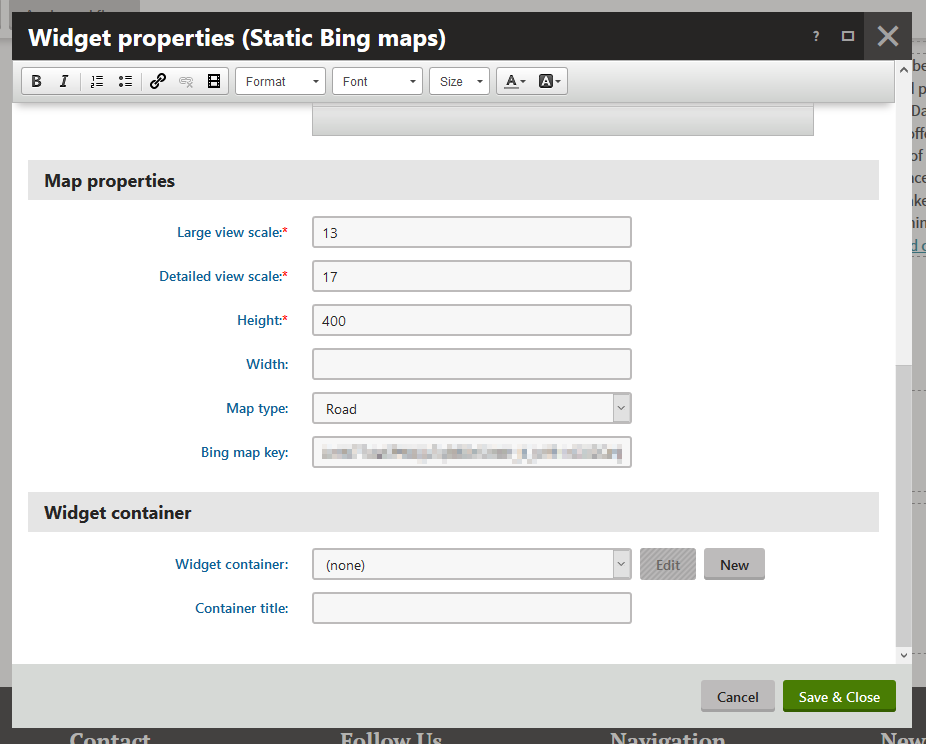
- Configure the widget (add values for latitude, longitude, zoom, and API key)
Overall it's not hard at all. But you know editors. First, it starts with a single pin in the map on the location of the roastery. Then, they would like to put a little note next to it. In a month, they ask you for a way to mark an area where the coffee plants are. This is all easy to do using Maps API, but is beyond the Bing Maps webpart's capabilities. All of a sudden, you are facing a tough decision. You can either clone and customize the web part or implement a new custom one. Both of these options add complexity to your project.
But we've all been there with PE and made our peace with it. How would we solve a similar task in MVC?

Building an MVC Widget
See all source code files on GitHub
First of all, we need to create the widget. It sounds like you are going to get your hands dirty, but you won't. It's in no way like creating web parts for Portal Engine. Let's take a look at what changed in widget definition.
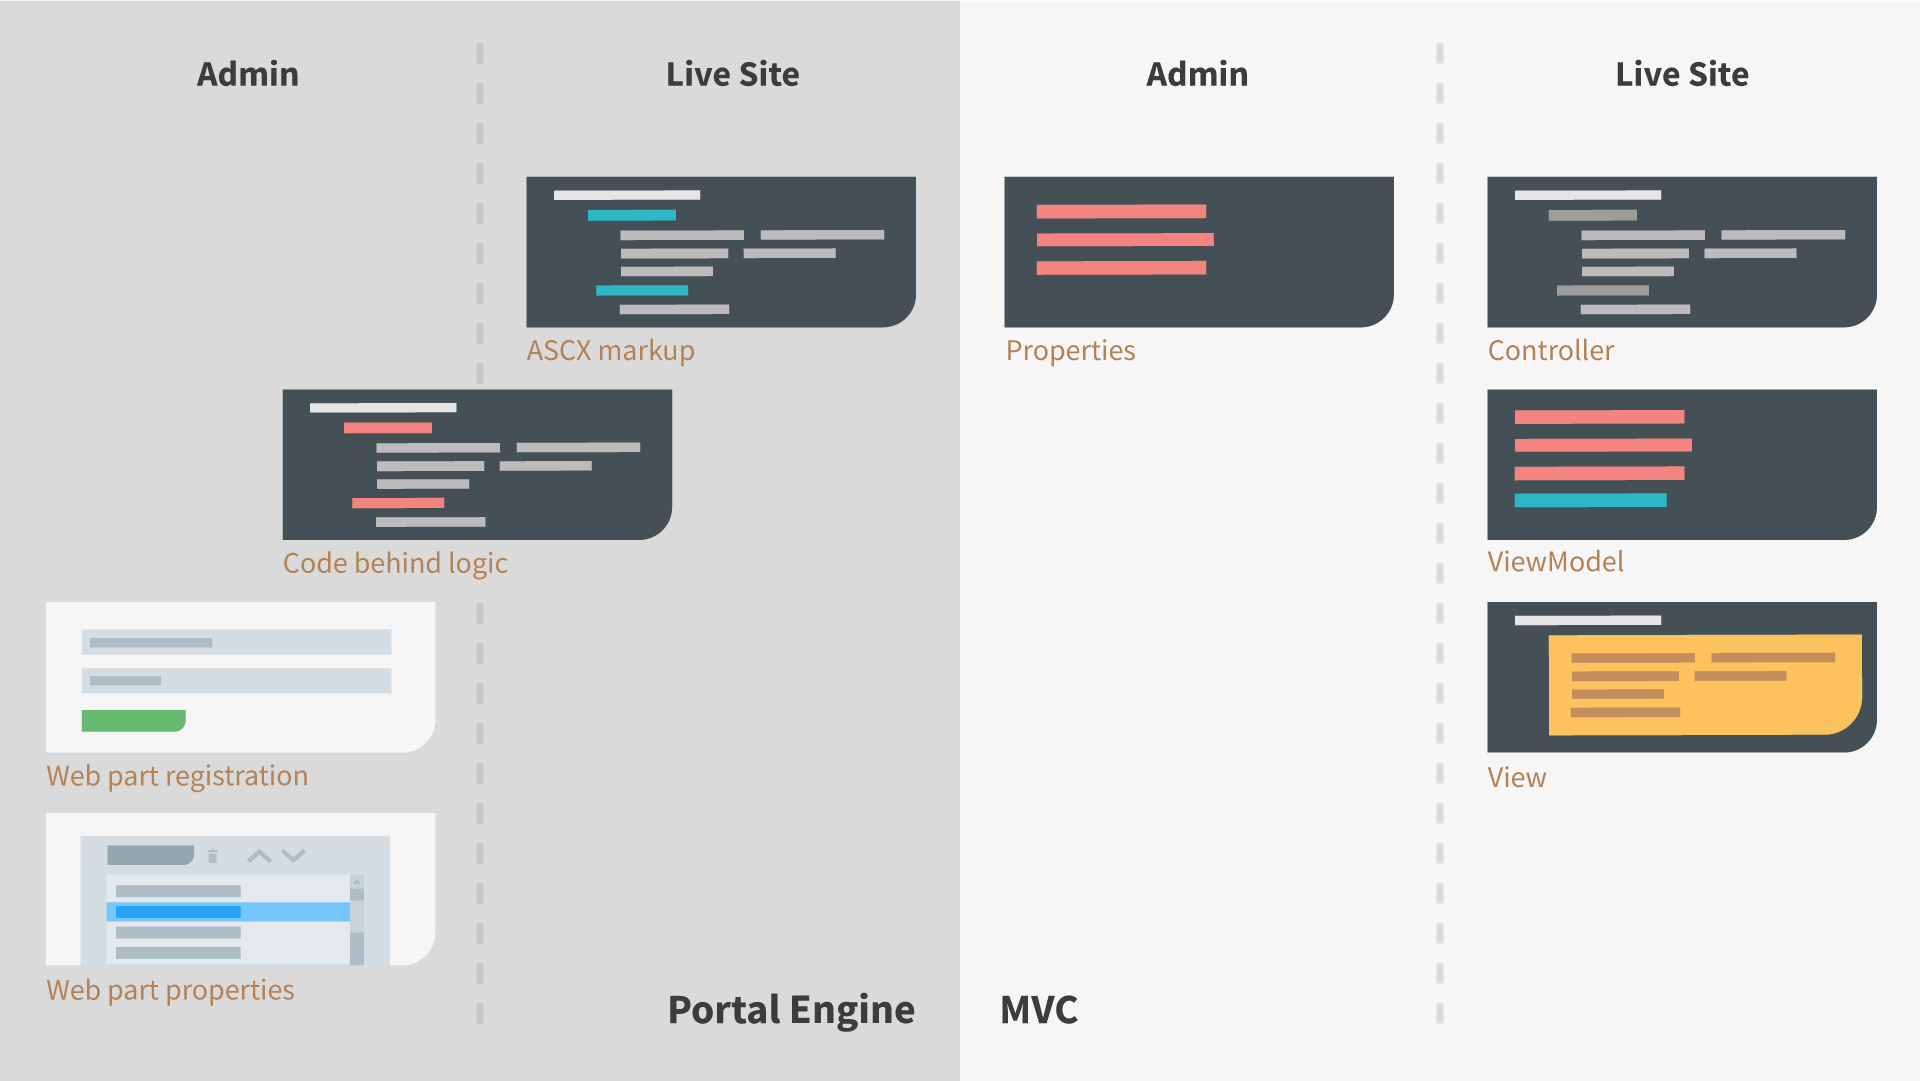
We all know the old way of creating web parts and widgets. First, you needed to create ASP.NET User Control, provide markup and implement its logic in code behind. After compilation, you had to go into the CMS to register the control and define its properties. Often, this was a slow process as the Application Pool was restarted with every implementation change.
In MVC, all this goes away. All code files are part of the front-end project so the recompilation is fast and the administration interface keeps running. It's also finally possible to properly separate concerns. How?
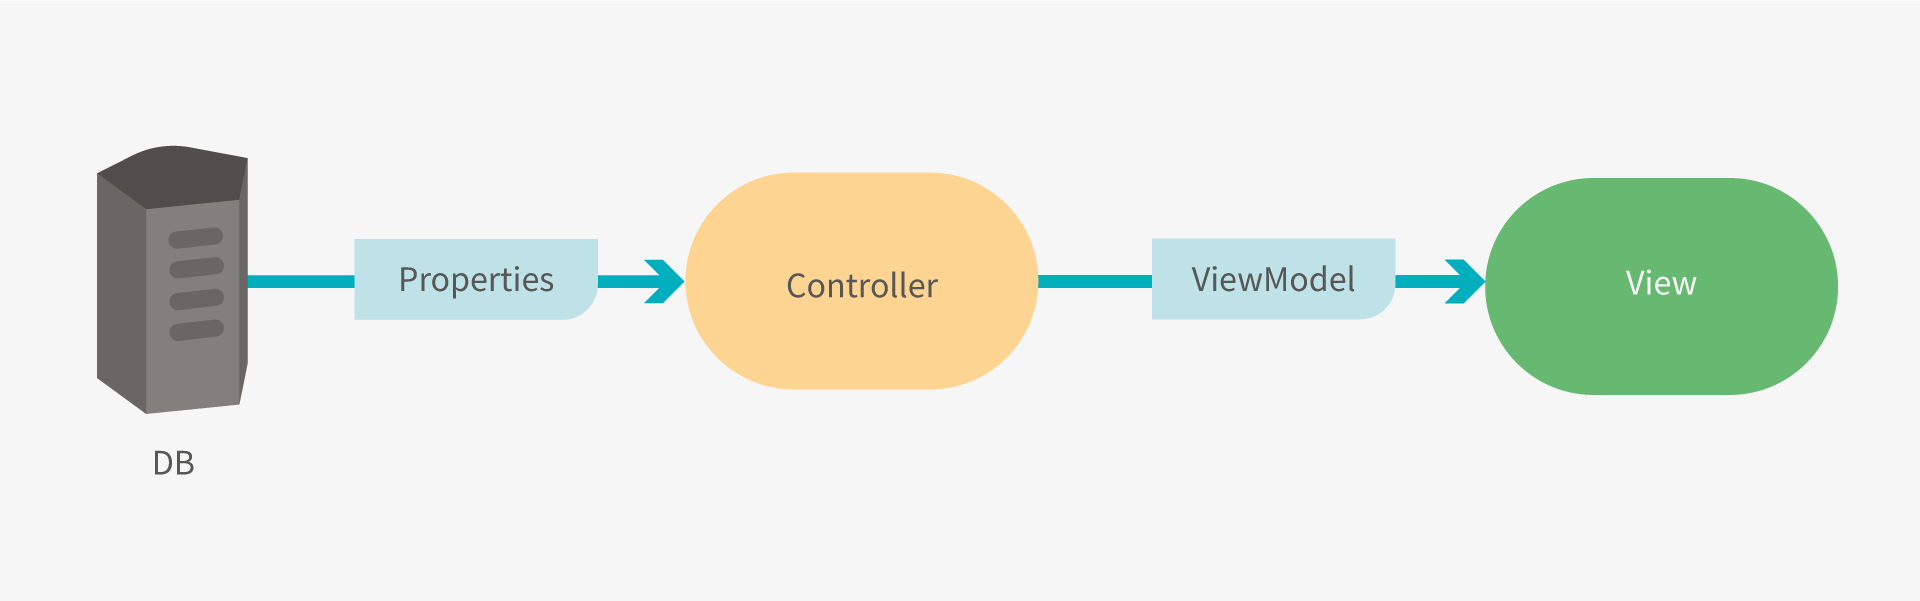
Properties are defined in a code file together with form control definitions. This makes much more sense than defining a list of properties later in the CMS. When you add a property for your widget in code, you already know which form control you want editors to use to set its value.
The logic of a widget is defined in a Controller that has access to all properties’ values and page data. Its job is to create a ViewModel object that contains all data needed by the markup (View).
Bing Maps MVC Widget
So, what would a simple Bing Maps MVC widget look like and would it be future-proof? Let's take a look.
First, we start with properties. They define what editors are capable of configuring. Here, it would be coordinates of the pin (that is also the center of the map) and initial zoom. If the pin locates an address in Chicago we would likely use a more detailed zoom than, for example, a plant in South America.
public class BingMapsWidgetProperties : IWidgetProperties
{
    [EditingComponent(TextInputComponent.IDENTIFIER, Label = "Latitude")]
    public string Latitude { get; set; }

    [EditingComponent(TextInputComponent.IDENTIFIER, Label = "Longitude")]
    public string Longitude { get; set; }

    [EditingComponent(IntInputComponent.IDENTIFIER, Label = "Initial zoom")]
    public int ZoomInitial { get; set; } = 10;
}
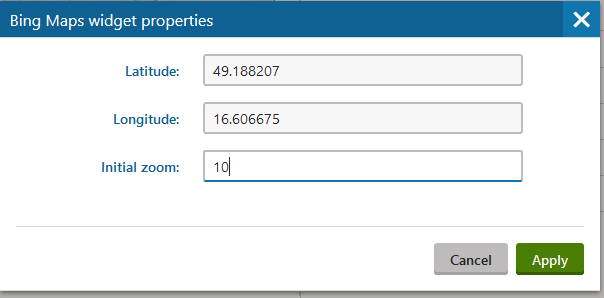
Note the EditingComponent attributes. For all fields, editors will see input boxes, but the `ZoomInitial` will only allow them to input numbers. This particular property also features a default value. This is how the configuration dialog will look like:
Let's create yet another very similar code file - ViewModel. Both of these files should be stored in a folder /Models/Widgets/{name of your widget}.
public class BingMapsWidgetViewModel
{
    public string Latitude { get; set; }
    public string Longitude { get; set; }
    public int ZoomInitial { get; set; }

    public string ApiKey { get; set; }
}
It looks like Properties code file without attributes, right? The difference between Properties and ViewModel is that Properties are a data source for widget logic (Controller) while ViewModel is a data source for widget markup (View). The reason we need two separate files is that ViewModel usually contains extra data necessary for the livesite presentation (such as API key) while Properties only define configurable fields for editors.
As you might have already guessed, in the case of the Bing Maps widget the Controller has only a single task - get the Bing Maps API key from configuration. It's the only extra property in the ViewModel. The rest of the data is simply copied from Properties - values provided by editors that are from the database.
public class BingMapsWidgetController : WidgetController<BingMapsWidgetProperties>
{
    public ActionResult Index()
    {
        var properties = GetProperties();
        var viewModel = new BingMapsWidgetViewModel
        {
            Latitude = properties.Latitude,
            Longitude = properties.Longitude,
            ZoomInitial = properties.ZoomInitial
        };
        viewModel.ApiKey = ConfigurationManager.AppSettings["BingMapsApiKey"];

        return PartialView("Widgets/BingMapsWidget/_BingMapsWidget", viewModel);
    }
}
The controller should be stored within `/Controllers/Widgets/` and registered properly with a `RegisterWidget` attribute:
[assembly: RegisterWidget("{your company}.BingMapsWidget", typeof(BingMapsWidgetController), "Bing Maps widget", Description = "Shows Bing map", IconClass = "icon-brand-bing")]
The last piece of the puzzle is the View. Actually, it's Partial View as it renders only a single component of a page. I added the markup to /Views/Widgets/BingMapsWidget/_BingMapsWidget.cshtml which is the same path as the previously shown controller references.
The view is the best part. Look how straightforward the markup is:
@model BingMapsWidgetViewModel

<div id="bingMap" style="width: 100%; height: 250px;"></div>
<script type="text/javascript">
    function loadMap() {
        var map = new Microsoft.Maps.Map(document.getElementById("bingMap"), {
            center: new Microsoft.Maps.Location(@Model.Latitude, @Model.Longitude),
            zoom: @Model.ZoomInitial
        });
        var pin = new Microsoft.Maps.Pushpin(map.getCenter(), null);
        map.entities.push(pin);
    }
</script>
<script type='text/javascript' src='https://www.bing.com/api/maps/mapcontrol?key=@Model.ApiKey&callback=loadMap' async defer></script>
No messy ASP.NET controls, but simple and plain HTML code. By defining the ViewModel type at the top of the file it's possible to access all properties of the ViewModel using Razor syntax, that is using @Model property.
Maintaining MVC Widgets
Let's do a quick flashback to the initial use-case and always more demanding editors. How would we allow them to configure a selected area on the map? The Maps API requires a few points to define the area, so we would need editors to input those. To add new fields to widget configuration we would have to adjust the Properties file. We would also need to reflect those changes in the ViewModel simply because we would need those values in the View to pass them to the JavaScript code of the map.
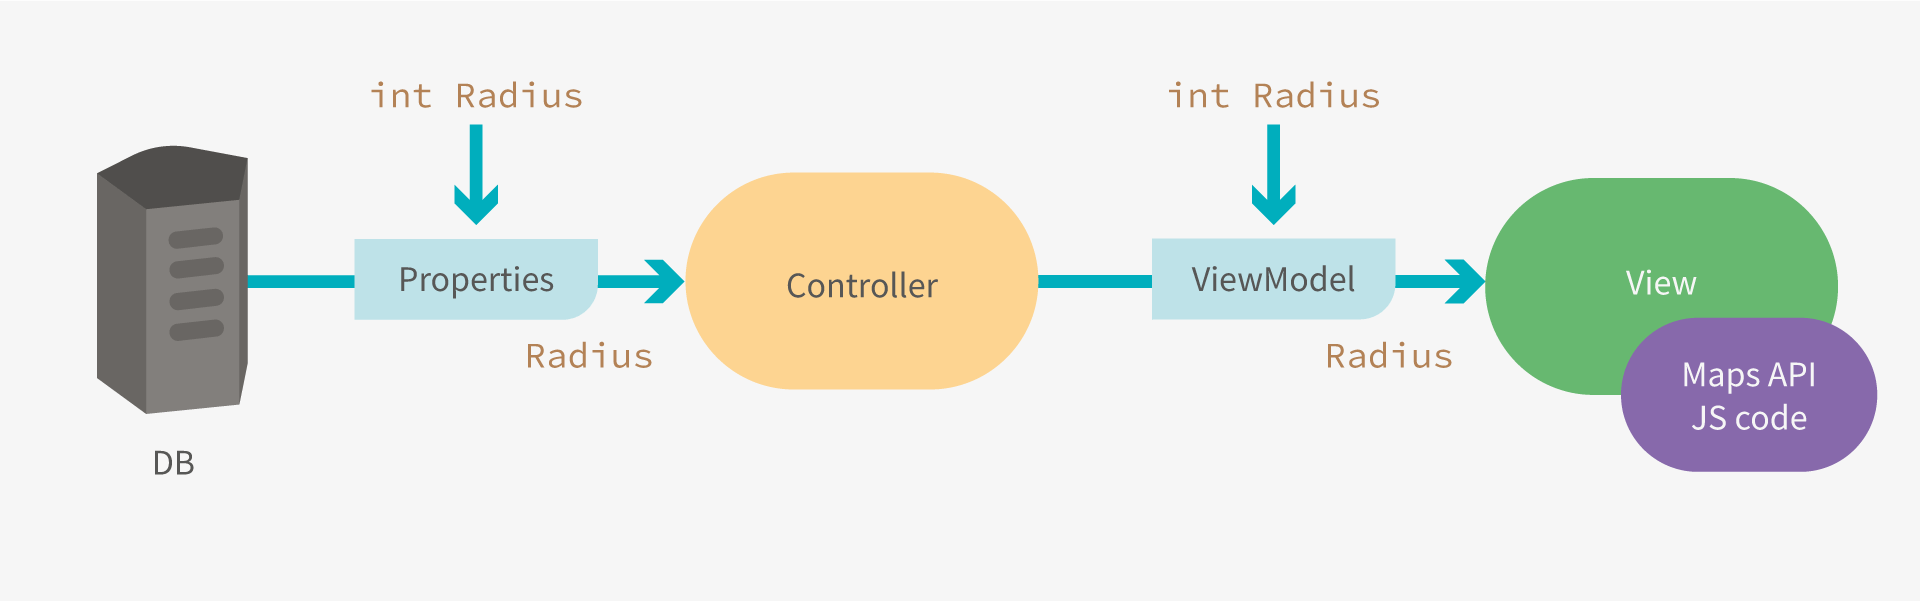
Let's add a radius value to define a distance from a point to form an area. The Controller would get the Radius value from Properties and copy it to the ViewModel. Suddenly we have everything we need in the markup and are able to adjust the Bing Maps API code easily.
Building a Page Using MVC Widgets
So how do we place that widget to a page and make editors happy again (that is, enable drag&drop)? In MVC this functionality is provided by Page Builder and Widgets. Our widget is already created so let's focus on the same steps as before with PE, those were:
- Add a new widget zone to the used template
- Go to Page tab and locate the new widget zone
- Add widget Bing Maps to the appropriate widget zone
- Configure the widget (add values for latitude, longitude, zoom, and API key)
Adding a New Widget Zone
Just like there are templates in PE, there are views in MVC. It's the same markup, but stored within the web project instead of database (yay, easy CI!). The markup of Contact page is within `Views/Contacts/Index.cshtml` view.
<!-- added widget zone -->
<div style="margin-right: 25px">
    @Html.Kentico().EditableArea("Roastery")
</div>
Roastery is just a unique identifier, much like web part zone ID on Portal Engine template.
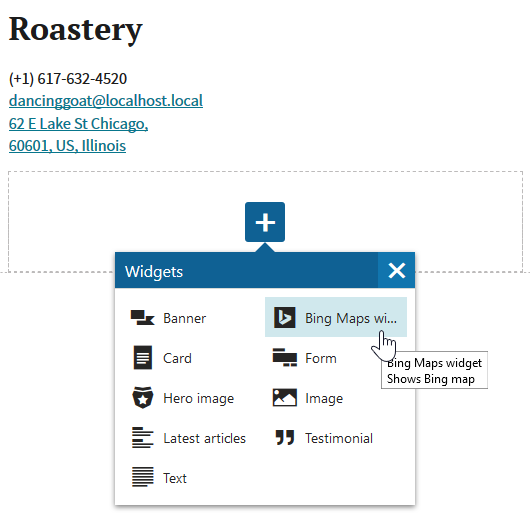
Adding a Widget to a Zone
With PE you had to filter the widget you wanted to insert from a list of all widgets. In MVC you can limit the selection of widgets that are usable for each zone, so the list gets much clearer for editors.
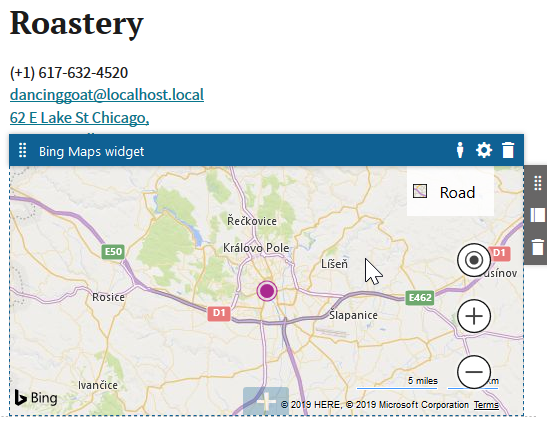
Configuring the Widget
The configuration dialog displays only the properties you defined in the Properties code file. Therefore, the dialog is much easier to navigate. As a bonus you also see a preview of the widget after saving the configuration changes.
MVC Is the Future
In this article, I showed you how to create a simple widget in MVC. There are other features like JS and CSS bundling that I did not need to use in my example. However, they are nicely described in our documentation. I also demonstrated how the editor user experience of selecting, adding, and configuring widgets has been dramatically improved compared to Portal Engine.
The MVC development model comes with many benefits starting from the fact it is the recommended future-proof way to implement web applications by Microsoft. It also helps with onboarding new developers - the clear separation of concerns and short single purpose files help a lot to understand the code and keep it clean. They no longer need to spend hours trying to reverse-engineer pages in the CMS and then figuring out how complex web parts or widgets work. That does not only save time but keeps everyone on the project motivated.
See all source code files on GitHub