Advanced document library
In this article, we will have a closer look at how to extend the built-in Document library web part to be able to use it with a custom navigation web part and we will also add some additional columns to give the user a better overview of the displayed document.
The current state
First of all, we have to look at the current structure of the Document library web part. You’ll see that the web part itself barely contains any functionality at all. We can see that the web part (CMSWebParts\DocumentLibrary\DocumentLibrary.ascx) uses a DocumentLibrary user control:
<cms:DocumentLibrary ID="libraryElem" runat="server" />
This user control is implemented as a part of a separate module in Kentico, so it’s placed in the CMSModules section (CMSModules\DocumentLibrary\Controls\DocumentLibrary.ascx). This implementation is and isn’t beneficial for us. It’s great that we have access to the code, as it makes modification or replication much easier, but
not so good that the implementation is a module consisting of multiple user controls. This means that we will have to associate multiple files with our Advanced document library. We would like to implement our solution as a standalone web part. This approach will allow us to move the code between instances quite easily with the Import/Export module. Fortunately, Kentico comes with a nice feature that allows you to associate any files with a web part by simply placing them into a folder called <web part code name>_files. All the files located in this folder will automatically be included in the export package.
Let’s say we have these requirements for our Advanced document library setup:
-
Create a navigation to navigate through the content tree that includes folders and nested folders similar to those in our tree view web part
-
Add additional columns to the default view of the document library (modified date, owner, check-out info, etc.)
-
Add the option to hide columns from the default view
-
Add a simple rating option to the document
-
Add the ability to control / require metadata (properties/attributes) for documents during the upload of the document
After a thorough examination of the requirements and the current web part, we’ve come to the following conclusions:
-
The additional navigation should be a separate web part so the designer is able to place it wherever he needs it to be placed, separate from the document library web part.
-
As a starting point (or for inspiration) for the navigation web part, we might use the tree view web part.
-
The current implementation of the document library web part doesn’t allow us to easily specify the starting path dynamically (e.g. via macros), which is required to populate the library on the fly based on the path selection in the navigation. This means the library needs to be cloned and extended. As we will find out later, this control needs to be extended for various other reasons (e.g. for requiring metadata during upload).
-
The document library is implemented with a UniGrid and static XML definition (CMSModules\DocumentLibrary\Controls\DocumentLibrary.xml), which doesn’t allow us to add or remove columns for the UniGrid on the fly, as per requirements.
-
The Kentico rating web part always rates the current document, so we cannot use it in the document library since its not able to rate a document based on a parameter (like a node alias path or any other identifier). This means a custom control is required.
-
The current implementation of the document library uses a direct uploader to add new documents. This approach doesn’t allow us to specify required fields.
Results of investigation
So the results of our investigation are as follow:
-
We need to copy the Document Library control and modify it to achieve the dynamically modifiable columns and dynamically assigned path, and to add additional columns to the default view, including a custom rating control.
-
We need to create a custom rating control which will be able to rate a document based on its ID or other identifier.
-
We need to create a custom navigation.
Implementation
Firstly, I
cloned the Document library web part and assigned it the name Document library
navigation sensitive. Then I created a
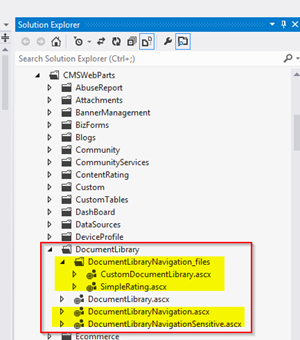
new web part called Document library navigation for our navigation and created a new folder called DocumentLibraryNavigation_files. This folder will contain additional files needed for this implementation, specifically the Simple rating control and our custom Document library control copied from the CMSModules folder. Additionally I created the control for our simple rating control. In the end, my solution explorer in Visual Studio looked something like this:
Summary for the files:

DocumentLibraryNavigation – The new navigation web part.
DocumentLibraryNavigation_files – Folder which will be included in the export when the Document library navigation web part is exported.
CustomDocumentLibrary – The copied file from the CMSModules folder containing the actual functionality.
SimpleRating – A simple custom rating user control.
DocumentLibraryNavigationSensitive – Our new (cloned) Document library web part.
First I decided to implement the Document Library Navigation web part and thus make the cloned Document Library Navigation Sensitive web part dynamically update itself based on the supplied path or ID.
Before implementing the navigation, I took a look at the Tree view web part (\CMSWebParts\Navigation\cmstreeview.ascx.cs). The web part itself uses the .NET TreeView control, so I’ve also used it in this implementation.
<asp:TreeView ID="treeView" runat="server" />
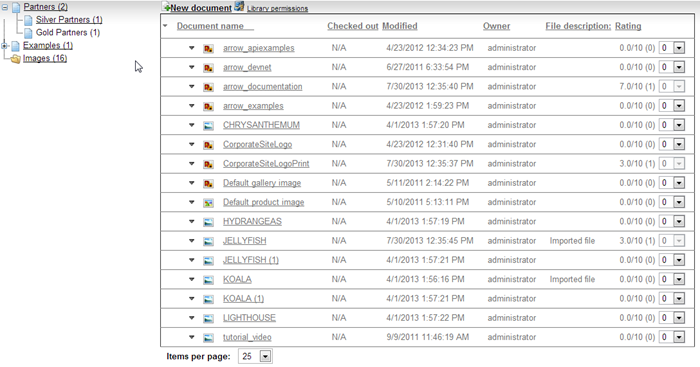
To set up the treeView, I’ve used the CMSMenuProperties object, which allows you to retrieve a dataset (GetDataSource() method) that will also take into account all Menu item-specific settings (e.g. the Hide in navigation property). I left most of the Tree view web part properties available for the editor and implemented them in the code. Additionally, for easier navigation, I added a custom column to the document dataset to indicate the number of child nodes that can be displayed in the Document library. This column is populated within the SetCMSFileChildCount method. After all the data is collected, the AddNodes(…) method adds all required nodes to the treeView control recursively. If you specify that you only want to display nodes with displayable child nodes, then this method will skip unnecessary nodes (based on my custom column populated in the SetCMSFileChildCount method) and show only relevant ones. When you select a node, the web part will simply change the current URL and add a query string parameter to it, indicating which document should be used as the starting path for the Document library web part. The final navigation web part looks like this (the nodes displayed depend on your settings and content):

Modifying the cloned Document library web part (CMSWebParts\DocumentLibrary\DocumentLibraryNavigationSensitive.ascx) to pass additional properties to the copied Document library control (from CMSModules) and to pick-up the selectedID (which is the NodeID of the selected document in the navigation) was one of the easier tasks. An alternative approach would be to use our
component events to update the Document library without changing the URL.
Then I had to modify the Document library control (CMSWebParts\DocumentLibrary\DocumentLibraryNavigation_files\CustomDocumentLibrary) itself to be able to dynamically change the displayed columns, add the rating option and collect metadata during file upload. There are some great sources to learn more about the UniGrid in Kentico (
knowledge base article,
documentation) so these were a good starting point for me to achieve the described functionality. At first I had to remove the XML definition of the UniGrid columns and create them dynamically in the code so I would be able to add or remove them as per the settings. This is done in the AddColumns() method where, before each column is added, the code checks if the column is required to be added (I am checking the settings, which are passed down from the Document library web part).
Additionally, to modify how the data is displayed in the columns, I needed to modify the gridDocuments_OnExternalDataBound(…) event. For example, I need to trim down the File description text so it doesn’t break the formatting of the table and I need to add my custom rating control to be displayed instead of the DocumentRatingValue of the document itself. (This processing needs to be skipped during export if the sender == null for correct results in the exported data.) The nuances of using the OnExternalDataBound event are described in the already-mentioned documentation or knowledge base article.
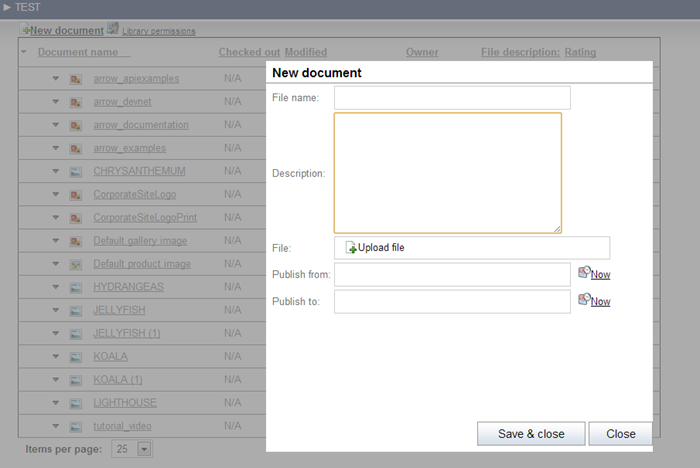
The next task was to allow the editor to specify required metadata fields during file upload. Unfortunately, this isn’t possible with the direct uploader control, which is used by default, because it simply displays an upload dialog without a middle step to collect the required data. However, I was able to replace the default uploader (a setting allows you revert back to the default functionality) with a standard CMSForm control and to place it into a ModalPopupDialog control (CustomDocumentLibrary control):
<cms:ModalPopupDialog runat="server" ID="ModalPopupDialog1" BackgroundCssClass="ModalBackground"
CssClass="ModalPopupDialog" Width="100%" ><asp:Panel ID="Panel1" runat="server" Visible="true">
<div class="DialogPageBody" >
<div style="height: auto; min-height: 0px;">
<div class="PageHeader">
<cms:PageTitle ID="PageTitle1" runat="server" EnableViewState="false" GenerateFullWidth="false"
SetWindowTitle="false" />
</div>
</div>
<div class="DialogPageContent DialogScrollableContent" style="height: 430px; width:500px;">
<div class="PageBody">
<cms:CMSForm runat="server" ID="formElem" Visible="true" HtmlAreaToolbarLocation="Out:CKToolbar"
ShowOkButton="false" IsLiveSite="false" ShortID="f" />
</div>
</div>
<div class="PageFooterLine">
<div class="Buttons FloatRight">
<cms:LocalizedButton ID="btnSave" runat="server" CssClass="SubmitButton LongButton"
ResourceString="documentlibrary.saveandclose" OnClick="btnSave_Click" />
<cms:LocalizedButton ID="LocalizedButton2" runat="server" CssClass="SubmitButton" CausesValidation="false"
ResourceString="general.close" OnClick="btnClose_Click" /></div>
<div class="ClearBoth">
</div>
</div>
</div>
</asp:Panel>
</cms:ModalPopupDialog>
Additionally, the DocumentManager object needed to be initialized before the form was loaded, which was done in the OnInit(…) event:
// Set up the DocumentManager for uploading a CMS.File document
DocumentManager.ParentNode = ParentNode;
DocumentManager.NewNodeClassName = CMS_FILE;
DocumentManager.NewNodeClassID = DataClass.ClassID;
DocumentManager.Mode = FormModeEnum.Insert;
DocumentManager.ParentNodeID = ParentNodeID;
DocumentManager.NewNodeCultureCode = CurrentDocument.DocumentCulture.ToString();
This way, the system displays a standard form to upload the document (a node of the type CMS.File determined by the DocumentManager.NewNodeClassName property). This allows the editor to specify required fields, which need to be filled out during upload.
The last step was to implement the Simple rating control. I again checked out our default implementation of our rating web part, which gave me a basic idea of how to use our rating API. To simplify things, the base class used for this control is the FormEngineUserControl class. This approach was used because we need to pass a value to this control from the UniGrid in the OnExternalDataBound event so that it’s able to display it. (Additionally you can use this control as a form control in Kentico). In this case we want to display the current rating of the document. The FormEngineUserControl class is used in the Kentico form engine for
form controls (as an input method for fields) and, as any form control, it is able to display and update values in the database. As mentioned, we will use this base class mainly because we are able to pass values down to it, which we cannot do with the System.Web.UI.UserControl class. (As an alternative we could use, for example, the .NET TextBox class which has also a Value property allowing you to pass it from the parent control).
That’s all, now let’s take a look at the results. If you are interested in some implementation details, please compare the default implementation with the modified files so you can see exactly what code was added or changed.
Result
The result of our efforts is a much more flexible document library which covers all the requirements mentioned at the beginning of this article.

The upload form can be modified to require a file description, or to display additional required fields such as document tags.

You can download the export package including the navigation and the advanced document library from
here.