|
|

Managing contacts |

|

|

|

|
|
Managing contacts |
|
|

|
|
|
|
Managing contacts |
|
|
|
|
|
Managing contacts |
|
|
|
|
|
|
||
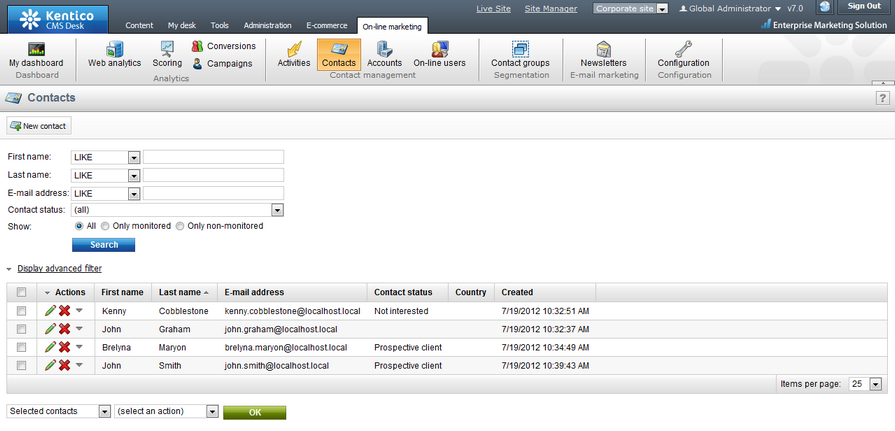
In this topic you will learn how to manage contacts. Contacts can be managed in:
•CMS Desk -> On-line marketing -> Contacts
•Site Manager -> Tools -> Contact management -> Contacts
The user interface in CMS Desk allows management of contacts that belong to the currently edited website. The one in Site Manager allows management of contacts belonging to all websites running in the system. If global contacts are enabled, they can be managed in both sections.
On the initial page of the user interface, you can see a list of contacts available on the current site. You may need to display only contacts matching certain search criteria (e.g. first name, last name, e-mail etc.). To do so, choose either the simplified or advanced filter, enter the required values and click Search.
Individual contacts can be Edited (![]() ) or Deleted (
) or Deleted (![]() ) and you can also perform
) and you can also perform ![]() Other actions such as
Other actions such as ![]() Export,
Export, ![]() Backup or
Backup or ![]() Restore. New contacts can be added by clicking the
Restore. New contacts can be added by clicking the ![]() New contact button.
New contact button.
Using the pair of drop‑down lists below the list, you can perform certain contact management tasks with multiple contacts at once, specifically adding contacts to a contact group, deleting and merging contacts or changing their status. To do this, choose either Selected contacts or All contacts from the first drop-down list, the required action from the second one and click OK.
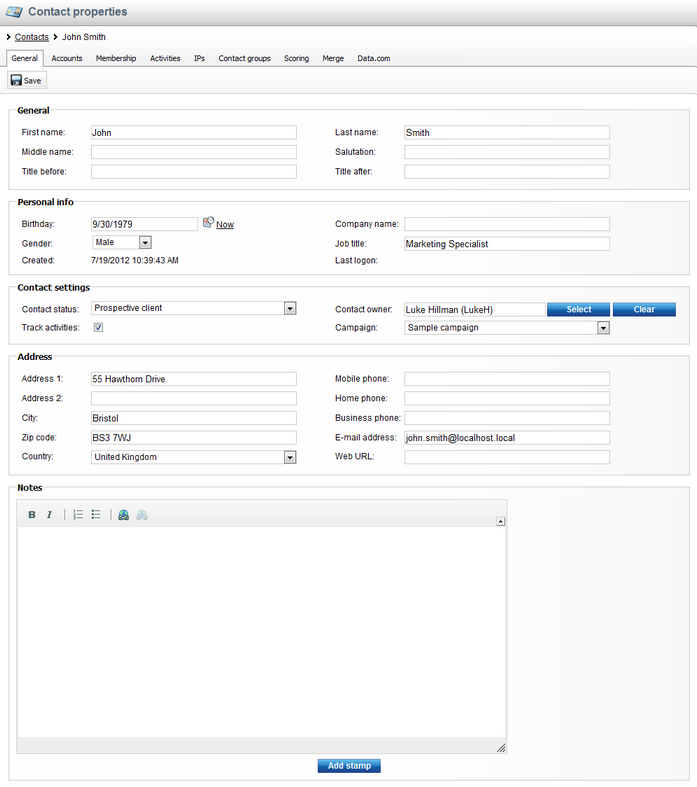
If Editing (![]() ) a contact, the following tabs are available:
) a contact, the following tabs are available:
On this tab you can view and edit the basic attributes of the selected contact. Once you have modified the values as required, click ![]() Save to save the contact.
Save to save the contact.
General
•First name - the first name of the contact.
•Middle name - the middle name of the contact.
•Title before - allows to define a contact title used before the name.
•Last name - the last name of the contact.
•Salutation - allows to define a contact salutation.
•Title after - allows to define a contact title used after the name.
Personal info
•Birthday - the birthday of the contact. Enter the value manually, use the Calendar (![]() ) or use the Now link.
) or use the Now link.
•Gender - the gender of the contact.
•Job title - the job title of the contact.
•Created - indicates when the contact was created.
Contact settings
•Contact status - allows to select a contact status. If defined, the contact can be labeled with a contact status, e.g. a V.I.P. contact.
•Track activities - if enabled, allows to track contact activities.
•Contact owner - allows to define a contact owner, i.e. a user responsible for management of the given contact.
•Campaign - allows to choose a Campaign to be associated with the current contact.
Address
•Address 1 - the first line of the contact's address.
•Address 2 - the second line of the contact's address.
•City - allows to define the city where the contact has their address.
•Zip code - allows to define the zip code of the area where the contact has their address.
•Country - allows to define the country where the contact has their address.
•Mobile phone - the mobile phone number of the contact.
•Home phone - the home phone number of the contact.
•Business phone - the business phone number of the contact.
•E-mail - the e-mail address of the contact.
•Web URL - the web URL of the contact.
Notes - you can leave contact notes either as plain text or as text with basic formatting, and you can also add your stamp by clicking the Add stamp button.
Please note that if you are viewing properties of a merged contact, you can click on ![]() Split from parent to split the current contact from the parent one.
Split from parent to split the current contact from the parent one.
|
Contact data values
You do not need to enter the values of the attributes on the General tab manually for all contacts.
The system will automatically try to collect and update the data of each contact based on the information provided by the corresponding user on the website. Please see the Mapping fields to contact attributes topic for more information. |
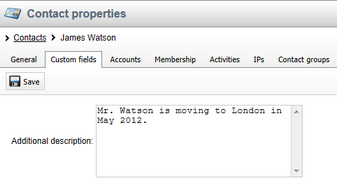
On this tab you can enter values into the custom fields defined for contacts in Site manager -> Development -> System tables -> Edit (![]() ) Contact management - Contact on the Fields tab. When you have entered the values, click
) Contact management - Contact on the Fields tab. When you have entered the values, click ![]() Save to confirm the changes.
Save to confirm the changes.
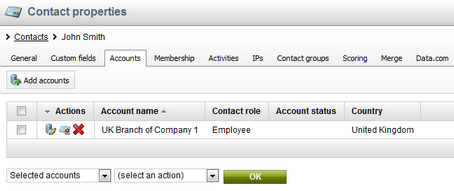
On this tab you can see a list of accounts assigned to the current contact and you can also create accounts by clicking on ![]() New account. If you decide to do so, the Select account dialog opens, enabling you to assign selected accounts to the current contact; optionally, a contact role may be selected (if defined). Please note that if you edit a global contact, only global accounts are offered. Similarly, if you edit a site contact, only current site accounts are offered.
New account. If you decide to do so, the Select account dialog opens, enabling you to assign selected accounts to the current contact; optionally, a contact role may be selected (if defined). Please note that if you edit a global contact, only global accounts are offered. Similarly, if you edit a site contact, only current site accounts are offered.
You can View account details (![]() ) of individual accounts and you can also Select contact role (
) of individual accounts and you can also Select contact role (![]() ) or Remove (
) or Remove (![]() ) an account. The displayed list can be sorted by account name, contact role, account status and country.
) an account. The displayed list can be sorted by account name, contact role, account status and country.
Using the pair of drop‑down lists below the list, you can perform certain management tasks with multiple accounts at once, specifically Selecting contact role or Removing accounts. To do this, choose either Selected accounts or All accounts from the first drop-down list, the required action from the second one and click OK.
On this tab you can manage the current contact's memberships, i.e. users, e-commerce customers and newsletter subscribers that should be associated with the currently edited contact.
The following tabs are available under the Membership tab:
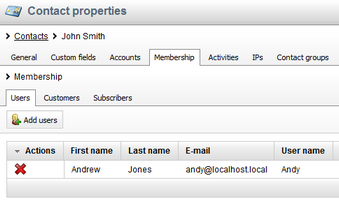
•Users - here you can see a list of users under the current contact and you can also manually ![]() Add users. Please note that the usual scenario is that a contact acts as one registered user. However, more users can be assigned to a contact as well.
Add users. Please note that the usual scenario is that a contact acts as one registered user. However, more users can be assigned to a contact as well.
•Customers - here you can see a list of customers under the current contact and you can also manually ![]() Add customers.
Add customers.
•Subscribers - here you can see a list of subscribers under the current contact and you can also manually ![]() Add subscribers.
Add subscribers.
On each tab, the listed items can be Deleted (![]() ) and the list can be sorted e.g. by name and e-mail.
) and the list can be sorted e.g. by name and e-mail.
You may need to display only items matching certain search criteria (e.g. first name, last name, e-mail) on the respective tabs. To do so, enter the required values and click Search.
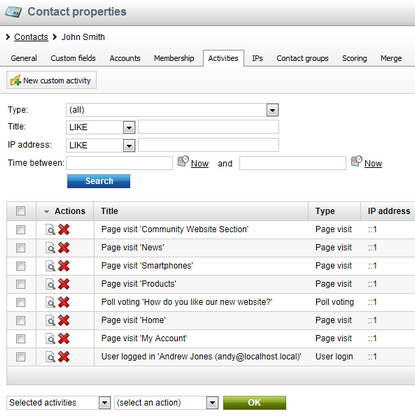
On this tab you can see a list of the current contact's activities, e.g. user registration, blog post subscription, poll voting etc. However, activities are logged only if the Enable on-line marketing setting is enabled in Site Manager -> Settings -> On-line marketing and the Log activities setting is enabled in Site Manager -> Settings -> On-line marketing -> Contact management -> Activities.
Individual activities can be Viewed (![]() ) or Deleted (
) or Deleted (![]() ). The displayed list can be sorted by title, type, IP address and activity time.
). The displayed list can be sorted by title, type, IP address and activity time.
You may need to display only activities matching certain search criteria ,e.g., an activity type, title etc. To do so, fill in the fields as required and click Search.
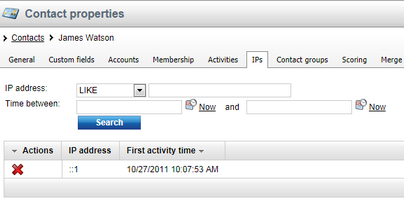
On this tab you can see a list of IP addresses from which the current contact accessed the website. The listed items can be Deleted (![]() ) and you can also Export (
) and you can also Export (![]() ->
-> ![]() ) the items. The displayed list can be sorted by IP address and activity time.
) the items. The displayed list can be sorted by IP address and activity time.
You may need to display only IP addresses matching certain search criteria (IP address, time period). To do so, fill in the respective fields as required and click Search.
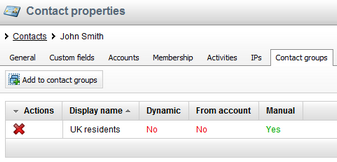
On this tab you can see a list of contacts groups to which the current contact is assigned. You can also add the contact to other contact groups by clicking ![]() Add to contact groups. Individual items can be Removed (
Add to contact groups. Individual items can be Removed (![]() ) from the list, which results in the current contact being removed from the respective contact group.
) from the list, which results in the current contact being removed from the respective contact group.
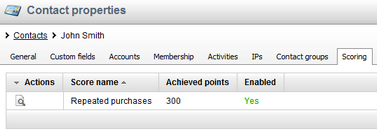
On this tab you can see a list of scores in which the current contact achieved some points, together with the actual score point values. By clicking the View (![]() ) icon, the respective score's management interface is opened in a pop‑up window. The interface is identical to the one displayed when editing (
) icon, the respective score's management interface is opened in a pop‑up window. The interface is identical to the one displayed when editing (![]() ) a score in CMS Desk -> On-line marketing -> Scoring.
) a score in CMS Desk -> On-line marketing -> Scoring.
On this tab you can merge other contacts with the currently edited contact so that only the currently edited contact remains. This is useful in cases when you come to the conclusion that multiple contacts actually represent a single real‑world person. On the tab, you can also view a list of contact that have been merged with it and split them back into separate contacts if needed. Detailed information on merging in Kentico CMS can be found in the Merging contacts and accounts chapter.
This tab allows you to compare the currently edited contact with matching contacts in the Data.com database and search for additional information. Data.com integration must be enabled and configured in order for this feature to be available. Refer to the Integration of 3rd party modules -> Data.com chapter to learn more.
