Module development – Versioning & Recycle bin
Working with complex objects within your modules introduces a higher chance of unintentionally losing data, or changing it to values you don’t want. Read this article to learn how to set up versioning and recycle bin support for your data, which allows your users to easily recover data lost as a result of mistakes.
Hi there,
Today, I would like to show you how to easily leverage the object versioning features that come with Kentico. If you haven’t read the previous article about module development, please start at least with the basics in Module development – Introduction, and Module development – Parent / Child relationships to learn about building tabbed UIs.
Versioning engine
Both versioning and the recycle bin are built on the same engine, which performs similar operations as staging or import/export. A version of an object is basically all the object data serialized to XML in the database table CMS_ObjectVersionHistory, from which it can be restored or rolled back.
The system requirements for proper support of this engine are the same as for other general features. You simply need to maintain consistency of data and related metadata by correctly configuring your type info. To be more specific, all foreign keys that are represented by IDs pointing to other objects must be properly configured within the class type info. See Module development – foreign keys.
Note that at the time of writing of this article, the versioning and recycle bin support for objects is purely meant for recovering previous data (either deleted or overwritten), and also as an audit trail of changes made to particular objects. It doesn’t provide any publishing workflow capabilities at this point.
Recycle bin
If the recycle bin is enabled for objects of a given type and an object is deleted, Kentico ensures one version in the version history that represents the deleted object and its data. This is the version that is displayed in the recycle bin. If versioning is enabled and at least one version already exists, Kentico just marks the last version as the representation of the deleted object without creating any new versions, while keeping the rest of the version history for that object intact. Then, when an object is restored from the recycle bin, the system reconnects these versions to the restored objects. This allows the system to keep the version history of a restored object in the previous state, similar to the functionality of pages.
All objects support the recycle bin by default, because the only criteria that you need to meet is consistency of data and metadata, which is also required for other features (staging, import export, etc.) to work properly. If you would like to disable this feature, just set the AllowRestore property of your type info to false.
If the recycle bin is enabled on your instance, and if you deleted some of your testing data, you should already be able to see deleted items in the recycle bin.

Note that if you change the structure of your data, it may not be backwards compatible with the previously serialized versions of your deleted objects. So either be careful about making drastic changes to your data structure, or make sure that when you perform such a change, you clear or don’t use obsolete data from the recycle bin or version history. The same applies to other parts of the system that use serialized data of objects (staging, import/export, etc.).
Versioning
As you will see, enabling versioning for specific object types is very simple. If you want to use it, you need to ensure additional prerequisites in addition to the data consistency requirements. The editing UI for the object type must provide tabs, even if there is only one page with an editing form (see Parent / Child relationships to learn how to build a tabbed UI). So before you continue, make sure that you have your object editing UI defined with an extra UI element level using a “tabs” page template.
The last thing you really need to do to support versioning of your objects is to enable it. This part may be tricky if you haven’t done it before. There are 3 factors that determine whether versioning is enabled for a given object:
- Versioning must be enabled via the system setting Settings > Versioning & Synchronization > Object versioning > Enable objects versioning
- The object type info must allow versioning via the SupportsVersioning property
- The system must contain a settings key in format CMSEnableVersioning<objectTypeWithoutDots>, e.g.CMSEnableVersioningMHMIndustry, which enables versioning for the given object type. You may notice that all Kentico objects that currently support versioning have their corresponding settings in the same settings section in the Use object versioning for category.
Start by enabling the general versioning setting, and adding the SupportsVersioning property to your type info:
namespace MHM.ContactManagement
{
  ...
  public class IndustryInfo : AbstractInfo<IndustryInfo>
  {
    ...

    public static ObjectTypeInfo TYPEINFO = new ObjectTypeInfo(...)
    {
      ...
      SupportsVersioning = true
    };

    ...
  }
}
Then choose the scenario from the following options that best suits your needs.
Versioning without an extra setting
Let me first show you how you can enable versioning for your object just by modifying code, without the need to add an extra setting for your specific object type. You may find this handy if you don’t want to allow such granularity, or if you would like to handle the versioning settings for multiple objects using a single setting, or other custom code.
Add the following property override to your info class code:
namespace MHM.ContactManagement
{
  ...
  public class IndustryInfo : AbstractInfo<IndustryInfo>
  {
    ...

    protected override bool VersioningEnabled
    {
      get
      {
        return SettingsKeyInfoProvider.GetBoolValue("CMSEnableObjectsVersioning");
      }
   }

    ...
  }
}
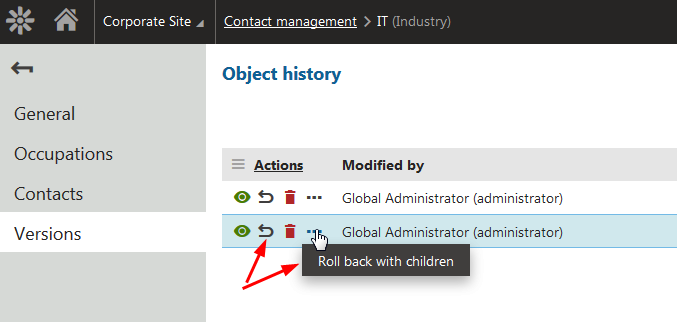
This simple piece of code enables versioning for the object only based on the global setting, omitting the check for the specific object type setting. Now your object is set up for versioning and when we visit our tabbed editing UI, Kentico automatically provides an extra Versions tab. Make some modifications to your data to generate some versions:

You probably noticed that even if you make just one change at the start, you will see two versions in the object history. One of the versions is the latest version, and it may be overwritten by a more recent version in certain situations (I will explain later in this article). The first version is stored to allow rollback to the very first version of the object.
You can alter the property code to make the object versioning for a specific type be based on other factors or settings. As this is an instance property, you can even make it rely on the data of individual objects.
Versioning with an extra setting
If you went through the previous scenario and have the overridden property in your code, please remove it before you continue with this part.
To allow versioning through an extra setting, we just need to define that setting within our module. Navigate to the Settings tab in the module properties. Here you can see a similar view to the one on the User interface tab. All tree nodes that are greyed out and disabled represent existing settings of various installed modules. The granularity of these goes to the level of setting groups inside individual categories, where you can add a new category, but can’t edit existing ones. If we allowed you to add your custom settings between existing ones, it could cause a UX and maintainability nightmare for all of us when upgrading to new versions.
So anytime you want some custom settings within your module, at the very least you need to create a settings group. This can be within an existing category in the settings tree or within a new custom category. We want to keep the versioning settings in a consistent location, so we will just create the group in Settings > Versioning & Synchronization > Object versioning. I will just name the group after our module:

Note that I have used a similar pattern for the code name as other groups in this category. We haven’t yet defined any specific naming conventions for setting groups, because their code names aren’t really used in any specific processes. The best you can currently do is to name them in a similar pattern as their siblings if you put them into the same category, and use the module code name as a prefix if you use custom categories.
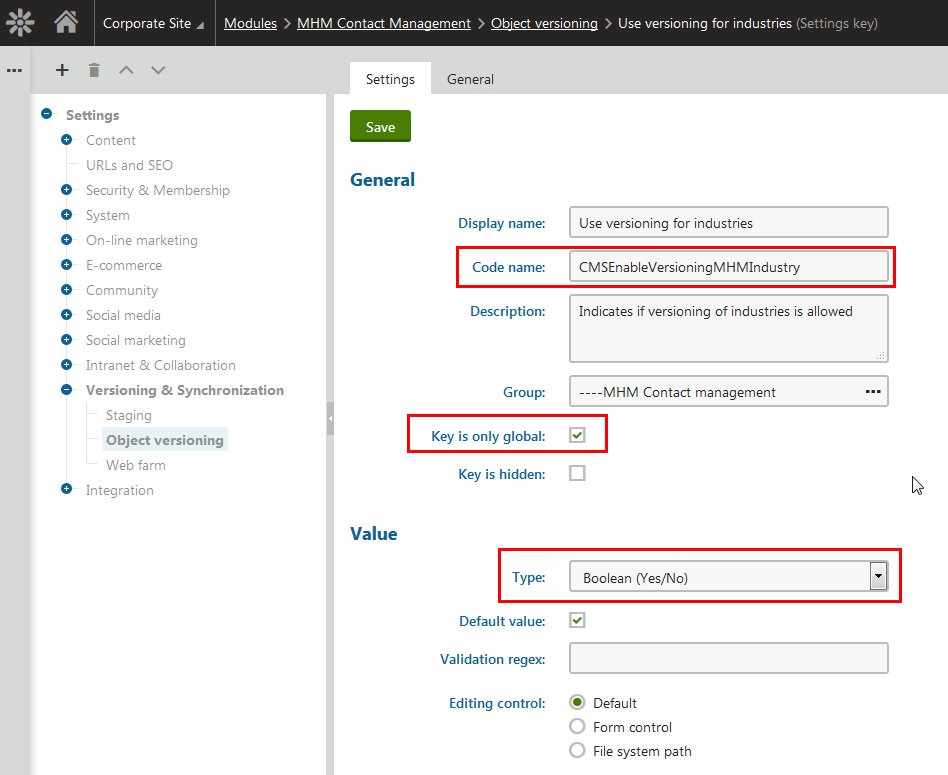
Now create a new settings key in the group with the following data:

Let me now comment on the most important items:
- The Code name is the settings key name that the system uses and was mentioned earlier. The Object type is added as a suffix, but with dots removed.
- My industries are not site specific, so we only want to have a global settings key for them. If the related object type had a site column, we could make the setting site specific.
- We just want the setting to provide an enabled/disabled status, so I used boolean as the setting type.
Custom settings in your modules are pretty powerful and you can save any kind of value, including for example structured XML edited by a custom form control (configure it through specific properties by defining an inherited control in the Form controls application). Describing this would be beyond the scope of this article, but if you want to get some inspiration, just look at how some of the more complex Kentico settings are handled.
Now when you save this setting, you should be able to manage the value from the settings UI.

Your group will be at the top of the listing by default. I recommend moving it to the end through the settings management interface.
If you now try to enable / disable your setting, the admin UI for your data should show / hide the Versions tab accordingly, with one exception. If an object already has some existing versions, the Versions tab appears for that particular object even when versioning is disabled to keep the data available to you (as I said earlier, the primary purpose of versioning is backup and restoring of data). Disabling versioning does not remove any versions from either the version history or recycle bin. The same applies if you remove versioning support from the type info properties.
If you want to get rid of the Versions tab for a specific object with existing versions, you can just click the Clear history button, and when you refresh the UI, the tab will no longer be displayed.
Versioning of child objects
Like in staging and import/export, child objects are by default automatically included in parent versions. You can see this data if you check the box “Display all data” in the View version dialog.
You may also notice that you have two options for rollback to previous versions. You can choose to roll back either the object itself (the default option) or both the object and its child objects.

Note that restoring an object from the recycle bin always restores both and you can only choose how site bindings (if available) are handled.
If your child objects have complex data on their own, it may be worth it to provide better versioning and rollback granularity for those as well. To achieve that, we basically need to enable versioning for the child object the same way as for the parent object.
Because my child objects do not yet provide a tabbed interface, I will need to provide tabs first. So I changed my UI elements from the original one without tabs:

To the following structure, as described in Module development – Parent / Child relationships.

Just to remind you, make sure the new UI element for tabs has the code name of the previous editing element with the “Edit” prefix. Also, don’t forget to enable breadcrumbs for the tabs.
Now we have an editing UI with a single tab if versioning is disabled:

We decided to keep it this way even when there is a single tab to keep the user experience unified. As I said earlier, the visibility of the Versions tab depends on particular objects. So if you switched between different objects, each of them would have a different layout of its UI.
Now just enable versioning the same way as for the parent object. I don’t want to add an extra settings key, but control both of my object types with one, so I will just reuse the settings key I created in the previous example:
namespace MHM.ContactManagement
{
  ...
  public class OccupationInfo : AbstractInfo<OccupationInfo>
  {
    ...

    public static ObjectTypeInfo TYPEINFO = new ObjectTypeInfo(...)
    {
      ...
      SupportsVersioning = true,
      IncludeToVersionParentDataSet = false
    };

    ...

    protected override bool VersioningEnabled
    {
      get
      {
        return
          SettingsKeyInfoProvider.GetBoolValue("CMSEnableObjectsVersioning") &&
          SettingsKeyInfoProvider.GetBoolValue("CMSEnableVersioningMHMIndustry");
      }
    }

    ...
  }
}
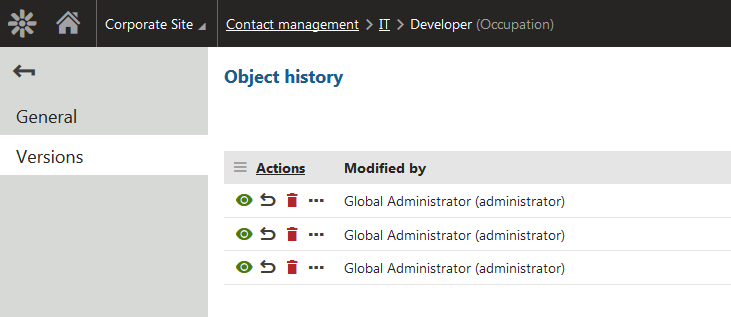
Now my UI properly includes versioning and logs object versions:

If you look back at my OccupationInfo code, I also used the additional IncludeToVersionParentDataSet property in its type info to prevent the system from including this object type into parent versions. It is up to you whether or not you want to use the property, and you can also use it to not include child data within regular versioning if you don’t need or want it to be versioned.
Here are some pros and cons of including child data in the parent:
- When included, you can roll back or restore with children to easily restore multiple related objects to a point in time.
- When included, a change to child data causes an update of the parent version, which may be a heavy operation if there are many complex children.
We in Kentico typically use object versioning for children and leave the children included in the parent when they are developer-specific objects (page type as the parent, with transformations and queries as children), and omit them from the parent data when there are many child types, or their editing context is very different (email campaign as the parent with subscribers as children).
Workflow with objects
As I mentioned, versioning for objects does not currently include any workflow functionality. All changes to objects are immediately used as published data. Publishing workflow features are currently available only for pages. If you would like to achieve some kind of workflow, you should probably make two copies of the same object type and use one for the editing version, the other for the live version, and then implement custom code to move / replicate data between the two storages. I might take a look at this topic more closely in the future, and write an article explaining how to best achieve this behavior.
Version numbers
I would like to make a quick comment on version numbers, which is also related to the fact that objects do not provide publishing workflow. If there were a publish action, there would be a clear point indicating when the major version should increment. But as there isn’t anything like that, you need to explicitly tell the system when you consider your version to be major (a more interesting point in time) or configure the system to do this automatically for you after a certain period of time.
You can manually promote a version to a major version by clicking the “Make current version major” button on the Versions tab. This not only performs promotion of the version number, but also ensures that this version is no longer modified by subsequent updates.
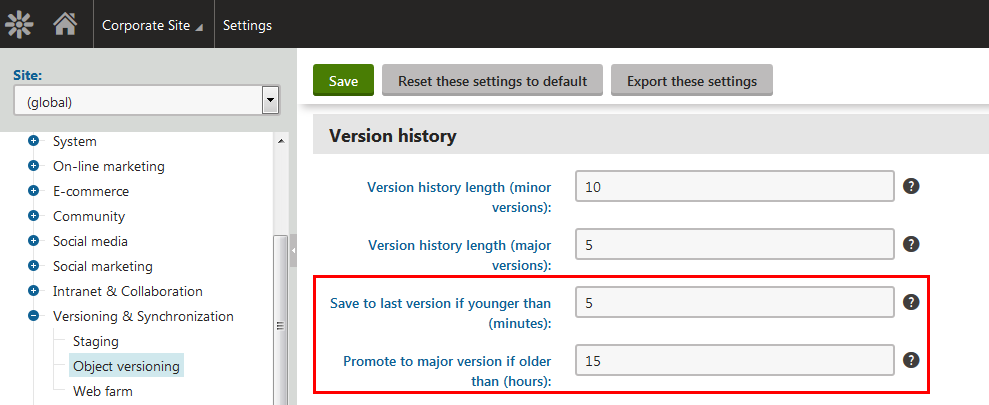
I mentioned that a single version may be overwritten several times. Kentico is by default set up with a timeout which allows several subsequent modifications of the same object to be saved to a single version that will be remembered for rollback.
This is all fully configurable, so if you need to keep each individual change as a separate version, you can. You can find these settings in the same location as the other object versioning settings.

The general idea behind these settings is to save the database space used for storing versions, and help end users better recognize important points in time when rolling back. You may ask why there is a 15 hour delay by default for promoting to major versions. This is our best guess for identifying the next business day, but at the same time provides enough time so that users can be interrupted while working on a task without consequences in the version history.
Check-in / check-out
A feature very close to object versioning, and even easier to set up, is Object locking. By that, I mean check-in / check-out functionality that allows you to get exclusive access to an object.
Let’s modify our IndustryInfo to enable object locking:
namespace MHM.ContactManagement
{
  ...
  public class IndustryInfo : AbstractInfo<IndustryInfo>
  {
    ...

    public static ObjectTypeInfo TYPEINFO = new ObjectTypeInfo(...)
    {
      ...
      SupportsLocking = true
    };

    ...
  }
}
When you enable the SupportsLocking property, the UI page template used for editing the object automatically picks up on this setting, and provides corresponding actions in the UI:

All necessary operations are done for you automatically, so it is as simple as can be. When object locking is enabled, versioning does not use the automated version numbering, but saves the current state to a single checked out version.
Wrap up
Today you learned how to fully leverage object versioning and the recycle bin to allow your users to easily recover from mistakes. We went through:
- The general versioning engine
- Recycle bin
- Setting up versioning for main objects
- Setting up versioning for child objects
- Automatic version numbering
- Object locking
I hope this feature will help you and your clients become more effective in your daily jobs.
See you next time …