Module development - Foreign keys
Some of the most common questions about custom development in Kentico are how to handle foreign keys in your data, and how to extend existing objects with a foreign key referencing your custom data. Read this article to master foreign key management in Kentico.
Hi there,
This is my second article on module development best practices. I expect that you already either read my
first article about the basics, or the official
documentation on module development. If not, start with those.
Today, I would like to show you how to properly define a foreign key pointing from your data to other data and vice versa, as well as a couple of tricks that help simplify the development steps.
Foreign key in your data
I would say that the single most asked about scenario related to custom classes is adding a field that identifies the user who made the last change to the item, as a complement to the last modified time stamp of the object. This is quite typical for the more secure applications out there.
While Kentico currently does not support this out-of-the-box, I will show you how you can easily create such a field yourselves. I will extend the Industry class that I created in my last article by adding the
LastModifiedByUserID field
, which will provide this information.
Adding the field
First, I added the field to my class definition. The field is of the
integer type (it will point to the CMS_User.UserID column), does not display in the editing form, but allows empty values, because the class already has some existing data. Once you get rid of the NULL values in your existing data, you can switch the field to not allow empty values.
One additional field setting that you need to set is
Reference to. Set the value to
User, and the
Reference type to
Required, has default.
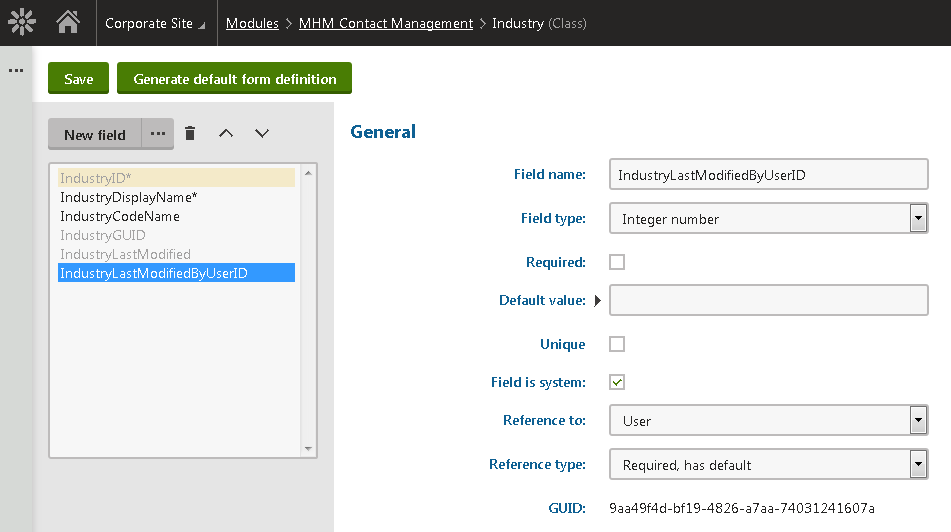
Note that both these fields are optional and only meant to help you generate default metadata for the info object. If you prefer configuring these in code, you can do that without configuring the Reference settings in the field editor.
Let me explain these settings in more detail:
- Reference to – This basically says that the field is a foreign key to some object type. The reference is always to the primary key (ID column) of that given type.
- Reference type – This tells the system how to treat the column within certain general operations, such as synchronization / export / import, and also during automatic cleanup of references when you delete a referenced object.
Here is what particular reference type values mean in a nutshell:
- Required – If the foreign key value is present, it must remain stable and consistent during all of the operations mentioned above. It cannot be transferred to a replacement value such as NULL, or another target object. Note that I wrote “if the value is present”. This setting has nothing to do with the “Required” checkbox of the field itself (allow null), it just defines the consistency of the field. This is the strictest setting of all when using foreign keys as just additional data. If the target object is not available, the operation will fail.
- Required, has default – Less strict than the Required option. If the value is present, but the target object does not exist on the target system, this option allows a fallback to a default object of the given type. Since we’re working with users in our example, the fallback is the default user account defined in Settings > System > Default user ID. If you want to leverage this with your own data as the target, you need to override the GetDefaultObject method in your info class so that the default value can be provided.
- Not required – Least strict option. When the target object does not exist, the system is allowed to remove the value and leave NULL in that field. This is the best option for truly optional information that doesn’t necessarily need to be preserved across environments.
- Binding – This is a special value for foreign keys that are part of the primary key of M:N relationships (bindings) in the system. I will cover this topic in one of my next articles. You can also learn more about how to define bindings in the Kentico documentation. It has the same behavior as Required in terms of field data, because consistency of M:N relationships is important.
In our case, having the object in the system is more important than losing the record of who edited the object (for example if we delete that user). That is why I selected “Required, has default”.
Kentico currently doesn’t provide native foreign key management on the database level, so the next step you want to perform is in the database. Open SQL Management Studio and add a foreign key constraint pointing to CMS_User.UserID to your new column. This step is optional, Kentico doesn’t mind if the foreign key is not defined, but if you want to leverage the performance and consistency enforcement advantage of foreign key constraints, I recommend doing this.
Note that as Kentico currently doesn’t recognize foreign keys on the database level, you need to transfer this change manually within your deployment process, like you would do with other tweaks to the database such as extra indices.
Updating info code
Now is the time to check out the Code tab. When you look at it, you can see how your changes influenced the generated code of the info class. Depending on whether you already deployed your info class code to your file system, you can either save it there, or just copy/paste the new code. If you already set up the TYPEINFO or made some customizations to the deployed code, I recommend that you just copy over parts of the code, or save the code to a new file and merge the two files.
In my case, I will just copy over the following code:
public static ObjectTypeInfo TYPEINFO = new ObjectTypeInfo(...)
{
  ...
  DependsOn = new List<ObjectDependency>()
  {
    new ObjectDependency("IndustryLastModifiedByUserID", "cms.user", ObjectDependencyEnum.RequiredHasDefault),
  },
};

/// <summary>
/// Industry last modified by user ID
/// </summary>
[DatabaseField]
public virtual int IndustryLastModifiedByUserID
{
  get
  {
    return ValidationHelper.GetInteger(GetValue("IndustryLastModifiedByUserID"), 0);
  }
  set
  {
    SetValue("IndustryLastModifiedByUserID", value, 0);
  }
}
If you look at the code closely, it reflects exactly what we have defined. There is a new field, and there is an object dependency collection containing the information about the foreign key. This is how the system gets knowledge of the foreign key and its behavior. Note that at this point, the definition of the foreign key does not have to be done from the admin UI. That is just a simplified approach for beginners. Once you master this topic, you can very well define foreign keys just within the code. If there were more foreign keys, they would all be listed in that collection.
Automating the field value
One would expect the value that indicates who modified an object to be automatically filled in by the system. Let me just quickly show you how to achieve that. Open your info provider code, and add one extra line to the
SetIndustryInfoInternal method:
protected virtual void SetIndustryInfoInternal(IndustryInfo infoObj)
{
  infoObj.IndustryLastModifiedByUserID = MembershipContext.AuthenticatedUser.UserID;

  SetInfo(infoObj);
}
From now on, all new and updated Industry objects will be updated with information that identifies the user who made the change. Easy, isn’t it?
Displaying the foreign key in the listing
Before we create or update some data, I want to perform one more step. Add two more columns to your grid definition for the Industry listing. Here is a basic version of the columns:
<grid>
  ...
  <columns>
    ...
    <column source="IndustryLastModified" caption="$general.lastmodified$" wrap="false" />
    <column source="IndustryLastModifiedByUserID" caption="$mhm.contactmanagement.lastmodifiedby$" wrap="false" />
    ...
  </columns>
</grid>
Just as a reminder, my grid definition is located in
~/App_Data/CMSModules/MHM.ContactManagement/UI/Grids/MHM_Industry/default.xml.
I am just directly displaying the raw column values. Kentico supports the last modified time stamp by default, so there is already a resource string for that column’s title. I will use my own resource string for the other column. Just like with other data, it is good to use the best practice to include a prefix of the module name in the resource string key, which is “MHM.ContactManagement” in my case.
Now when I create some Industry data or update it, I get a view like this:

The last steps to make this view more presentable are two simple ones:
- Create the resource string “MHM.ContactManagement.ModifiedBy”
- Apply a transformation to the ID value in the grid
The first one is simple, so let’s focus on the second one. No matter what data you refer to, you can use
Object transformation to transform the value of an object ID to its properties. Let’s change the definition of the modified by column to the following:
<column source="IndustryLastModifiedByUserID" caption="$mhm.contactmanagement.lastmodifiedby$" externalsourcename="#transform: cms.user.fullname" wrap="false" />
Now the view I get is exactly what I wanted. Looking slick and my task is done:
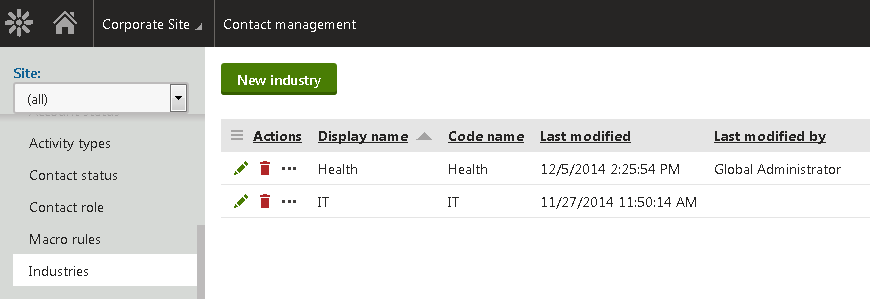
Note that this is the most general way to transform data to a more suitable value. You can use
built-in UniGrid transformations or other ways to transform listing values as described in the documentation.
Foreign keys in macros
As I said in the previous article, I will also try to cover how the data you implement in your module is available in macros. Let me show you how the Industry object looks like when accessed through the macro console:
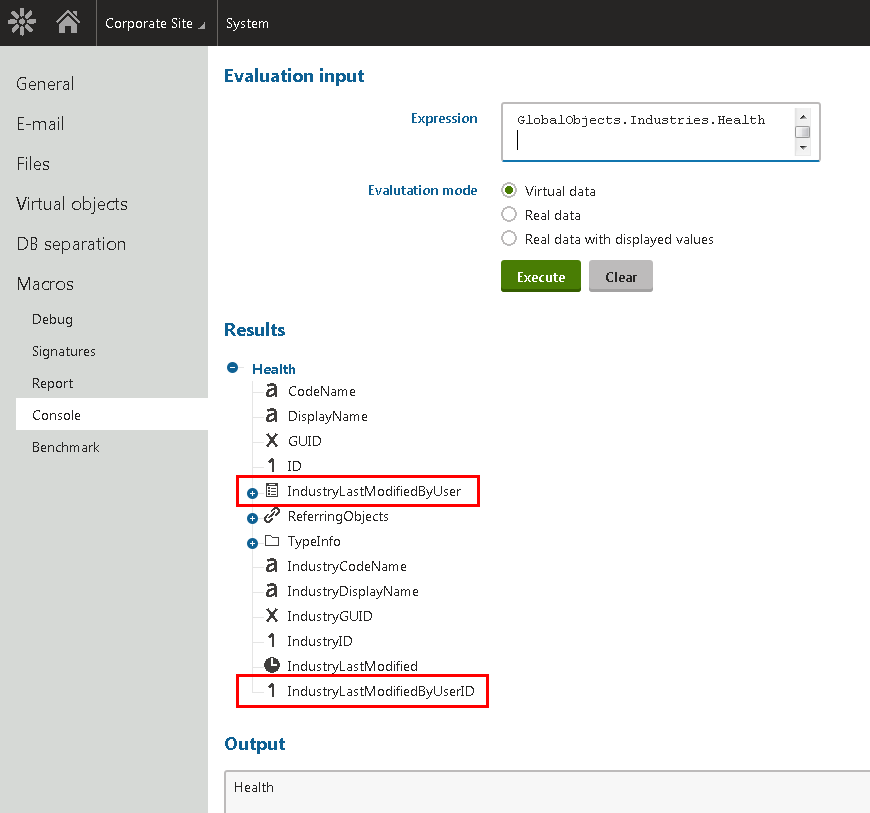
Even though I created only one “last modified by” property, you can see two similar properties in the object properties. Let’s see what we have here:
- IndustryLastModifiedByUserID is the database field you created, and it just stores the integer value of the foreign key (the one you saw in the raw listing).
- IndustryLastModifiedByUser is an automatic property provided for each foreign key with a name that ends with the “ID” suffix. This property returns the target object to which the foreign key points.
Note that the automatic property is only available in macros. If you want to provide it in your info objects, you can do that as well by adding the following code to your info class:
/// <summary>
/// Industry last modified by user
/// </summary>
public virtual UserInfo IndustryLastModifiedByUser
{
  get
  {
    return GetProperty("IndustryLastModifiedByUser") as UserInfo;
  }
}
Note that I didn’t use the [DatabaseField] attribute this time, because this is not a representation of a database field value. It is a more complex property.
Extending existing objects with foreign keys
I have covered adding of foreign keys into your own data, but how about someone else’s data? While the general concept and the resulting metadata in the system during runtime are the same, it is a little more complicated to set up foreign keys for existing objects that you don’t own. Simply due to the fact that you don’t have access to the original code of the info class and the provider that you could modify within the steps described above.
Adding the field
This task is the same as in the previous case. You just add the field to a class of an existing module (one which is customizable). In my case, I will be extending the
Contact class in the
Contact management module by adding a
foreign key to my new
Industry class. Same field settings as before, except for the reference and its type, which I will configure later directly in the code. My field is named “ContactIndustryID” and I have placed it into a new field category called “Job”.
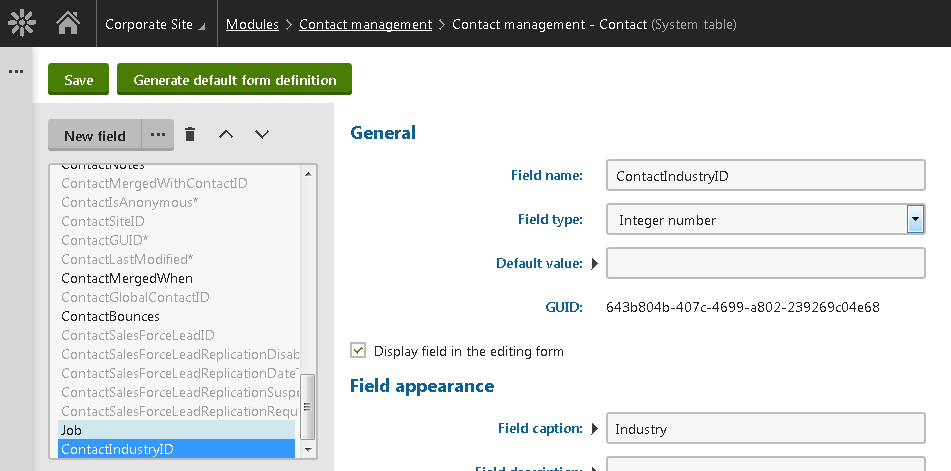
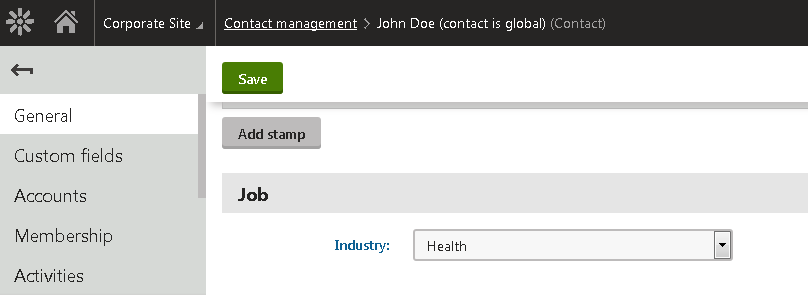
Before I get to the part where I set the field up as a foreign key, I want to finish the field’s form appearance. In this case the field won’t be automatic, but editable on the contact form. Like with the listing, if I left the default editing control as a text box, the field would accept and display the raw integer values of the foreign key. That is probably not something that a marketer would appreciate…
I will set up the field to use a general form control named
“Uni selector” that allows me to easily provide a selector for my object type. Whenever you see or hear “Uni” in relation to Kentico, think about a general component that is capable of working with any type of data and is typically set up using an object type. That is why Kentico has components like the UniGrid, UniSelector and others.

So in this case I have set up the field in the following way:
- Object type – mhm.industry (which is the object type name constant defined in my info class)
- Selection mode – Single dropdown list (most user friendly for shorter lists)
- Allow none – Checked (we allow empty values in our field)
By setting just these three properties, we get a working UI within the contact editing form for managing the contact industry value.
If you plan to leverage the same kind of selector multiple times, I recommend creating a
predefined inherited form control based on the Uni selector form control, as described in the documentation.
I bet that some of you geeks must be getting anxious. When do we get to write some code? So far, Kentico generated almost all the code for us or no code was necessary. Don’t worry, it is coming...
Extending the metadata of existing objects
We have defined the foreign key field and provided an editing UI for it. Now is the time to let the system know that this field is a foreign key and what its constraints are.
To do that, we update the Industry info class with a piece of metadata that Kentico recognizes and automatically injects into the defined existing type:
public static ObjectTypeInfo TYPEINFO = new ObjectTypeInfo(...)
{
  ...
  Extends = new List<ExtraColumn>
  {
    new ExtraColumn(ContactInfo.OBJECT_TYPE, "ContactIndustryID", ObjectDependencyEnum.NotRequired)
  },
  ...
}
This time we are using a collection named
“Extends” which defines new foreign keys in existing objects that point to your object. The settings are very similar to those of object dependencies, except you define everything
from the other side.
My code says “The Contact object type has one extra foreign key column that points to this object type (meaning Industry)”. This also includes the consistency setting that I described earlier. The information is then transformed to an ObjectDependency and injected into the target object type as if it were defined there by its author. This happens at the early stages of the application start.
With this extra piece of metadata, Kentico is able to handle the new foreign key with ease in all the general features mentioned at the beginning of this article, as well as ensure proper recognition in macros like with the first scenario.
Other customization of extended objects
It was easy to update the API we own. Let me now give you some tips on how to achieve similar things with extended objects:
Getting and setting extra field values and properties – Use the general methods
GetValue and
SetValue to work with the field values. For automatic properties, use the method
GetProperty.
Automating field values – By leveraging
Object events, especially
Insert.Before and
Update.Before, you can achieve the same as with the code that provided the automatic value for the extra field. Use this approach with existing object types where you can’t update the code directly.
Adding extra columns to listings – Like in the first example, you can extend the listing of an existing object with your own column by locating and modifying the corresponding grid definition. Unlike the previous steps, this modifies existing Kentico files, so it won’t provide as smooth an upgrade experience as the other steps. I recommend that you only do this in absolutely necessary cases, and make sure you keep track of all changes so you can apply them again after the upgrade in case we overwrite that definition.
Wrap up
In this article you learned how to properly set up a foreign key in both directions: from your data to an existing object and vice versa.
I covered:
- Creating the fields
- Automatically populating field values
- Defining metadata so that the system properly works with fields in general features
- Database restrictions on foreign key constraints
- Building listings with suitably displayed values
- Providing easy-to-use selectors in the editing UI
- Accessing the foreign key fields and their target objects in macros
Now you should have enough information to be able to work with foreign keys in most scenarios. Let me know if you have any questions about this topic. Also, any feedback is appreciated as always.
In the next article, I will show you how to build a parent-child relationship between two object types in your module.