Kentico CMS 4.1 - Insertion of images and media was never easier
One of the new things in version 4.1 is the improved usability of the WYSIWYG editor for easier insertion of images, video, flash and links into the page. Let's have a look a little bit closer...I'm sure you will like it.
1) WYSIWYG editor - How it was in version 4.0
2) WYSIWYG editor - What we did in version 4.1
3) Media selection in version 4.1
4) Summary
WYSIWYG editor - How it was in version 4.0
Before introducing the improvements I would like to remind you of using
WYSIWYG editor in previous versions. The insertion of images, video, flash and links was enabled using the following dialogs:
 1) Insert image
 - inserting images from Content or Media libraries
2) Insert flash - inserting flash from Content or Media libraries
3) Insert link - inserting links to documents from Content or links to files from Media libraries
In fact, each of the insertion above was done using
two separate dialogs. After the specified icon in the toolbar was clicked the standard WYSIWYG editor dialog was opened. Another dialog was opened after clicking the Browse server button - that dialog were used for selecting file or document managed by CMS. These two separate dialogs made the insertion quite complicated and slow. Also uploading new files wasn't as straightforward as it could be. See the schema bellow:
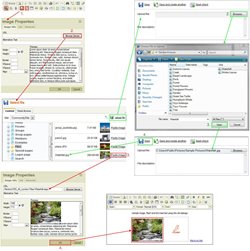 |
red line - inserting image/flash/link
green line - uploading new file |
|
Open in full size |
|
4) Insert media - inserting images, audio, video and flash from Media libraries
This dialog was opened immediately after the specified icon in the toolbar was clicked however the dialog was really simple without any additional functionality (only width and height parameters were available). Plus all files were inserted as simple inline control which was displayed as text without any preview. See the schema bellow:
 |
red line - inserting image or media from Media libraries
green line - uploading new file |
|
Open in full size |
|
Main disadvantages of the old dialogs
-
too many different dialogs
-
too complicated and slow insertion
-
too complicated and slow upload of new files
-
poor possibilities of the Insert media dialog
-
no view modes
-
no file search
-
location the last file was inserted from was not remembered so the user should navigate there again when inserting another file from the same location
WYSIWYG editor - What we did in version 4.1
Simply, we threw old dialogs away and created new dialogs from scratch. Our goals were to:
-
simplify and speed up the process of insertion
-
simplify and speed up the process of new file upload
-
create unified dialogs with improved UI and functionality
As the result the following dialogs were created and built-in into the WYSIWYG editor:

-
Insert image or media - replaces Insert image, Insert flash and Insert media dialogs
-
Insert link - replaces old Insert link dialog
-
Quickly insert image - completely new dialog
-
Insert YouTube video - completely new dialog
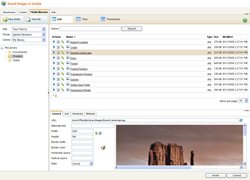
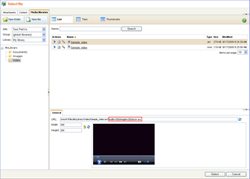
1) Insert image or media
This dialog allows you to insert
images,
flash,
audio or video into the page. It means the dialog can manage insertion of all media and you don't have to think which dialog to choose any more. See the dialog's overview bellow:
You can select the files from all available sources:
-
Document attachments (new in version 4.1) - offers attachments of the current document
-
Content - offers documents stored in the content tree
-
Media libraries - offers media files stored in Media libraries
-
Web - enables you to insert the content which is not handled by your web application
To make the file selection much more comfortable and easier the dialog allows you to switch between the different views which give you different level of details of the listed files, following views are available:
 |
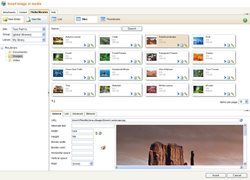 |
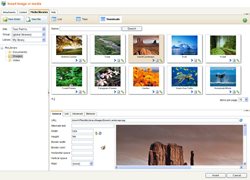 |
|
List view |
Tiles view |
Thumbnails view |
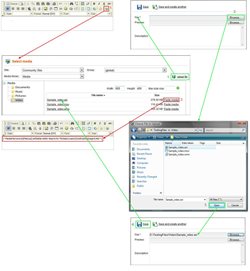
The process of insertion is really simple. After selecting a specified file in the current view you can see its preview and specify its properties. When you are finished you can click 'Insert button' to paste it into the text. No more dialogs are opened like in previous version, all is handled by single dialog. Also uploading new files is faster and easier. See the schema bellow:
 |
red line - inserting image/audio/video/flash
green line - uploading new file |
|
Open in full size |
|
2) Insert link
This dialog allows you to insert links to the different content like document attachments (Attachments tab), documents (Content tab), media files (Media libraries tab) and web content (Web tab). In fact the dialog is very the same as the 'Insert image or media' dialog because we know that the unified UI makes the work easier than working with many different dialogs. The only difference is in the properties which are available when some file is selected. Another thing is the possibility to insert the mail-to links (E-mail tab) and links to anchors (Anchor tab) on the current page. See the dialog's overview bellow:
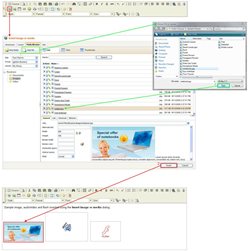
3) Quickly insert image
Imagine the following situation: You are currently writing your article and you have already prepared all required images you would like to use. All you want is to paste them into the text. This is the right time for the completely new dialog 'Quickly insert image':
-
Click the 'Quickly insert image' icon in the WYSIWYG editor toolbar, 'Browse dialog' is opened.
-
Locate the image on your local disk and click 'Open button'.
-
Image is inserted into the text in original size. At the same time the image is automatically uploaded and stored as attachment of the current document.
-
Optional: Of course, additionally you can modify its properties like dimensions or style, or you can add some link etc.
 |
red line - inserting image
green line - uploading image as attachment of the current
document (automatically) |
|
Open in full size |
|
Just few clicks and the image is both placed in your text and uploaded into your web application, isn't it great?
4) Insert YouTube video
I think many of you have already used YouTube as the place where you can upload your videos and show them to your friends and to other people all around the world. In version 4.1 you can use the advantage of the built-in dialog 'Insert YouTube video' which helps you to paste any YouTube video into your page.
How it works
All you need is the URL of the YouTube video you wish to insert into your page. That URL must be pasted into the URL field in the dialog. Then the dialog provides you with the possibility to configure YouTube video player parameters. Of course, you can see the video player preview before it is inserted into the page. See the schema bellow:
Media selection in version 4.1
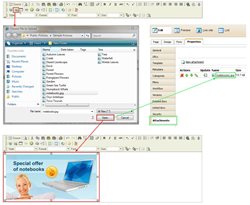
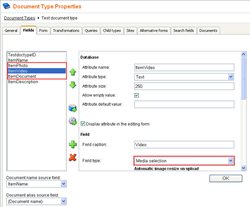
One more thing I would like to mention is a new type of field which can be used in your document types for media selection. It is Media selection control which uses that new dialog for image and media selection. It means you can easily use any file from all sources (from Document attachments, Content and Media libraries) in your document types. Following example demonstrates how you can achieve this:
1) Create your custom document type called "Test document type" with 3 fields which enable content editor to select image, video and document. I have created ItemPhoto, ItemVideo, ItemDocument fields of type Media selection:
2) Switch to Transformations tab while editing properties of your custom document type "Test document type" and specify its new transformation as follows:

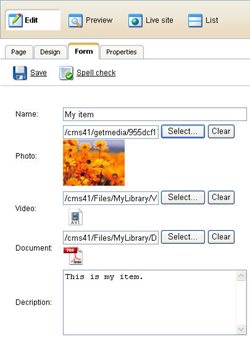
3) Create a new document of type "Test document type" and specify its data on Form tab:
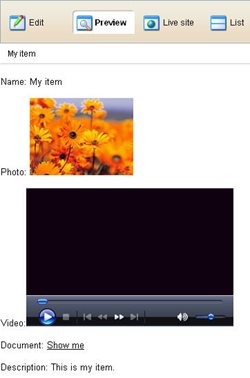
4) Use some of the viewers (e.g.: CMS Repeater web part) to display data of your new document using your defined transformation:
As you can see the control MediaControl is able to identify the type of content from its URL property automatically. It is recognized according to the following URL parameters:
width = width of the image or media player
height = height of the image or media player
ext = extension of the file (= type of media)
These parameters are automatically attached to the selected file URL when selecting the media using the Media selection field:
Summary
I hope this post will help you to identify the main improvements concerning the insertion of images and media faster than looking for updated chapters in our documentation, however I recommend you to go through the WYSIWYG editor documentation to get the deeper knowledge of all its improvements.
Then I recommend you to test the version 4.1 to touch the improvements by yourself. You will be really surprised how document attachments together with new dialogs in WYSIWYG editor can speed up and simplify the use of the additional content like images and media in your web projects.
P.V.