Building Applications Using Microservices and Azure – Part 2
Developing applications using microservices is a great way to increase functionality, without being solely dependent on a single solution. By using multiple systems and services, you can leverage the best from each platform. In Part 1 of this series, I showed you how I architected my personal site using a microservices. In this next edition, I’ll break down these integrations and show you how to leverage disconnected systems in your applications to achieve some powerful capabilities.
Integrating services into applications is not a new concept. Since the dawn of the internet, there have always been niche platforms that companies will use for a specific task. Whether it’s hooking your site up to analytics or sending mail, leveraging a separate service can save valuable development time, and provide a lot better functionality that you may be able to build on your own.
As I highlighted Part 1 of this series, there is a pretty big shift in the community to the microservices approach to application development. By using a Headless CMS and supporting services, you can now build out your sites using several smaller pieces, all communicating over industry-standard channels (REST). While I gave you some awesome graphics in my first post, I wanted to give you some code to show you how I pieced together my personal site using these cloud-based systems.
Content
For my content, I integrated with Kentico Cloud (shocking, I know). This new Headless CMS was the perfect foundation for my site, as it would allow me to store and manage my content in a single location, and display it within my site easily.
You can check out my three-part blog series on Building and MVC site with Kentico Cloud here.
Blogs
While Kentico Cloud handled nearly all my content, I still had my blog posts I wanted to include as part of my presentation. Because my Kentico-related blogs are posted to DevNet, this meant I needed to consume this content from a separate service. For this, I went with the tried and true RSS feed method. Nothing exciting here, just getting an RSS feed using an HttpClient and parsing the XML.
        public static async Task<IEnumerable<BlogPost>> GetBlogs(ProjectOptions _projectoptions, int intTake = 999)
        {
           var feedUrl = _projectoptions.BlogRSSFeed;
            using (var webclient = new HttpClient())
            {
                webclient.BaseAddress = new Uri(feedUrl);
                var responseMessage = await webclient.GetAsync(feedUrl);
                var responseString = await responseMessage.Content.ReadAsStringAsync();

                //extract feed items
                XDocument blogs = XDocument.Parse(responseString);
                var blogsOut = from item in blogs.Descendants("item")
                               select new BlogPost
                               {
                                   PubDate = Convert.ToDateTime(item.Element("pubDate").Value),
                                   Title = item.Element("title").Value,
                                   Link = item.Element("link").Value,
                                   Description = (item.Element("description") != null) ? Regex.Replace(Regex.Match(item.Element("description").Value, @"^.{1,180}\b(?<!\s)").Value, "<.*?>", string.Empty) : "",
                                   DocumentTags = item.Element("documenttags").Value
                               };

                return blogsOut.Take(intTake);
            }
        }
See, I told you microservices have been around for a while! Consuming RSS feeds are a perfect example of bringing in content quickly, without having to build out blogging capabilities within your application.
Tracking
For website analytics, I wanted to add some tracking capabilities to the site. I could have gone with Google Analytics, however, I wanted something a bit more integrated with my actual content. To achieve this, I opted for Kentico Cloud Analytics. Because the KC tracking functionality can access the underlying data, I could get more contextual information about my users with a much lighter-weight solution than Google Analytics.
To integrate this service, I opened the Kentico Cloud dashboard and navigated to the API Keys section on the left menu. There, I copied the Tracking code snippet to include in my site.
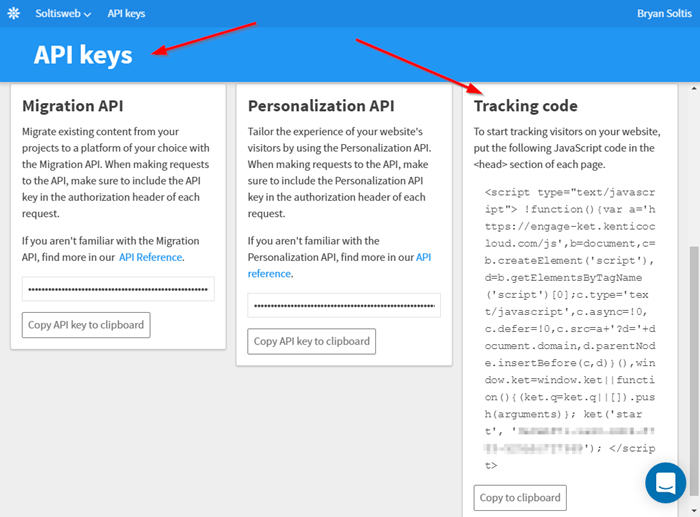
This block of code is all that is needed to start tracking my site users and recording their behavior. It also includes functionality to identify forms within your site and capture contact information, when entered.
I placed the code block on my /Shared/_Layout.cshtml page so that it would be included in all requests.
<head>
    …
    <script>!function () { var a = 'https://engage-ket.kenticocloud.com/js', b = document, c = b.createElement('script'), d = b.getElementsByTagName('script')[0]; c.type = 'text/javascript', c.async = !0, c.defer = !0, c.src = a + '?d=' + document.domain, d.parentNode.insertBefore(c, d) }(), window.ket = window.ket || function () { (ket.q = ket.q || []).push(arguments) }; ket('start', 'XXXXXXXXXX-XXXX-XXXX-XXXX-5XXXXXXXXXX');</script>
</head>
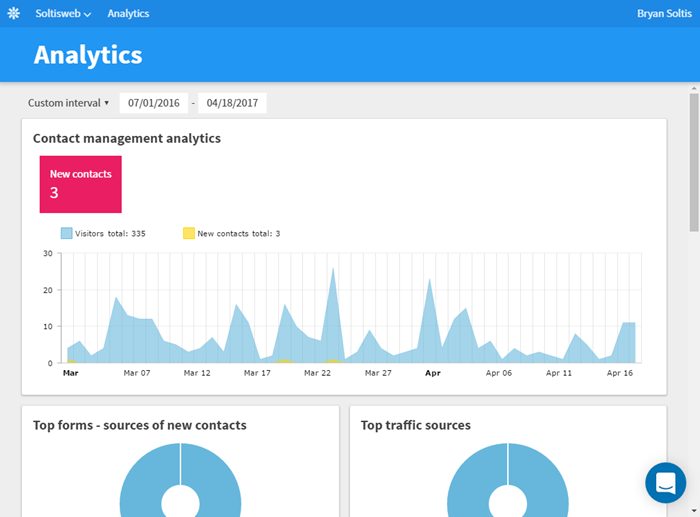
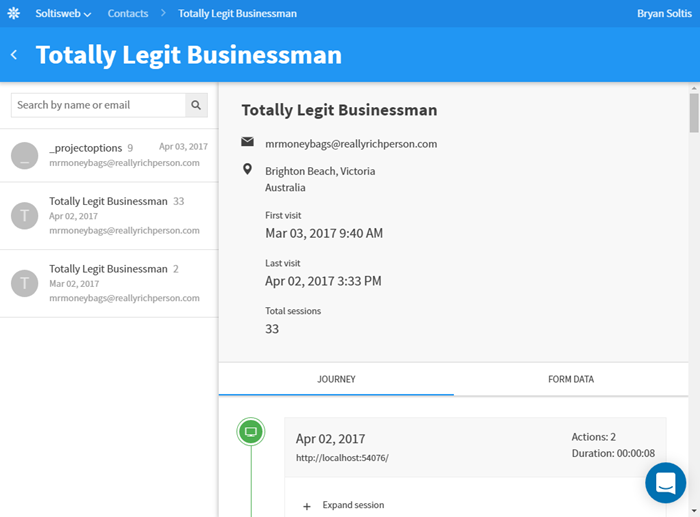
After adding the code, I could then start seeing my contact sas they filled out my form, as well as their activity.
Search
The next microservice I wanted to include was Azure Search. While I can use the Kentico Cloud API to query my content, having a full-featured search solution would be much more usable, as it would allow me to have facets, scoring, and highlighting capabilities. Azure Search was a perfect solution for this, and fit into my Azure-hosted architecture, as well.
Azure Search works by indexing your data and then providing a REST API to interact with that index. For Search to index your content, you must provide it to the service. Because my content is hosted in Kentico Cloud, I had to develop the functionality to get the data from Kentico Cloud to Azure Search. Spoiler alert: Azure Functions were the perfect choice!
Using an Azure Timer Function, I synced my data once a day from Kentico Cloud to Azure Search so that it can be indexed. The actual integration is a good bit of code, so I’ll save that for my next blog post. Don’t worry, it will be out in just a few weeks! As preview, here is the overall concept behind how it works:
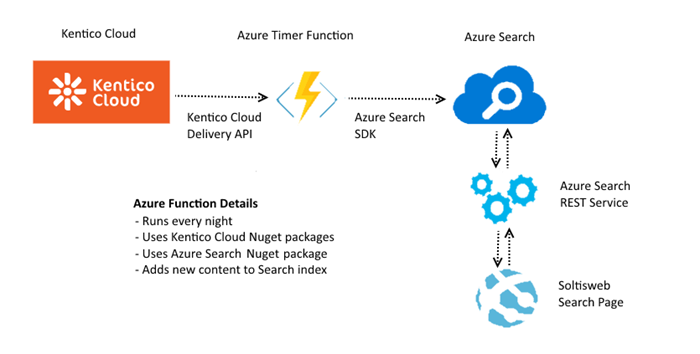
Within the Azure Function, I used the Kentico Cloud Nuget packages to connect to my project and retrieve my content. I then used the Azure Search SDK to add the content to my index. Because my content doesn’t change all that often, I had the function configured to run once a day. Lastly, I used the Azure Search SDK within my site to query the Search index and return the results. With this solution, I could execute searches against my content and provide a dynamic search experience for my users.
Here’s a little bit of the code you’ll see within the function.
        List<IndexAction> lstActions = new List<IndexAction>();
        // Get the Kentico Cloud content
        DeliverClient client = new DeliverClient(ConfigurationManager.AppSettings["DeliverProjectID"]);
        var filters = new List<IFilter> {
                new InFilter("system.type", "speakingengagement"),
                new Order("elements.date", OrderDirection.Descending),
            };

        var responseContent = await client.GetItemsAsync(filters);
        foreach (var item in responseContent.Items)
        {
            var doc = new Document();
            ...
        }
In my next blog, I’ll be sure to give you all the coding details for the function in case you want to implement it for your sites.
Reporting
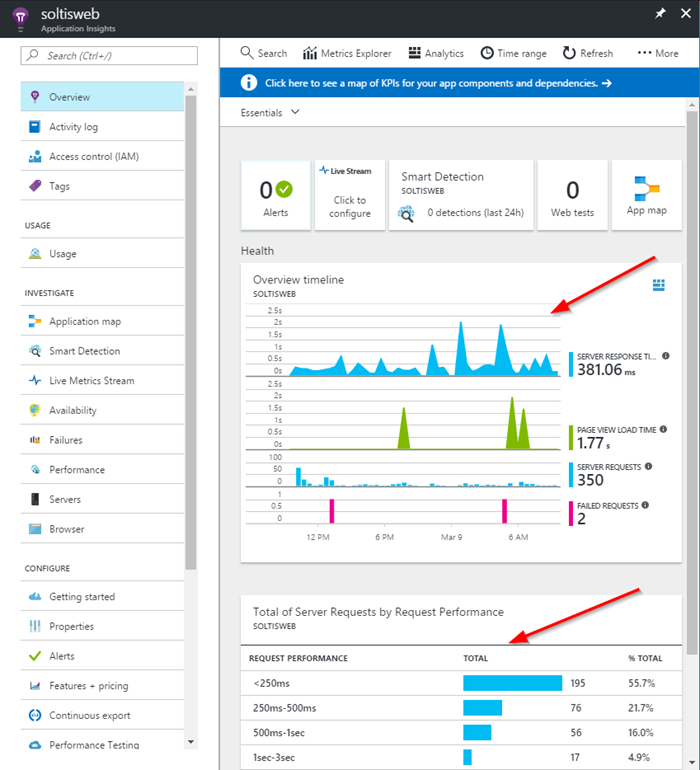
The next micro service I wanted to incorporate was Azure Application Insights. This service would allow me to track how the web server was performing, record my traffic statistics, and allow me to gain insights into any errors or issues. I covered the integration process in a previous blog that you can check out here.
With Application Insights in place, I could easily view my traffic and see how users are interacting with my site.
Chat Bot
Adding a bot to my site would give me an immersive, unique experience for the hordes of people who will want to learn about me. Again, going with an Azure-hosted option made the most sense, as all the systems would be located within Microsoft’s cloud. I selected an Azure Bot Service for the job. Using my FAQ data, I “taught” the bot the responses for specific questions people may ask about me.
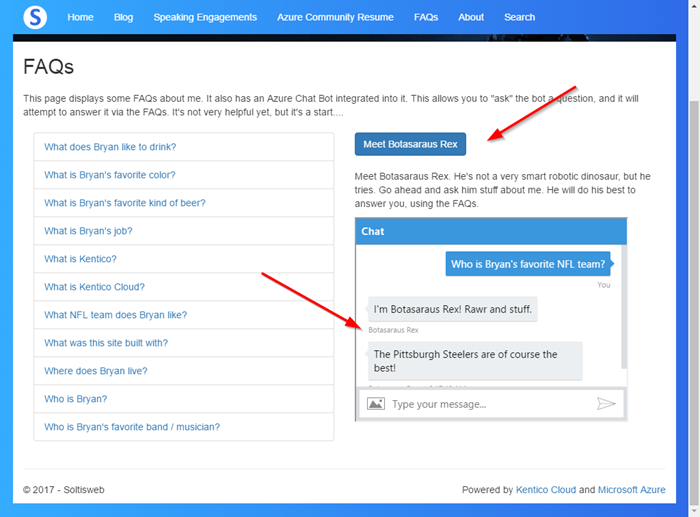
Much like the Azure Search functionality, this integration also required a good bit of code. I’ll detail the bot integration process in a future post, so you can see how it’s all put together. For now, here’s how I pull in the bot into my View using an iframe.
            <div>
                <input type="button" class="btn btn-primary toggle-link" value="Meet Botasaraus Rex" />
            </div>
            <div class="toggle-content" style="padding-top:10px;">
                <div style="padding: 10px 0;">
                    Meet Botasaraus Rex. He's not a very smart robotic dinosaur, but he tries. Go ahead and ask him stuff about me. He will do his best to answer you, using the FAQs.
                </div>
                <iframe style="height:300px; width: 400px;" src='https://webchat.botframework.com/embed/bryansdemo1bot_XXXXXXXXXXX?s=XXXXXXXXXX.XXX.XXX.XXXXXXXXXXXXXXXXXXXXXXXXXXXXXXXXXXXXXXXXXXXX'></iframe>
            </div>
Moving Forward
In this blog, I detailed how I integrated various microservices into my application. By leveraging their capabilities, I extended the functionality of my site quickly, without having to develop a lot of custom code. Because so much emphasis is placed delivery and performance, ensuring you have the best resources within your site is critical to building enterprise-level applications. I hope this article helps you understand the microservices-driven approach and prepare your applications for this “new” architecture. Good luck!