5 steps to create a Responsive text email widget
Email marketing is one of the best performing marketing channels with returns up to $42 from a single $1 invested. A typical Kentico developer would not open the Email marketing application on a daily basis. That's something for his marketing colleagues.
But what if he could increase their productivity and increase the results of their campaigns? Would that buy him a beer?
Kentico's Email Builder allows marketers to create email campaigns from templates, and by dragging-and-dropping, add content to emails using email widgets. They can compose and send their email blasts all by themselves with no help from developers.
What kind of content can they add?
Well, anything they need. The email widget is just a piece of reusable code that marketers can use to add text, images, product cards, clickable call-to-action buttons, or whatever they need.
In this article, I'll show you how to create an email widget for adding text. If you like the shortcuts, download the Responsive text widget and investigate it by yourself.
And if you feel like getting into the dirt and mud of HTML 4 trenches, join me on this five-step adventure that will make you an email widget grandmaster.
Step 1. Buckle up
You’re about to embark on an epic adventure. Building the widgets is fun, but you're also in for some necessary debugging and optimizing. Kentico gives you the tools, but it's you who calls the shots.
Step 2. Gather requirements for your widget
I know some back-end developers who frown upon front-end code. “It’s just HTML and CSS, right? I can crank out a ton of this code at no time!” is their mantra. Hold on to your horses. The HTML email can bite you in places you’d never expect. Don't let it and start small – by specifying what the widget should do.
In my case, I want to enable marketers to:
- Add the widget into a one-column or two-column template layout
- Make the email's text bold or italicized
- Use Kentico built-in email macro methods to personalize the text
- Align the text to left, center or right
- Add space above and below the text
Further, the text in the widget:
- Adjusts to the devices in which recipients open the email
- Allows for progressive enhancements if the email client supports the features
Step 3. Define the widget’s properties
Widget properties are parameters that email marketers use to add content to the email. And—based on the code behind—they also adjust how the content looks and feels.

You can look at the widget properties as standard form controls. When you create the email widget, Kentico stores it in the Newsletter_EmailWidget table, where each property takes up an individual column. Thanks to this, marketers can use built-in Kentico macro expressions to customize and personalize the email content.
Start in the Email marketing application, and on the Email widget tab, click the New email widget button to a new widget called Responsive text.
Done? Let’s define now the Responsive text widget' properties.
Property to store the email text
- The Text property uses the Long text data type. The Rich text editor form control comes with the built-in WYSIWYG CKEditor.

- In the Advanced options, you can adjust what will the text widget looks like in the admin UI. For example, you know that your marketers work mainly from laptops with smaller screens. You can define the widget's size using em size units so it adjusts dynamically to their screen.
- The built-in WYSIWYG editor comes with advanced styling. For emails, many of these styling options could cause you headaches, should the marketers use them to freshen up the email text.
Kentico comes with a pre-configured version of the WYSIWYG editor suitable for emails with limited styling options. To add the EmailWidget configuration, use the field Toolbar set. (You can either paste in the value directly into the field or click the arrow next to the field and paste it from there).

Property to align the text
- The TextAlign property allows marketers to align their text. This text data type uses Radio buttons form control and List of options in the Data source field.

Property to add space above and below the copy
- The TextTopIndent and TextBottomIndent properties are integers with default value 12 that marketers can adjust.

Step 4. Define the widget’s look and feel
If you’ve followed up down here, you might think – “Where’s the adventure? I was hoping for some dirty front-end stuff!”
Be patient, young Padawan. We're getting to the front-end implementation now.
Remember that the widget’s code should:
- Work across different email clients
- Allow for progressive enhancements
If you’ve peeked into my previous article about developing an email template or spent some time creating emails and templates on your own, you have already met the ultimate villain—the good-old Outlook.
How I handled the front-end part? Here’s the front-end code that you can add on the Widget editor tab.
<!-- Checks if the widget contains any text ->
{% if(Text !="") {%}
<!-- Condition kicks in if reader opens the email in any MS client -->
<!--[if mso]>
<table role="presentation" cellpadding="0" cellspacing="0" width="100%">
    <tr>
        <td style="margin-left:16px;padding-right:16px">
            <![endif]-->
            <!-- End of MS client condition -->
<table border="0" cellpadding="0" cellspacing="0" width="100%" style="width:100%; max-width:100%">
  <tbody>
    <tr>
      <!-- Uses values from UI as HTML/CSS properties -->
      <td class="mobile-padding email-copy" align="{%TextAlign%}" style="text-align:{%TextAlign%};word-wrap: break-word;padding-top:{% TextTopIndent %}px;padding-bottom:{%TextBottomIndent%}px;background-color:#{%BackgroundColor%};">
        <!-- Padding-left and right fixes issue with margin in Gmail web client -->
        <p class="responsive-text" style="padding-left: 16px;padding-right:16px">{% Text %}</p>
      </td>
    </tr>
  </tbody>
</table>
<!--[if mso]>
        </td>
    </tr>
</table>
<![endif]-->
{% } %}
Code highlights:
Step 5. Test the widget vigorously
Well done, you have created your Responsive text widget. Before marketers can use it in their emails, you need to add this widget to a template on the Assigned to email templates tab.

Now, you can switch to the Email feed tab in the Email marketing application, and create a new email feed to test your widget.

Then switch to the Emails tab and create a new email using the email template with 2 zones.

Finally, in the Email builder, drag-n-drop the Responsive text widget and add some content.
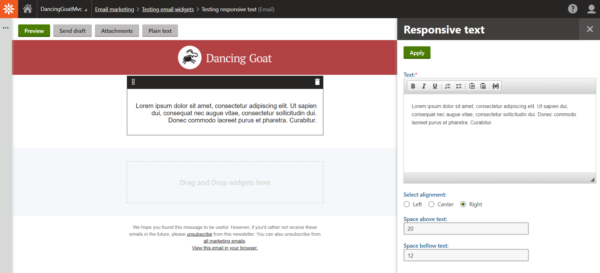
And here it is!
Use the Send draft button and send your test the email delivery on various platforms with your testing accounts.
But wait, what?
Why send it at all? Why not just use Papercut or some other SMTP test server?
Here comes the "HTML email can bite you in places you’d never expect."
Even though you create a valid HTML code that checks all the boxes, email clients have their minds – and their quirks. You can start testing your email in Papercut, but at some point, you need to see if your code is rendering correctly in an actual inbox.
And that means you need to be sending and opening your tested emails in different email clients, both on desktop and mobile. (Or use advanced testing features that come with Litmus or EmailOnAcid.)
There is no other way.
Send. Test-open. Tweak code. Rinse, repeat. That’s the mantra of creating HTML emails.
A quick tip: What if you use local development?
Even if you’re developing your widget locally, you can still connect your Kentico instance to an SMTP server. For example, when creating this Responsive text widget, I was using my MS Office 365 personal account for the test ride. If you’re not sure how to set up an MS SMTP server in Kentico, check out this excellent guide on setting up SMPT servers in Kentico.
Email clients quirks solved
Here are some issues I had to tackle during testing this proof-of-concept text widget. It’s possible they were caused by local installation quirks, e.g., browser or Outlook add-ons.
Outlook 2019 padding/margin issue
The desktop Outlook 2019 refused to add the left and right space. It’s fixed by combining margin-left and padding-right CSS properties.
<!-- Outlook 2019 spacing fix -->
<td style="margin-left:16px;padding-right:16px">
Gmail padding issue
Gmail refused to add any space to the left and right of the table’s cell. The Responsive text places all the contents within a paragraph where the padding-left/right resolves correctly.
<p class="responsive-text" style="padding-left: 16px;padding-right:16px">{% Text %}</p>
These were the two main issues that I ran into. However, if you want to use this widget in production, make sure to test it in your email templates across different devices/browsers (with different plugins) and different email clients.
When you’ve resolved all the weird styling issues in your new Responsive text widget, don’t forget to pat yourself on the back. You deserve it!
Conclusion
Here’s the final widget in action:

Looking nice, isn't it?
Building this widget took only a few minutes and no back-end code. And once you get the hang of it, you’ll be cranking email widgets out in no time. Your marketers will thank you. And fixing all the little tiny, client-specific issues will pet your developer ego. Or is that just me?
Have you developed a similar widget for your email marketers or clients? What issues did you run into? Share your war stories in the comments. And if you want to play around in Kentico, spin up your personal sandboxed instance.