
Defining user choice |

|

|

|

|
|
Defining user choice |
|
|

|
|
Defining user choice |
|
|
|
|
|
Defining user choice |
|
|
|
|
|
|
||
You can add steps to automation processes that allow human users to decide how individual contacts go through the process. Designated users (such as members of the website's marketing staff) can manage individual instances of automation processes for specific contacts.
To add an approval step to your automation processes:
1.Place the Standard step onto the grid from the designer toolbar.
2.Integrate the approval step into the flow of the process by connecting a preceding step.
3.Connect the step's source point to the next step in the process.
4.(Optional) Edit the step by clicking the pencil icon next to its name or by double-clicking the step box:
a.Fill in the User action text and User action tooltip for the approval step.
b.Add an additional Condition — the process allows users to approve the step only if the condition is fulfilled.
c.Click ![]() Save.
Save.
d.Open the Security tab and configure which users or roles are allowed to approve the step.
When a contact reaches the step, the process waits for approval from a designated user before continuing to the next step.
The User choice step can split the process into any number of branches. Designated users need to manually choose the next step for each contact in the process.
1.Place the User choice step onto the grid from the designer toolbar.
2.Integrate the step into the flow of the process by connecting a preceding step.
3.Click Add new choice (plus sign in the step header) to create the required number of user choices.
4.(Optional) Edit individual choices in the step by clicking their pencil icon:
a.Fill in the User action text and User action tooltip for the choice.
b.Add an additional Condition — the process allows users to to select the choice only if the condition is fulfilled.
c.Click ![]() Save.
Save.
d.Open the Security tab and configure which users or roles are allowed to select the choice.
5.Connect the source points of all choices to other steps in the process.
When users manage automation processes for specific contacts, they can move the contact between steps via action buttons. You can edit the text captions of the buttons for individual steps in your processes.
For example, the following image shows the process management interface for contacts in a User choice step with two available choices.
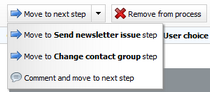
User action button with two possible step choices
To edit the action button text of a step:
1. Edit the step by clicking the pencil icon next the its name.
oThe Process step properties dialog opens.
2. Fill in the following fields:
•User action text - the caption of the action button.
•User action tooltip - text displayed when a user hovers over the action button.
3. Click ![]() Save.
Save.
If the step contains multiple cases (choices):
1.In the Process step properties window, switch to the Cases tab.
2.Edit (![]() ) each of the cases.
) each of the cases.
3.Fill in the user actions fields.
4.Click ![]() Save.
Save.