
Working with the process designer |

|

|

|

|
|
Working with the process designer |
|
|

|
|
Working with the process designer |
|
|
|
|
|
Working with the process designer |
|
|
|
|
|
|
||
This chapter describes the process designer, a built-in tool that provides a visual representation of automation processes. The designer allows you to define the steps that implement the functionality of automation processes.
To open the process designer for an automation process:
1. Log in to CMS Desk and navigate to On-line marketing -> Processes.
oYou can also access the process designer in Site manager -> Tools -> On-line marketing -> Automation processes.
2. Edit (![]() ) the process for which you want to access the designer.
) the process for which you want to access the designer.
3. Switch to the Steps tab.
The following image shows the appearance of the designer for an automation process consisting of the Start, Send newsletter issue and Finish steps. The steps are connected by transition lines. The direction of the arrows indicates which way the process moves forward.
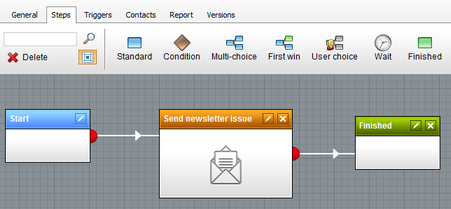
Process with Start, Send newsletter issue and Finish steps
Tip: If your graph doesn't fit into the designer area, click an unoccupied area of the grid and drag to expose additional free space.
You can use the following types of basic steps to design automation processes:
Step |
Description |
Standard |
Basic approval step. Allows designated users or roles (e.g. marketing managers) to decide whether the process continues to the next step. |
Condition |
Splits the process into two branches based on a condition. The process automatically transitions to the next step according to the result of the condition.
|
Multi-choice |
Splits the process into any number of branches based on a set of conditions.
•If exactly one condition is met, the process automatically continues through the given branch. •If multiple conditions are fulfilled, designated users need to manually choose the next step.
|
First win |
Splits the process into any number of paths based on a set of conditions. The process automatically continues through the branch whose condition is met first.
|
User choice |
Splits the process into any number of branches. Designated users need to manually choose the next step for each contact in the process. |
Wait |
Halts the process for a specified amount of time before continuing to the next step.
|
Finished |
Represents the end of the process. |
You can also embed actions into processes. When a contact reaches an action step in a process, the system automatically performs the given action.
Action step |
Description |
Change contact account |
Adds or removes the contact from an account. |
Change contact group |
Adds or removes the contacts from a contact group. |
Delete contact |
Deletes the contact. |
Import to Salesforce |
Replicates the contact into a lead in a target Salesforce organization.
You need to have Salesforce replication set up for your website to use this action. |
Log custom activity |
Logs a custom activity for the contact. |
Newsletter subscription |
Subscribes or unsubscribes the contact from a newsletter. |
Send e-mail |
Sends an e-mail (to any address). |
Send newsletter issue |
Sends a newsletter issue to the contact.
Note: When performing this action step, the process automatically adds the contact as a subscriber for the newsletter containing the specified issue. |
Set contact property |
Inserts a new value into one of the contact's properties (fields). |
Set contact status |
Changes the contact's status. |
Start process |
Triggers a different marketing automation process for the contact.
Based on the recurrence settings of the target process, this action can result in multiple unnecessary instances of the process running concurrently. |
Update from Data.com |
Updates the contact's information with the data found in the Data.com database.
You need to have Data.com integration set up for your website to use this action. |
Note: If your developers create custom actions, you can add them through the designer as well.