|
|

Macro conditions |

|

|

|

|
|
Macro conditions |
|
|

|
|
|
|
Macro conditions |
|
|
|
|
|
Macro conditions |
|
|
|
|
|
|
||
Macro conditions add a large degree of flexibility to various types of functionality in the system. Each condition is defined by a macro expression that returns a boolean value (true or false). Whenever the condition is evaluated, the specified macro is resolved according to the currently available context data and its return value determines whether the condition is fulfilled or not. For example, such conditions may be used to dynamically set when a certain action should be performed, under which circumstances an item should be visible and so on.
Conditions are available for the following types of objects:
•Content personalization variants
•Dynamic contact groups
•Web analytics campaigns
•Scheduled tasks
•Report subscriptions
•Fields and categories in the field editor
•Workflow scopes and advanced workflow steps
•Automation process triggers
The interface used to enter these conditions is provided by a special Macro condition editor.
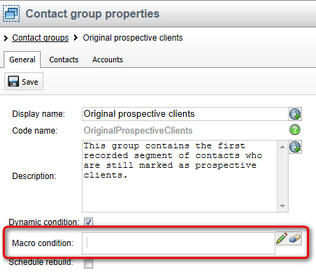
It is not necessary to enclose the expression between the standard macro parentheses — the entire content of the condition is automatically processed as a context macro. You can also leverage Macro autocompletion support when typing in condition fields. Clicking the Clear condition (![]() ) action deletes the current condition.
) action deletes the current condition.
The editor itself can be accessed in a separate dialog, opened by clicking the edit icon (![]() ) next to the respective condition field. There are several different approaches that may be used to define conditions, as described in the sections below.
) next to the respective condition field. There are several different approaches that may be used to define conditions, as described in the sections below.
In some cases, macro conditions may need to be created by non-technical users without any knowledge of K# macro syntax. For this reason, the condition editor provides a way to build conditions simply by adding and configuring predefined components called Macro rules. Each macro rule is implemented by a standard macro expression, which is wrapped into a user friendly, text‑based interface.
Macro rules need to be prepared in advance before they may be used in conditions. Many different types of rules are included by default, but you can also define any additional ones that your users might need. There are several categories of macro rules, which can be managed in different sections of the administration interface. The rules from each category are offered when designing the corresponding types of conditions, as described in the following table:
Rule category |
Description |
Global |
Global rules may be used for all conditions in any part of the system.
They can be defined in Site Manager -> Development -> Macro rules. |
Workflow |
Offered when adding conditions to Workflow scopes or advanced workflow steps.
Workflow rules may be managed in Site Manager -> Development -> Workflows -> Macro rules. |
On-line marketing |
On-line marketing rules can be selected when building conditions for the following items:
•Content personalization variants
They may be defined in CMS Desk -> On-line marketing -> Configuration -> Macro rules. |
Reporting |
These rules are available when specifying conditions for Report subscriptions.
To add reporting macro rules, go to CMS Desk -> Tools -> Reporting, select any report category in the tree and choose the Macro rules tab. |
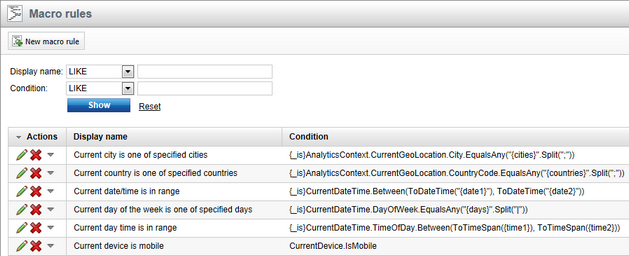
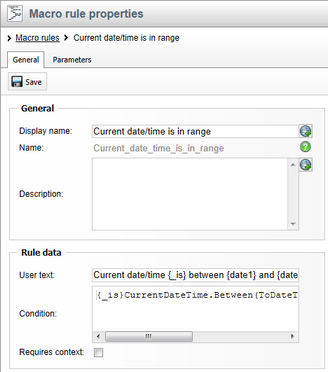
When creating a new macro rule or editing (![]() ) an existing one on the General tab, the following options can be specified:
) an existing one on the General tab, the following options can be specified:
•Display name - sets the name of the macro rule displayed to users. This name is shown to users in the list of available macro rules, so it should also serve as a basic description.
•Name - sets the name used as an identifier for the rule (for example in the API).
•Description - may be used to enter a description for the rule. This text is displayed to users as a tooltip when they hover over the rule in the list of available options.
•User text - defines the text clause displayed when the rule is inserted into a macro condition. It should accurately describe the requirements that must be fulfilled in order for the rule to be true.
•Condition - this is where the actual condition represented by the rule needs to be defined using standard context macro code (K#). The entered macro expression is resolved whenever the rule is evaluated, and its return value determines whether the rule is true or false. Autocompletion support is provided when writing in this field.
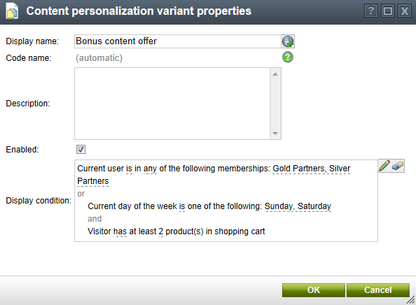
•Requires context - this property should be enabled if the rule's condition needs to access context data (information about the current user, the currently viewed page etc.) in order to work correctly. Doing so ensures that the rule will only be offered for conditions that have the context available when they are resolved. For example, the context is accessible when evaluating the conditions of content personalization variants on the website's page, but not when the system is building dynamic contact groups.
The functionality of a macro rule can be modified through parameters. After a user adds the rule to a condition, they can configure its exact behavior by setting the values of its parameters. This makes rules more flexible and allows them to be used for various different scenarios. For example, in a macro rule that requires the current user to be a member of a role, the exact role could be determined by a parameter.
Parameters can be created by editing the rule on its Parameters tab. Each parameter is defined as a field with a certain data type and various other settings. The interface shown to users when editing the parameter's value is provided by a selected Form control.
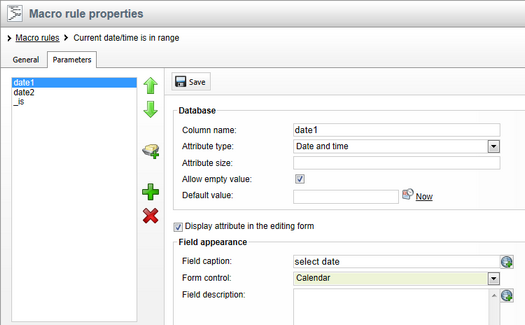
Once the required parameter fields are prepared, it is necessary to add them into the rule's text clause and condition code back on the General tab. To place a parameter into the User text, enter its Column name enclosed in curly brackets, for example {role}. Also use the same format to insert parameters into the appropriate position in the rule's Condition code. When the condition is being resolved, the parameter expressions are replaced by the values specified by users for the given occurrence of the rule.
There are several predefined parameters that may be used to add commonly required functionality to macro rules:
•{_is}, {_has}, {was}, {_will}, {_perfectum} - these provide an easy way to negate a rule's condition. Several variants with different wording are available, so you can use the one that matches the text of the particular rule. They allow users to choose between a positive and negative option, e.g. is or is not. If the negative option is selected, the parameter is resolved into the K# negation operator "!" in the condition code. With the positive option, it returns an empty string.
•{_any} - useful for rules where a list of items needs to be specified through another parameter. It allows users to switch between two options that determine how the item list will be processed — any (at least one of the items must meet the given condition) or all (the condition must be fulfilled for all items in the list). When resolved, the parameter returns either a false (any) or true (all) value. In the condition code, the parameter can be inserted as an additional argument of macro methods that work with object lists, which automatically ensures the required functionality. For example: CurrentUser.IsInRole("{roles}", {_any})
When one of these parameters is entered into the User text field of a rule and saved, the corresponding definition with the appropriate form control and default values is automatically created on the Parameters tab of the given rule.
When creating a condition via the macro condition editor, you can work with macro rules on the Rule designer tab.
All rules prepared for the type of condition that is being edited are listed under the Available rules section. To add a rule to the condition, select it in the list and use the Add rule (![]() ) button. This inserts the given rule clause into the main designer area, where it is displayed as a text description of the corresponding requirements.
) button. This inserts the given rule clause into the main designer area, where it is displayed as a text description of the corresponding requirements.
If multiple rules clauses are present in the condition, logical operators are automatically added between them. The and operator means that the combination of two rules will only be true if both of them are also true. If or is placed between two rules, the result will be true if at least one of them is fulfilled. You can switch between these two options by clicking on individual operators. The final result of the condition is calculated based on the used operators.
Any parameters in the text of the added rules are underlined. Clicking on a parameter opens a separate dialog where the user can set its value.
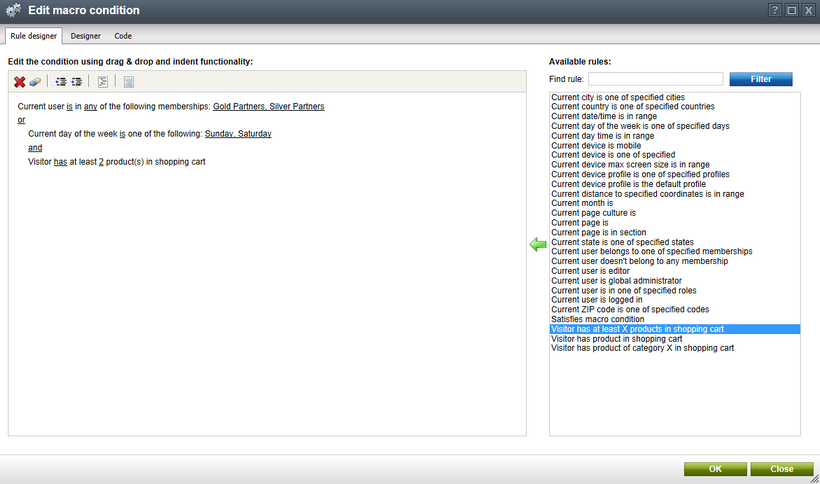
You can select a rule clause in the designer simply by clicking on it (outside of any underlined parameter text). The rules may be managed through the actions available in the header of the designer area:
•![]() Delete - removes the currently selected macro rule clause.
Delete - removes the currently selected macro rule clause.
•![]() Clear all rules - removes all rules from the condition.
Clear all rules - removes all rules from the condition.
•![]() Unindent - this action decreases the indentation of the selected macro rule. Indentation in the rule designer provides a way to group together macro rules and set the precedence of the logical operators between them. The rules on the level with the largest indentation are evaluated first. The result is then passed to the level above, and this continues until the final result of the condition is known.
Unindent - this action decreases the indentation of the selected macro rule. Indentation in the rule designer provides a way to group together macro rules and set the precedence of the logical operators between them. The rules on the level with the largest indentation are evaluated first. The result is then passed to the level above, and this continues until the final result of the condition is known.
•![]() Indent - increases the indentation level of the selected macro rule.
Indent - increases the indentation level of the selected macro rule.
•![]() Auto indent - changes the indentation of all rules in the condition according to standard operator priorities.
Auto indent - changes the indentation of all rules in the condition according to standard operator priorities.
•![]() View condition in K# - allows you to view the K# code of the overall condition defined through the macro rules.
View condition in K# - allows you to view the K# code of the overall condition defined through the macro rules.
It is also possible to change the order of the rules by dragging them to a different position in the designer area.
Once all required rules are added, you can insert the result into the edited condition field by clicking OK.
In addition to the Rule designer, the macro condition editor also offers other ways to create conditions that are directly based on writing K# code. This approach offers much more flexibility and does not need any predefined components. However, it requires users to have at least basic understanding of the macro syntax and programming principles.
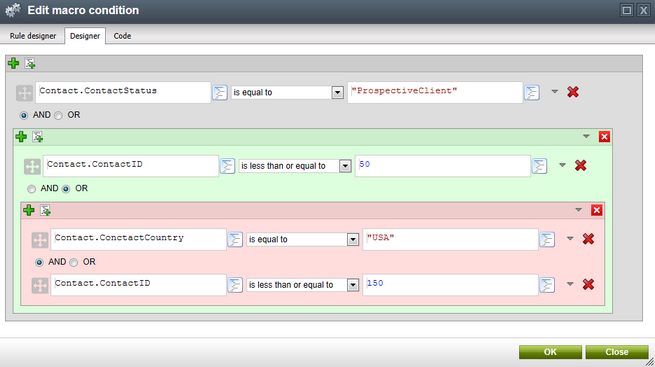
The Designer mode of the editor provides a graphical interface that makes it easier to build complex conditions. It allows you to divide the condition into individual expressions and groups of expressions, which can then be managed as separate elements. The overall condition is defined by combining these sub‑elements as necessary.
You can add elements into the designer using the actions in the headers of groups or the main area:
•![]() Add expression - adds a new macro expression into the group.
Add expression - adds a new macro expression into the group.
•![]() Add group - adds a new sub-group under the given group.
Add group - adds a new sub-group under the given group.
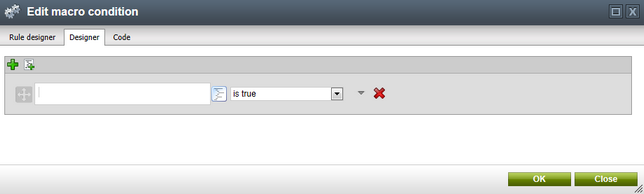
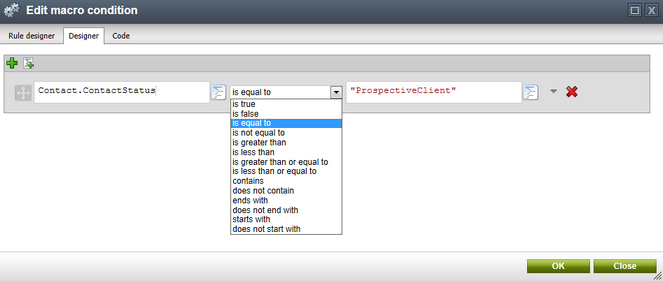
Expressions are composed of two macro selection controls with a relation drop-down list between them. You can either input context macro code or static values into these fields. Macro autocompletion and the Show/hide macro object tree (![]() ) button are available for easier macro specification.
) button are available for easier macro specification.
Each expression must always return a boolean result (true or false). Through the relation drop-down list, you can specify the operator that will be used to evaluate the values on the left and right of the expression. The following operator options are available:
•is true, is false - these options may be used to evaluate macro expressions that already return a boolean value. Only one macro field is displayed in this case, as there is no need to compare two values.
•is equal to (==), is not equal to (!=) - determine whether the values returned by the expressions on the left and right are equal.
•greater than (>), less than (<), greater than or equal (>=), lesser than or equal (<=) - allow you to compare numeric values returned by the expressions on the left and right.
•contains, ends with, starts with (and does not equivalents) - these operators allow you to compare text-based (string) values in various ways.
By adding groups, you can organize expressions and set precedence. Groups in the macro designer are the equivalent of parentheses. Each group of expressions is evaluated separately before being combined with the remaining elements.
Expressions and groups are added together using logical conjunction (AND) or logical disjunction (OR). You can choose which of these you wish to use by selecting the corresponding radio button between any two elements. The final result of the condition is determined by the total combined value of all expressions and groups.
Existing expressions or groups can be removed from the condition using the following action icons:
•![]() Remove group - removes the whole group, including all expressions and sub-groups that it contains.
Remove group - removes the whole group, including all expressions and sub-groups that it contains.
•![]() Remove expression - removes the given macro expression.
Remove expression - removes the given macro expression.
You can also change the order and position of elements using the actions available in the context menus that can be opened by clicking the respective ![]() icons:
icons:
•![]() Move up - moves the macro expression or group up before the one above it.
Move up - moves the macro expression or group up before the one above it.
•![]() Move down - moves the macro expression or group down after the one below it.
Move down - moves the macro expression or group down after the one below it.
•![]() Move to parent - moves the macro expression or group from its current group to the parent group.
Move to parent - moves the macro expression or group from its current group to the parent group.
Items can also be moved simply by dragging them into the desired location. Groups need to be picked up by their header row, expressions need to be dragged using the cross icon.
If necessary, the overall macro code of the defined condition can be reviewed or directly modified by switching to the Code tab.
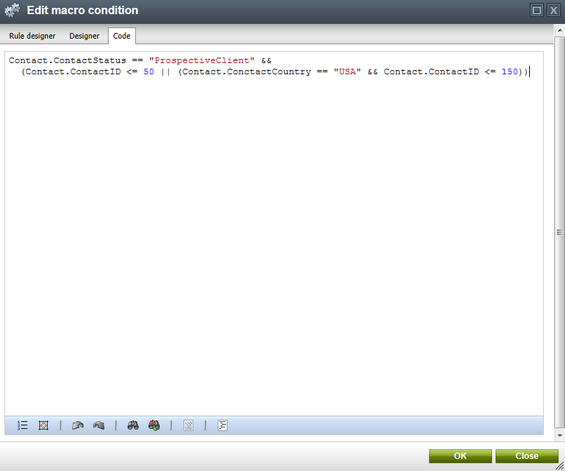
Finally, when you finish specifying the condition on either the Designer or Code tab, click OK to insert it. In this case, the resulting macro code will be displayed in the condition field.

|
Incompatibility with the rule designer
Please note that the system is not capable of converting general macro code to macro rules. Because of this, making any changes to the condition on the Designer or Code tab deletes the content of the Rule designer. |
