|
|

Managing blogs |

|

|

|

|
|
Managing blogs |
|
|

|
|
|
|
Managing blogs |
|
|
|
|
|
Managing blogs |
|
|
|
|
|
|
||
Users who created their own blogs on the Intranet Portal can edit and delete these blogs, same as edit and delete blog posts added to these blogs.
The following examples demonstrate how the actions available to blog owners can be carried out. For the purpose of the examples we will use Luke Hillman, one of the sample users shipped with the portal. Log on using the LukeH username with blank password.
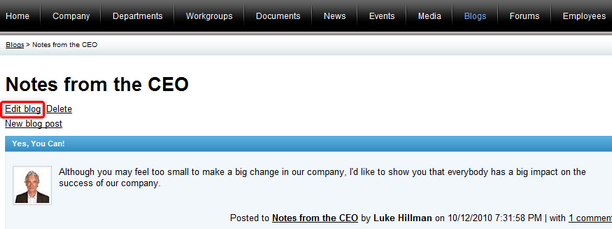
1. If you need to edit one of the blogs you created, access the portal and sign in. Now navigate to the Blogs section using the main menu and click on the name of the blog. On the page where you will be redirected to, click the Edit blog link. For more details on how to view blogs on the portal, please refer to Blogs overview -> Viewing blogs and blog posts.
2. This displays the dialog used for the editing of an existing blog.
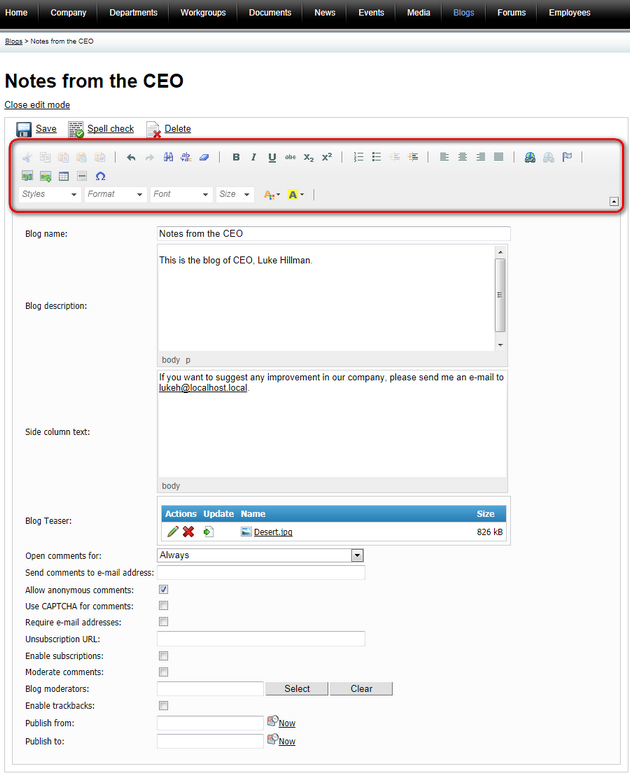
The following fields are available if you edit an existing blog:
•Blog name - the name of the blog displayed on the portal; a required field.
•Blog description - the description of the blog displayed on the portal; an optional field.
•Side column text - the blog side column text; an optional field.
•Blog Teaser - the teaser (preview) image of the blog. It is displayed together with the name of the blog; an optional field. Click the ![]() Upload file link to upload the image from the local or network file system.
Upload file link to upload the image from the local or network file system.
•Open comments for - indicates how long blog comments are opened after publishing a blog post; the default value is Always.
•Send comments to e-mail address - the e-mail address to which comments will be sent; an optional field.
•Allow anonymous comments - indicates if anonymous users are allowed to insert comments; an optional field.
•Use CAPTCHA for comments - indicates if CAPTCHA is used for comments; an optional field.
•Require e-mail address - indicates if e-mail address is required when adding a blog comment; an optional field.
•Unsubscription URL - URL of a page with the Blog post unsubscripiton web part, which handles blog post unsubscription requests from links contained in blog post notifications; an optional field. Unless you were instructed otherwise, please leave the field empty - a pre-defined page will be used.
•Enable subscriptions - indicates if subscriptions to notifications about new blog post comments are enabled; an optional field.
•Moderate comments - indicates if new comments require to be moderated before publishing; an optional field. If the blog is moderated, all new blog post comments are created in the rejected state and must be approved by a blog moderator or the blog owner before becoming visible. Moderators receive automatic notification e‑mails whenever a new blog post comment that requires their approval is created. Please note that blog moderators have the same rights to blog post comments like the blog owner.
•Blog moderators - users who are allowed to moderate blog post comments; an optional field. Use the Select button to select the moderators or use the Clear button to remove the moderators from the blog.
•Enable trackbacks - indicates if the trackbacking feature is enabled; an optional field.
•Publish from - the date and time when the blog will be published on the portal; an optional field. If you leave this value blank, the blog will be published right after its saving. You can click the Now link to insert the current date and time or you can click the ![]() icon to choose the date and time from the calendar.
icon to choose the date and time from the calendar.
•Publish to - the date and time until when the blog will be published on the portal; an optional field. You can click the Now link to insert the current date and time or you can click the ![]() icon to choose the date and time from the calendar.
icon to choose the date and time from the calendar.
You can use the built-in WYSIWYG editor to edit the Blog description and Side column text fields. The WYSIWYG editor is used in various parts of the portal and you can learn more about it in Other features -> WYSIWYG editor. The teaser image of the blog can be Edited (![]() ), Deleted (
), Deleted (![]() ), Updated (
), Updated (![]() ) or displayed in a separate window using either the actual teaser or name of the image file. You can also optionally click the
) or displayed in a separate window using either the actual teaser or name of the image file. You can also optionally click the ![]() Spell check button; the spell-checker will check the content of the blog description and the side column text and if it finds any mistake, you will be allowed to decide whether to ignore the word, add it to the dictionary or replace it with the suggested word.
Spell check button; the spell-checker will check the content of the blog description and the side column text and if it finds any mistake, you will be allowed to decide whether to ignore the word, add it to the dictionary or replace it with the suggested word.
When you have all values entered, click ![]() Save to save the blog. Alternatively, you can delete the blog using the
Save to save the blog. Alternatively, you can delete the blog using the ![]() Delete link.
Delete link.
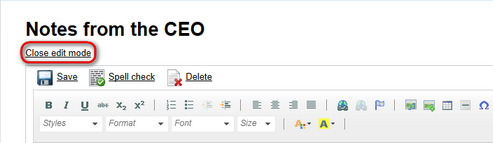
4. If you don't want to make any more changes to the blog, you can finally click the Close edit mode link. You will immediately be redirected to the blog page. If you now go to the main page of the Blogs section, the blog will be listed among other blogs in the Recent blogs box.
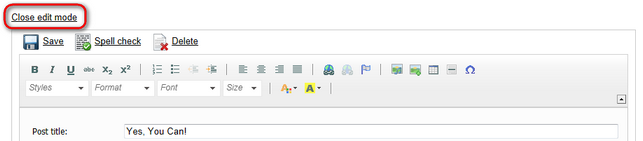
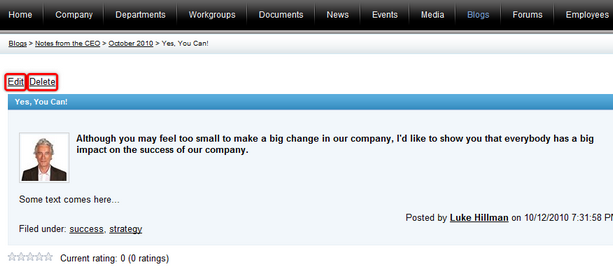
1. If you need to edit some of the blog posts you added to a blog whose owner you are, access the portal and sign in. Now navigate to the Blogs section using the main menu and click on the name of the blog post. On the page where you will be redirected to, click the Edit link. For more details on how to view blog posts on the portal, please refer to Blogs overview -> Viewing blogs and blog posts.

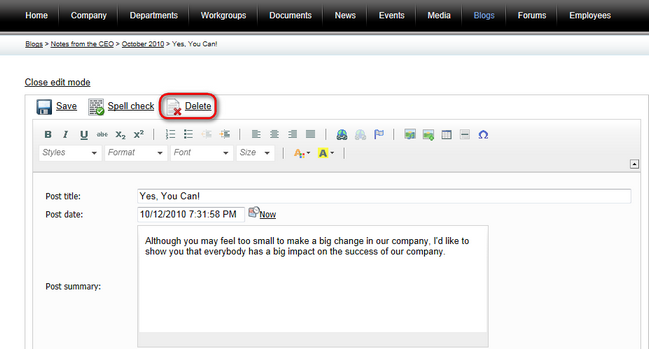
2. This displays the dialog used for the editing of an existing blog post.

The following fields are available if you edit an existing blog post:
•Post title - the title of the blog post displayed on the portal; a required field.
•Post date - the date and time of creation of the blog post, displayed in the details of the blog post; a required field. You can click the Now link to insert the current date and time or you can click the ![]() icon to choose the date and time from the calendar.
icon to choose the date and time from the calendar.
•Post summary - the summary of the blog post displayed in the list of blog posts; a required field.
•Post text - the text of the blog post displayed on the blog post page; a required field.
•Post teaser - blog post teaser (preview) image displayed in the list of blog posts; an optional field. Click the ![]() Upload file link to upload the image from the local or network file system.
Upload file link to upload the image from the local or network file system.
•Allow comments - indicates if commenting on the blog post is allowed; an optional field.
•Tags - special words that are associated with the blog post, displayed in the form of links; an optional field.
•Publish from - the date and time when the blog post will be published on the portal; an optional field. If you leave this value blank, the blog post will be published right after its saving. You can click the Now link to insert the current date and time or you can click the ![]() icon to choose the date and time from the calendar.
icon to choose the date and time from the calendar.
•Publish to - the date and time until when the blog post will be published on the portal; an optional field. You can click the Now link to insert the current date and time or you can click the ![]() icon to choose the date and time from the calendar.
icon to choose the date and time from the calendar.
You can use the built-in WYSIWYG editor to edit the Post summary and Post text fields. The WYSIWYG editor is used in various parts of the portal and you can learn more about it in Other features -> WYSIWYG editor. The teaser image of the blog post can be Edited (![]() ), Deleted (
), Deleted (![]() ), Updated (
), Updated (![]() ) or displayed in a separate window using either the actual teaser or name of the image file. You can optionally click the
) or displayed in a separate window using either the actual teaser or name of the image file. You can optionally click the ![]() Spell check button; the spell-checker will check the content of the post summary and post text and if it finds any mistake, you will be allowed to decide whether to ignore the word, add it to the dictionary or replace it with the suggested word.
Spell check button; the spell-checker will check the content of the post summary and post text and if it finds any mistake, you will be allowed to decide whether to ignore the word, add it to the dictionary or replace it with the suggested word.
When you have all values entered, click ![]() Save to save the blog post. You will immediately find it listed among other blog posts below the blog post properties form. Alternatively, you can delete the blog post using the
Save to save the blog post. You will immediately find it listed among other blog posts below the blog post properties form. Alternatively, you can delete the blog post using the ![]() Delete link.
Delete link.
4. If you don't want to make any more changes to the blog post, you can finally click the Close edit mode link. When you go back to the main page of the Blogs section, the recently edited blog post will be listed among other blog posts in the Recent blog posts area.
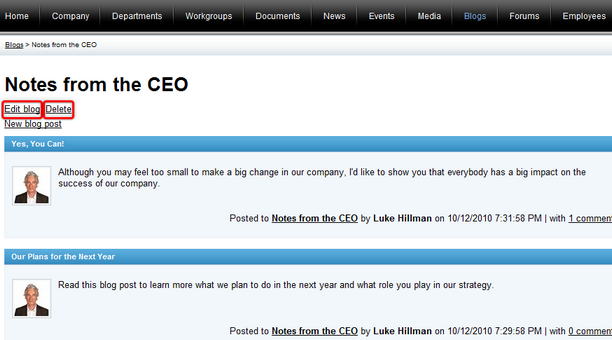
If you need to remove one of the blogs you created on the Intranet Portal, access the portal and sign in. Navigate to the Blogs section using the main menu and click on the name of the blog. On the blog page where you will be redirected to, click the Delete link. Please note that deleting the blog will result in removing all blog posts added to this blog, too. For more details on how to view blogs on the portal, please refer to Blogs overview -> Viewing blogs and blog posts.
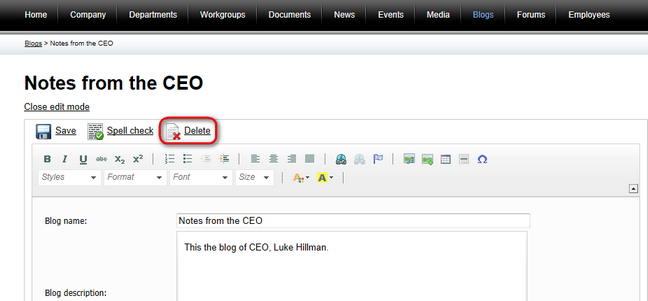
Another option to delete a blog is to navigate to the blog edit mode by clicking the Edit blog link and use the ![]() Delete link as described in the Editing blogs section above.
Delete link as described in the Editing blogs section above.
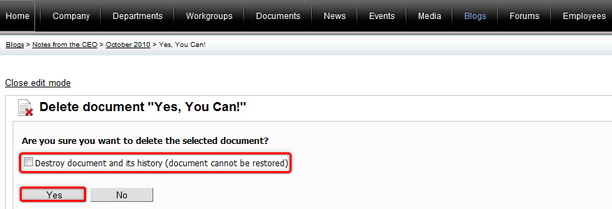
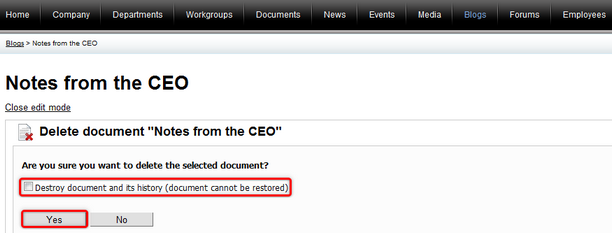
In both cases, you will be asked to confirm the removal of the blog. Please note that if you set the Destroy document and its history option to true, it will not be possible to restore the deleted blog. Click Yes to remove the blog from the portal.
If you need to remove one particular blog post whose owner you are, access the portal and sign in. Navigate to the Blogs section using the main menu and click on the name of the blog post. On the blog post page where you will be redirected to, click the Delete link. For more details on how to view blog posts on the portal, please refer to Blogs overview -> Viewing blogs and blog posts.
Another option to delete a blog post is to navigate to the blog post edit mode by clicking the Edit link and use the ![]() Delete link as described in the Editing blog posts section above.
Delete link as described in the Editing blog posts section above.
In both cases, you will be asked to confirm the removal of the blog post. Please note that if you set the Destroy document and its history option to true, it will not be possible to restore the deleted blog post. Click Yes to remove the blog post from the portal.