Running Kentico in a Docker container
Containers are the next big thing in the world of deployment and DevOps. Two weeks ago, at NDC Oslo 2016, I attended Ben Hall's presentation on Deploying Docker Containers on Windows Server 2016. That triggered me to do what I had wanted to do for a long time — deploy Kentico to a Windows Server Container using Docker. This article will walk you through the process step by step.
Why Docker?

Did you ever decide not to keep any of the DTAP environments on dedicated (virtual) machines just because it would be too expensive or too much work to maintain them? It doesn't always have to be a trade-off between the required level of isolation and maintenance/resource costs. Deploying an application to a Docker container is like deploying it to a VM, but without the bad bits. You get a high degree of isolation and portability while staying performant. Besides that, you get the ability to roll back to any previous version of the container, which is useful, especially if something goes wrong in production. Talking of production, scaling your app horizontally with Docker is a piece of cake — it takes just a few seconds to boot up more containers, either in your own infrastructure or in the cloud.
This set of features can make using Docker beneficial in all stages of your project — going from development to production. Plus, the fact that the containers can be scripted by developers aligns nicely with the idea of DevOps.
How Is It Different from Virtual Machines?
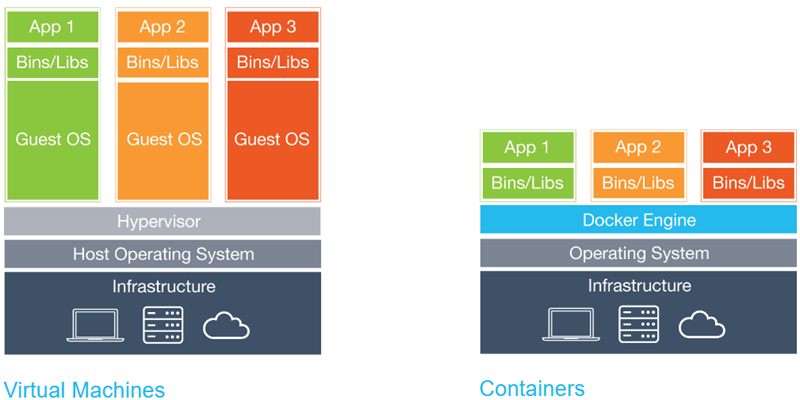
The difference between Docker and VMs is best described by the following scheme:

Instead of booting a Guest OS for every app (VM), the Docker engine provides each container with resource isolation and allocation while sharing the operating system. Containers are created from images that contain everything that application needs to run, and can be terminated and started again at any time. Images guarantee the consistency of the containers. We can create images by building a Dockerfile - a file with a list of instructions (commands) needed to assemble the image. Images can be inherited and can build on top of each other (we call it layering). The first layer is always a container OS image that is immutable. In the realm of Windows, there are two types of containers: Windows Server Core and Nano Server containers. In this article, I'll be talking about the first one - Windows Server Core containers.
If the terminology (hosts, images, container) is still confusing for you, have a look at container fundamentals on MSDN.
Prerequisites
Operating System
Though it's possible to run containers on earlier versions of Windows, I recommend using either Windows Server 2016 Technical Preview 5 or Windows 10 Insider Preview Build 14352. If you want to use your client system, you need to become a "Windows Insider".
For the purposes of this article, I'll be using Windows Server 2016 TP5 installed on an Azure Virtual Machine.
Windows Containers
Once you have installed the correct operating system, you have to install container support. The installation steps are a bit different for WS2016 and W10:
An alternative option is to let PowerShell take care of everything for you. Just run the following commands in your PS console:
# Download script
wget -uri https://aka.ms/tp5/Install-ContainerHost -OutFile C:\Install-ContainerHost.ps1
# Run this command on Windows Server 2016
.\Install-ContainerHost.ps1
# Run this command on Windows 10
.\Install-ContainerHost.ps1 -IgnoreClient
All possible parameters are listed in the
documentation on GitHub.
Kentico Web Project & Database
Make sure you have a Kentico instance running and that the SQL server is accessible from the host OS. Pack your web project into c:\kentico9\kentico9.zip.
In highly automated scenarios such as Continuous Integration, this manual step can be avoided by calling:
PS c:\> Compress-Archive -Path C:\<source control path>\Kentico9\ -DestinationPath c:\kentico9\kentico9.zip -CompressionLevel Fastest
Building a Docker Image
Now, let's put all the pieces of the puzzle together and build a docker image by creating a Dockerfile.
In short our Dockerfile will:
- base our image on Window Server Core 2016 with pre-installed IIS (you can find the image on Docker Hub or by running "docker search" in PowerShell, you can also see its Dockerfile)
- install ASP.NET 4.5
- copy the Kentico web project
- map a virtual directory to the web project
Create a file with the following contents and save it as C:\kentico9\Dockerfile on your host operating system. Normally, you would store the file in your source control system.
Dockerfile
# Use Windows Server Core with IIS as a base image
FROM microsoft/iis:latest
# Install ASP.NET 4.5
RUN powershell -executionpolicy bypass -command "Add-WindowsFeature Web-Asp-Net45"
# Create a new folder inside the container
RUN mkdir c:\payload
# Use the new folder as a work directory for docker commands
WORKDIR /payload
# Copy Kentico9.zip from host (c:\kentico9) to container (WORKDIR = c:\payload)
# Alternatively, you could use ADD command which supports URLs and unzipping .tar.gz archives
COPY Kentico9.zip Kentico9.zip
# Run a PowerShell command inside the container to extract the archive
RUN powershell -executionpolicy bypass -Command "expand-archive -Path 'c:\payload\Kentico9.zip' -DestinationPath 'c:\inetpub\wwwroot\'"
# Run appcmd.exe to add virtual directory to the Default Web Site in IIS
RUN %systemroot%/system32/inetsrv/appcmd.exe set vdir "Default Web Site/" -physicalPath:"c:\inetpub\wwwroot\Kentico9\CMS"
Run the following command to build the image and tag it "kentico9".
PS c:\> docker build -t kentico9 c:\kentico9
Let's verify that our image has been built successfully:
PS c:\> docker images
REPOSITORY          TAG                 IMAGE ID            CREATED             SIZE
kentico9            latest              68c367d7e41b        7 hours ago         10.28 GB
windowsservercore   10.0.14300.1000     5bc36a335344        4 weeks ago         9.354 GB
windowsservercore   latest              5bc36a335344        4 weeks ago         9.354 GB
microsoft/iis       latest              c26f4ceb81db        5 weeks ago         9.49 GB
microsoft/iis       windowsservercore   c26f4ceb81db        5 weeks ago         9.49 GB
"kentico9" is in there. So far, so good.
The image cache is stored at C:\ProgramData\docker\windowsfilter
Running the Docker Image
Now the fun part starts. Finally, let's run the image we've built.
#       docker run [OPTIONS]                                IMAGE    [COMMAND] [ARG...]
PS c:\> docker run --rm --name kentico9_instance1 -it -p 80 kentico9 cmd
Parameters
--rm Automatically removes the container when the command (cmd) exits
--name kentico9_instance1 Assigns a name to the container (otherwise a random but very intelligent name will be generated)
-p 80 Exposes port 80
-it Allocates a pseudo-TTY connected to the container’s stdin; creating an interactive shell in the container. (Simply put, it keeps the container alive.)
When you run the command, you should see a command prompt (which is running inside the container). If you exit the prompt, the container will be removed. Don't do that yet.

Let's first verify that our machine is running. Launch another instance of PowerShell and run the following command. You should see an image named "kentico9" running.
PS c:\> docker ps
CONTAINER ID        IMAGE               COMMAND             CREATED             STATUS              PORTS                NAMES
bf634a16abc9        kentico9            "cmd"               2 hours ago         Up 2 hours          0.0.0.0:80->80/tcp   kentico9_instance1
Connecting to the Container

When we started the container, Docker assigned it a random IP address. To find all details about the images and containers, we use the "inspect" command:
#       docker inspect <container|image>
PS c:\> docker inspect kentico9_instance1
# Will output a long JSON object

# Let's use Select-String to "grep" the result
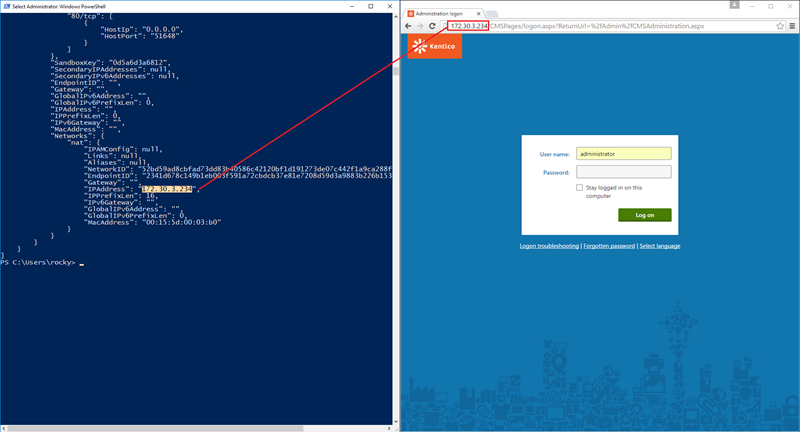
PS c:\> docker inspect kentico9_instance1 | sls IPAddress

            "SecondaryIPAddresses": null,
            "IPAddress": "",
                    "IPAddress": "172.30.3.234",
On your docker host system, open the browser and connect to the IP address. E.g. when I go to http://172.30.3.234/admin, I'm presented with a familiar logon screen. If you, for some reason, need to assign the container a static IP, configure a custom host name or do other networking magic, check out the MSDN documentation (or the Docker version).
Exposing the App through the Container Host
Our container is now running and is accessible from the container host via the IP. Let's take one step further, and expose the app to the rest of the world. Kill the running container by typing "exit" into the command prompt, and run the following command:
# Set -p 80:80 (-p host:container)
PS c:\> docker run --rm --name kentico9_instance1 -it -p 80:80 kentico9 cmd
If you get the "HNS failed with error : Failed to create endpoint." error, run the following command, restart the machine, and try again:
PS c:\> Get-NetNatStaticMapping | ? ExternalPort -eq 80 | Remove-NetNatStaticMapping
Adjusting Firewall Settings
Now, we need to open the HTTP port on our host machine:
PS c:\> New-NetFirewallRule -DisplayName "TCP 80" -Protocol TCP -LocalPort 80 -Action Allow -Enabled True
If you're running on Azure, you'll also need to add an inbound security rule to your network security group.

And we're done. We can access a Kentico instance running in a Docker container via a public IP:

Next Steps
Kernel Level Isolation
Did I mention that you can run a Docker container inside a Hyper-V virtual machine? It's as easy as specifying the --isolation parameter of the run command.
# Set --isolation=hyperv
PS c:\> docker run --isolation=hyperv --rm --name kentico9_instance1 -it -p 80:80 kentico9 cmd
Note that this is not possible in scenarios where the host operating is virtualized itself and the hardware virtualization is not being passed from hypervisor to the VM. This is the case of Azure VMs. However, if you have control over the infrastructure in your organization, you should be able to configure hardware (Intel VT-x, AMD-V or similar) virtualization passthrough to enable nested hypervisors. Both Hyper-V and vSphere support that.
Mounting Persistent Storage
Sometimes, you may need to create a folder that is shared across more containers or with the container host (e.g., for media files). Another time you need a folder that will survive container disposal. These scenarios can be accomplished using data volumes.
Here's how to mount a data volume:
# Set -v c:/<hostPath>:/c:/<containerPath>
PS c:\> docker run -v c:/Users/guest/:/c:/<containerPath> --rm --name kentico9_instance1 -it -p 80:80 kentico9 cmd
Conclusion
Docker has a great potential for deploying applications. I hope I have managed to demonstrate at least part of it. As you can see, all steps involved in the process can be scripted and, therefore, the whole process can be automated. This means we can plug it into CI and make our deployments a little more pleasant and consistent.
Let me know if you have found the article useful and if the examples worked for you.
Disclaimer:
No animals were harmed in the writing of this article. Just two pull requests were submitted.