Render Online Forms with ASP.NET MVC Display Templates and The Code Generator—Part 2
The first part of this article demonstrated how Kentico Online Forms were included in the Dancing Goat ASP.NET MVC 5 sample site. This second part of the article shows how to automate the implementation of Kentico Online Forms (and eventually other FormEngine data) in MVC sites. The article will also tell you how to create a new Online Form in Kentico from scratch and how to include it in an MVC site.
Note: The article was adjusted to support Kentico 10!
One of the nicest things about the support of MVC in Kentico is that it allows the developer to leverage all the best practices in an MVC site: view models, repositories, IoC, dependency injection etc. All the beauty can be seen in Part 1 of this article.
As the componentization and testability bring some additional complexity and a small bit of boilerplate code, a new community project was started that could eliminate them. The below is a preview of a Kentico MVC Code Generator module that is designed to automate part of the developer’s workload by generating the repository model code and the partial view code.
While both kinds of code files play an important role in the whole MVC solution, they usually contain less imperative code with minimum to no methods. Therefore, the ambitions of the module are to offload the burden of writing such code from the developer so that they can focus on some more intellectually challenging tasks.
I believe that together with the community of Kentico developers we can make the module soon to be an encompassing solution for generating MVC-related code files. Then the developer will be able to use them with just a few final touches. Who knows, maybe one day the module will be able to generate repositories or other kinds of classes.
The MVC Code Generator Module
The module demonstrates how the repository model code and partial view code can be generated by using the FormInfo and FormFieldInfo Kentico API classes.
What It Looks Like
This module allows the developer to generate the code just by editing an online form, navigating to the MVC code generator (preview) tab and typing in some input data.
The source code of the module already contains a reasonable amount of comments, so it wouldn’t make sense to rephrase it here. It will be just described how the module can be deployed and how it can be copied for further development. The article will also point out a few facts to think about when developing the module further on.
A side note: As the proper way of developing Kentico MVC sites is to use a web application project type, the module was also designed using this approach. The module hasn’t been tested with web site projects.
How to Install the Module
You can either try out the module directly by deploying its NuGet package or you can participate in the development of this module by adding the source code files into the solution manually.
Deploying with NuGet
In Visual Studio, deploy the Kentico.MvcCodeGenerator package into your CMSApp project. The package is compatible with Kentico 10.0.3 and higher (the package for Kentico 9 can be built using the below MvcCodeGenerator_Project.zip and MvcCodeGenerator_Export.zip files).
Build the solution and navigate to the Kentico administration interface.
The MVC code generator (preview) tab will now appear in the Forms application under each form’s edit page.
Installing for Further Development
If the NuGet package is currently deployed in the solution, uninstall it, rebuild the solution and refresh any of the pages of the Kentico instance.
Follow the instructions specific to the version of Kentico.
Kentico 9
Download the MvcCodeGenerator_Project.zip file and unpack its contents of into the \CMS\ folder.
Download MvcCodeGenerator_Project.zip
In the Kentico administration interface, in the Sites application, import the MvcCodeGenerator_Export.zip package. In step 2 of the import wizard, mark Import code files as checked.
Download MvcCodeGenerator_Export.zip
Kentico 10
Enable Continuous Integration (CI for short). Serialize all objects.
Navigate to the GitHub repository at https://github.com/Kentico/MvcCodeGenerator and fork it using the web interface.
Open the command line and navigate to the root of the Kentico solution folder (i.e., where the .sln file resides).
Initialize the repository and fetch its code files.
git init
git remote add origin https://github.com/owner/MvcCodeGenerator.git
git fetch
git checkout -t origin/master
Both versions
Add the existing \CMS\Kentico.MvcCodeGenerator.csproj project to the solution.
Adjust the version of the target .NET framework of the project to match the target framework version of the Kentico instance. The module was developed using the version 4.5 and it was successfully tested with the version 4.6.
Build the solution. If you encounter issues with project references and/or packages, open the Package Manager Console, switch the Default project to the \CMS\Kentico.MvcCodeGenerator.csproj project and run Update-Package -Reinstall.
Kentico 10
Restore the CI data to the Kentico database in the command line:
ContinuousIntegration.exe -r
Both versions
In Kentico administration UI, in Modules → MVC code generator (preview) → Sites, associate the module with all MVC sites.
Supported Controls
It is worth noting that this is just a preview of the functionality where a few form controls are supported. Further development should be done so that the module can act as a reliable gateway between artifacts of Kentico and ASP.NET MVC 5.
Currently, these form controls can be used:
- DecimalNumberTextbox
- EmailInput
- EncryptedPassword
- HtmlAreaControl
- IntegerNumberTextbox
- LongNumberTextbox
- TextAreaControl
- TextboxControl
As it is possible to swap the underlying data type of a form control in Kentico, it is also worth noting that the module currently supports just standard combinations of data types and form controls.
Code Generation Engine
One last note is dedicated to the underlying code generation engine. The module uses the T4 engine, the run-time way of generating code in particular. It wouldn’t make sense to use any ‘big hammer’ toolsets like the System.Linq.Expression class or Roslyn. These tools were designed for analyzing (and generating) C# or other CLI-compliant code. In this case, the source of information is the SQL Server database, not a C# code. Hence the choice of the T4 engine.
How to Create a New MVC Online Form from Scratch
The following text will show how to add a new form to the Dancing Goat ASP.NET MVC 5 sample site. This is the MVC version of the Dancing Goat sample site (DG for short). You can get it on GitHub.
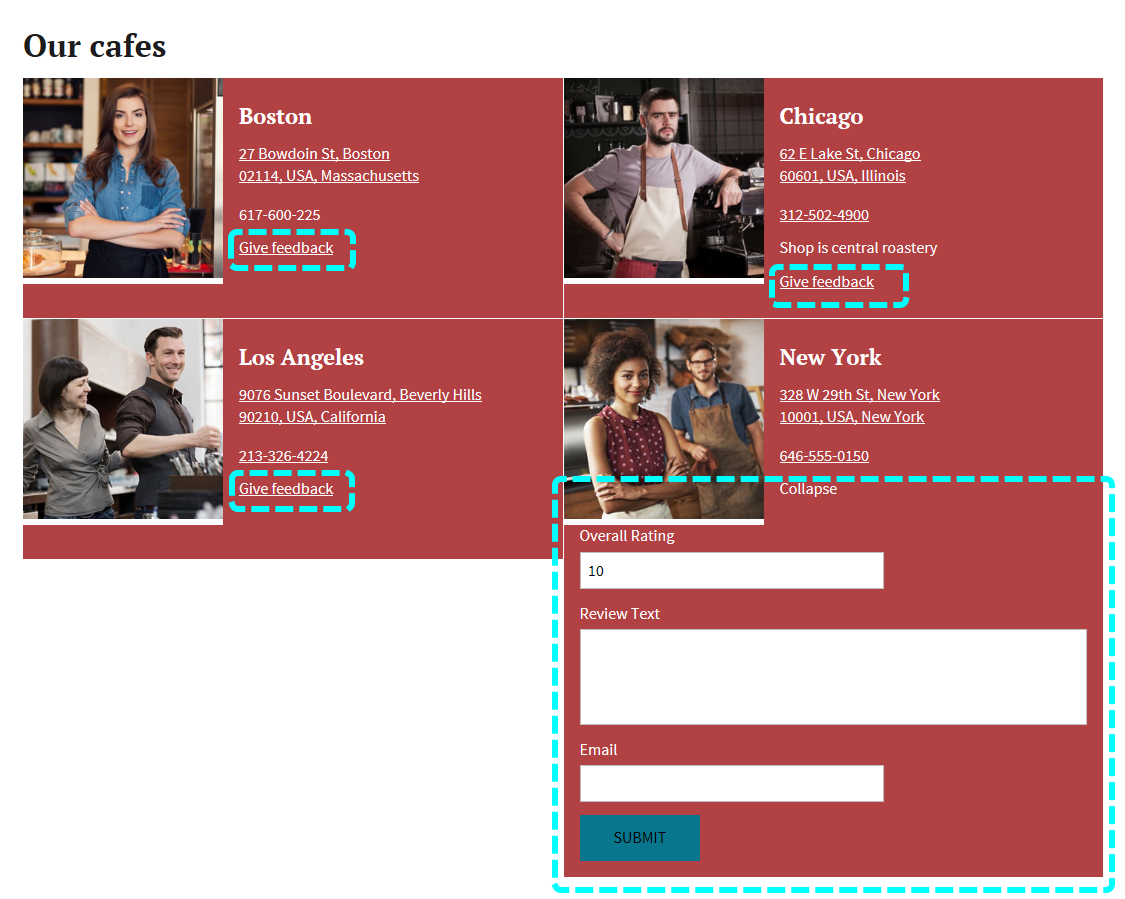
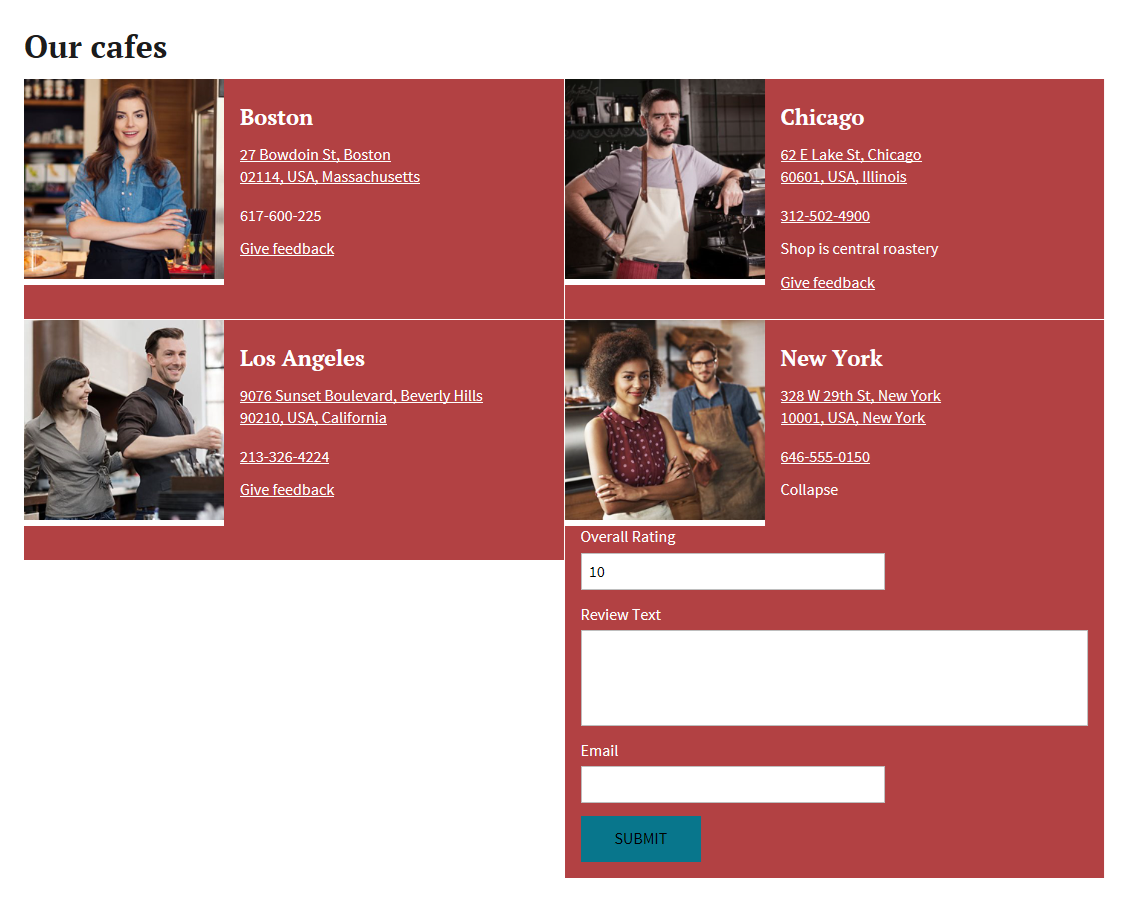
You will modify the Cafes page. The page lists company’s cafes. You will enrich each item (cafe) in the listing with a small Give feedback link. Upon clicking the link, the cafe item will expand to display a Cafe Feedback form.
The following picture shows how the page will look like after the modification. The dashed cyan lines denote the links and the expanded New York item with the Cafe Feedback form.
Let’s start modifying!
You will start in the Kentico UI. Then you’ll use the code generator to save us from some boilerplate coding. Finally, you’ll do some changes in the DG site.
Kentico UI
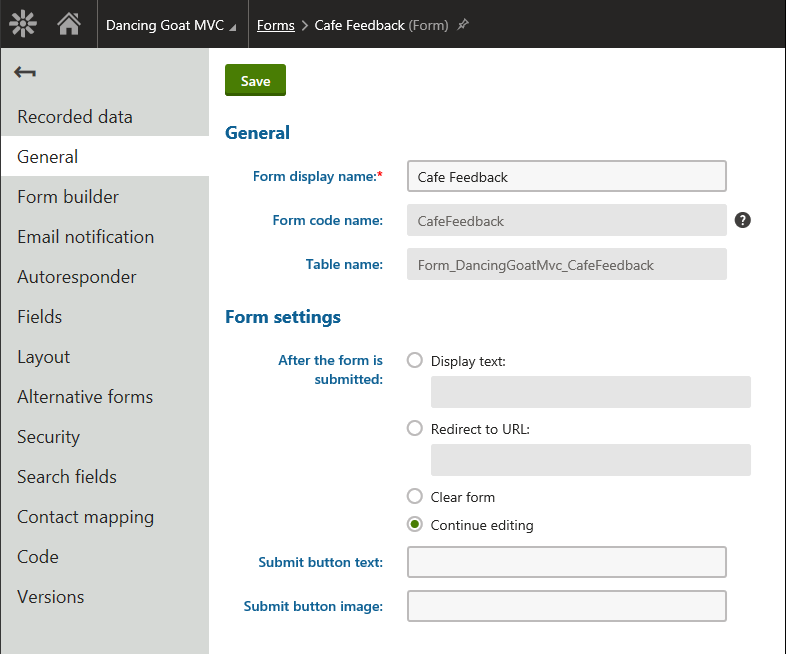
In the Forms application, create a form called Cafe Feedback:
In the Form builder tab, drag the following controls onto the canvas:
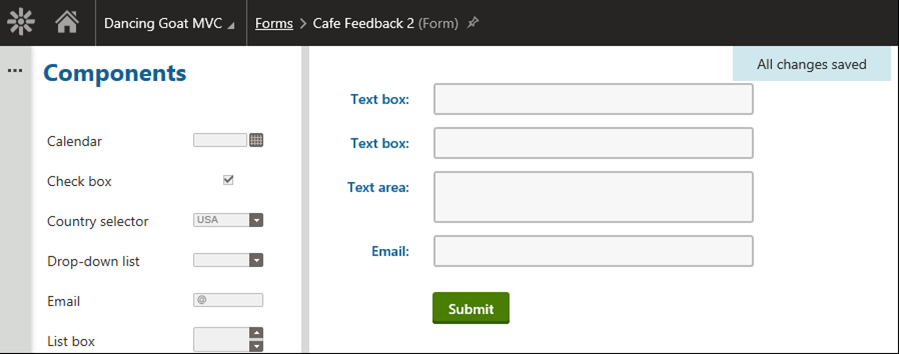
In the right-hand pane, adjust the labels to the following:
- CafeId
- Overall Rating
- Review Text
- Email
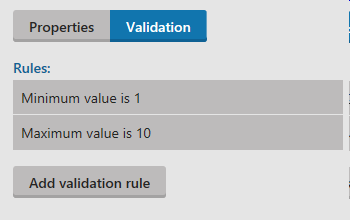
Make the Overall Rating field a Required field and set the following validation rules:
Let’s switch to the Fields tab.
Here you can fine-tune the settings that weren’t available in the Form builder tab.
Change the settings of the first text box to the following:
|
Field name
|
CafeId
|
|
Data type
|
Integer number
|
|
Field caption
|
CafeId
|
|
Show on public form
|
False (unchecked)
|
Do similar steps with other fields:
|
Field name
|
OverallRating
|
|
Data type
|
Integer number
|
|
Field caption
|
Overall Rating
|
|
Field name
|
ReviewText
|
|
Field caption
|
Review Text
|
|
Field name
|
Email
|
|
Field caption
|
Email
|
Note: In Kentico 10, the Field name value may already contain proper code names of the fields.
Let’s switch to the Code tab to generate the Kentico-originated model class.
Save the code file and copy it to the DG site filesystem. It is supposed to be stored in \Mvc\src\DancingGoat\Models\Generated\Forms\.
Generating The MVC Code
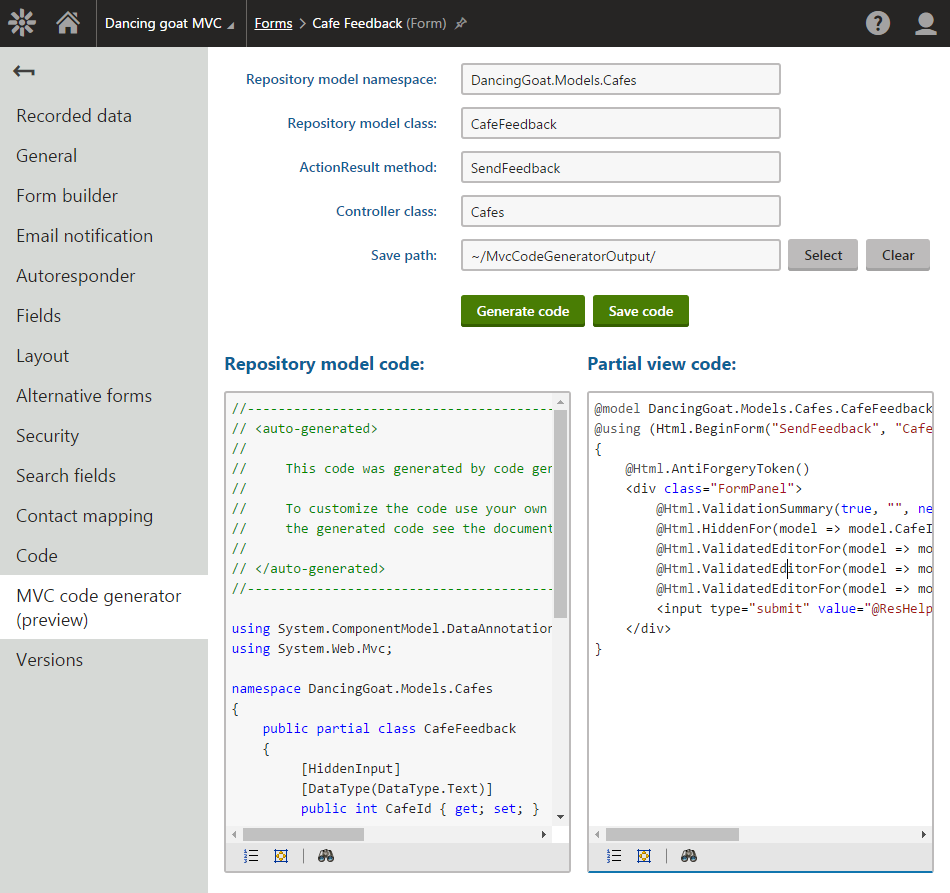
Now, navigate to the MVC code generator application. Select the Cafe Feedback form and specify the identifiers:
|
Repository model namespace
|
DancingGoat.Models.Cafes
|
|
Repository model class
|
CafeFeedback
|
|
ActionResult method
|
SendFeedback
|
|
Controller class
|
Cafes
|
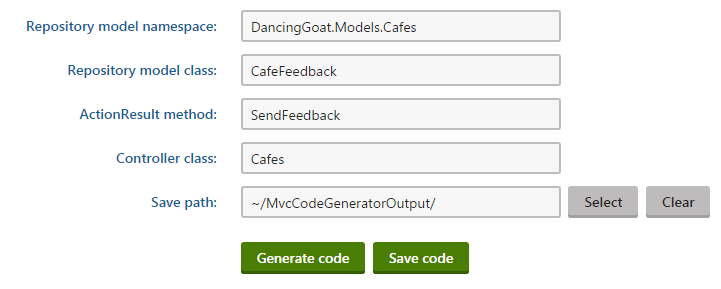
Generate the code and save it.
The generator will create the following repository model code:
//--------------------------------------------------------------------------------------------------
// <auto-generated>
//
//     This code was generated by code generator tool.
//
//     To customize the code use your own partial class. For more info about how to use and customize
//     the generated code see the documentation at http://docs.kentico.com.
//
// </auto-generated>
//--------------------------------------------------------------------------------------------------

using System.ComponentModel.DataAnnotations;
using System.Web.Mvc;

namespace DancingGoat.Models.Cafes
{
    public partial class CafeFeedback
    {
         [HiddenInput]
         [DataType(DataType.Text)]
         public int CafeId { get; set; }

         [Display(Name = "Overall Rating")]
         [DataType(DataType.Text)]
         [Range(typeof(int), "1", "10")]
         public int OverallRating { get; set; }

         [Display(Name = "Review Text")]
         [DataType(DataType.MultilineText)]
         [DisplayFormat(ConvertEmptyStringToNull = true)]
         [StringLength(500)]
         public string ReviewText { get; set; }

         [Display(Name = "Email")]
         [DataType(DataType.EmailAddress)]
         [DisplayFormat(ConvertEmptyStringToNull = true)]
         [StringLength(100)]
         public string Email { get; set; }

    }
}
It will also generate the partial view code:
@model DancingGoat.Models.Cafes.CafeFeedback
@using (Html.BeginForm("SendFeedback", "Cafes"))
{
    @Html.AntiForgeryToken()
    <div class="FormPanel">
        @Html.ValidationSummary(true, "", new { @class = "ErrorLabel" })
        @Html.HiddenFor(model => model.CafeId)
        @Html.ValidatedEditorFor(model => model.OverallRating)
        @Html.ValidatedEditorFor(model => model.ReviewText)
        @Html.ValidatedEditorFor(model => model.Email)
        <input type="submit" value="@ResHelper.GetString("General.Submit")" class="btn btn-primary" />
    </div>
}
Now, copy the files from the subfolders of \CMS\MvcCodeGeneratorOutput\ into corresponding subfolders of the DG site’s \Mvc\src\DancingGoat\ folder.
The DG Site
You’ll add the Cafe Feedback form into the Cafes page of the site. In fact, you’ll add the form below each tile of a particular cafe. As mentioned earlier, the forms will be collapsed with the option to expand them at will.
Open the DG site in Visual Studio.
In the Solution Explorer window, display all files and include the copied files in the project.
All the below code files can be cloned from the fork that was created specifically for this article.
Go to the fork
You’ll start with the interface of the repository class. You’ll create a file called \Mvc\src\DancingGoat\Repositories\ICafeFeedbackRepository.cs:
using DancingGoat.Models.Cafes;
using Kentico.Core.DependencyInjection;

namespace DancingGoat.Repositories
{
    /// <summary>
    /// Abstraction of a cafe feedback form item.
    /// </summary>
    public interface ICafeFeedbackRepository : IRepository
    {
        /// <summary>
        /// Saves a new form record from the view model data.
        /// </summary>
        /// <param name="feedback">Individual feedback data</param>
        void InsertCafeFeedbackFormItem(CafeFeedback feedback);
    }
}
Then you’ll add a repository class. It is the connecting line between the controller and the Kentico-originated model class. It should be called \Mvc\src\DancingGoat\Repositories\Implementation\KenticoCafeFeedbackRepository.cs:
using CMS.OnlineForms.Types;
using DancingGoat.Models.Cafes;
using System;
using System.Collections.Generic;
using System.Linq;
using System.Web;

namespace DancingGoat.Repositories.Implementation
{
    /// <summary>
    /// Implements an ICafeFeedbackRepository as a Kentico CafeeFeedback form item.
    /// </summary>
    public class KenticoCafeFeedbackRepository : ICafeFeedbackRepository
    {
        /// <summary>
        /// Saves a new form record from the view model data.
        /// </summary>
        /// <param name="message">The "Contact us" form data.</param>
        public void InsertCafeFeedbackFormItem(CafeFeedback feedback)
        {
            var item = new CafeFeedbackItem
            {
                CafeId = feedback.CafeId,
                OverallRating = feedback.OverallRating,
                ReviewText = feedback.ReviewText,
                Email = feedback.Email
            };

            item.Insert();
        }
    }
}
You’ll now adjust the \Mvc\src\DancingGoat\Models\Cafes\CafeModel.cs file. Just add the following auto-implemented property into its CafeModel class:
/// <summary>
/// View model of a cafe feedback.
/// </summary>
public CafeFeedback CafeFeedback { get; set; }
It’s time to move to the ‘point of gravity’ of the MVC design pattern—the controller.
You’ll need some field to store the form into. Add it to the top of the CafesController class in the \Mvc\src\DancingGoat\Controllers\CafesController.cs file:
private readonly ICafeFeedbackRepository mCafeFeedbackRepository;
You also need to populate it with data. Let’s change the signature and the code of the parametrized constructor:
public CafesController(ICafeRepository cafeRepository, ICountryRepository countryRepository, ICafeFeedbackRepository cafeFeedbackRepository, IOutputCacheDependencies outputCacheDependencies)
{
    mCountryRepository = countryRepository;
    mCafeRepository = cafeRepository;
    mOutputCacheDependencies = outputCacheDependencies;
    mCafeFeedbackRepository = cafeFeedbackRepository;
}
The GetCompanyCafesModel method is responsible for loading the data from the repositories. You’ll add a few lines to it to include the CafeFeedback object in the initial view model (the GET request). This is how it should look like after the adjustment:
private IEnumerable<CafeModel> GetCompanyCafesModel(IEnumerable<Cafe> cafes)
{
    return cafes.Select(cafe => new CafeModel
    {
        Photo = cafe.Fields.Photo,
        Note = cafe.Fields.AdditionalNotes,
        Contact = CreateContactModel(cafe),
        CafeFeedback = new Models.Cafes.CafeFeedback()
        {
            CafeId = cafe.CafeID,
            OverallRating = 10,
            ReviewText = string.Empty,
            Email = string.Empty
        }
    });
}
Let’s now add a method responsible for taking the view model data from the incoming POST request and forwarding it to the repository:
[HttpPost]
[ValidateAntiForgeryToken]
public ActionResult SendFeedback(CafeFeedback feedback)
{
    if (!ModelState.IsValid)
    {
        return View("Index");
    }
    else
    {
        try
        {
            mCafeFeedbackRepository.InsertCafeFeedbackFormItem(feedback);
        }
        catch
        {
            return View("~/Views/Contacts/Error.cshtml");
        }

        return RedirectToAction("ThankYou", "Contacts");
    }
}
Good. You have the Kentico-originated model class, the repository model class, the repository interface and its implementation, you can load the empty forms in the GET request into the controller context and you also have the proper ActionResult method to handle the POST request. Let’s now create some basic UI for that.
Insert the reference of the \Mvc\src\DancingGoat\Views\Shared\CafeFeedbackPartial.cshtml partial view into the code of the main view. Open the \Mvc\src\DancingGoat\Views\Cafes\Index.cshtml file.
Find the following line:
<p>@cafe.Note</p>
Place the following right underneath that line.
<div class="cafe-feedback-container">
    <a href="javascript:void(0)" class="cafe-feedback-heading cafe-tile-address-anchor">Give feedback</a>
    <div class="xs-hidden sm-hidden md-hidden lg-hidden clear">
        @Html.Partial("~/Views/Shared/CafeFeedbackPartial.cshtml", cafe.CafeFeedback)
    </div>
</div>
It is also a good idea to remove the cursor-hand and js-scroll-to-map CSS selectors from the wrapping div element in the line 12 like this:
<div class="cafe-image-tile" data-address="@cafe.Contact.City,@cafe.Contact.Street">
(If you left the selectors intact, every click made within the boundaries of that div would scroll to the below Google map region.)
Then, in the Scripts section of the view, add a reference to the JavaScript resource file. This is how it looks like after adding it:
@section Scripts {
    @Html.Partial("_GoogleMaps")
    @Scripts.Render("~/Scripts/cafe-feedback.js")
}
Now you can create that JavaScript file as \Mvc\src\DancingGoat\Scripts\cafe-feedback.js:
$(".cafe-feedback-heading").click(function () {
    $header = $(this);

    // Get a reference to the form contents
    $content = $header.parent().find(".xs-hidden").first();

    // Toggle the visibility of the contents with a callback function
    $content.slideToggle(0, function () {
        $header.text(function () {
            return $content.is(":visible") ? "Collapse" : "Give feedback";
        });
    });
});
The final step is to slightly tweak the \Mvc\src\DancingGoat\Content\Styles\Site.less file or the sibling Site.css file. It is recommended to edit the LESS file and re-compiling it into Site.css using the Web Compiler extension.
Change the file according to the difference link.
You’re done!
The Result
In the Cafes page of the DG site you can now start collecting feedback for the cafes. The gathered data can be viewed in the Forms application. It can possibly be combined with other Kentico data and then it can be displayed through the Reporting application. Or it can trigger some powerful workflow defined in the Marketing automation application. There is a really vast amount of possibilities.
Final Words
The main point of the article was to explain the merits of the MVC design pattern and its related patterns like view models, repositories, IoC and dependency injection. They allow for testable and maintainable code that allows for even better compile-time checks. The second point was to ease the job of a Kentico MVC developer by creating the preview of the MVC code generator module. The community of Kentico developers can contribute to the project on GitHub. With this in hand we all should be able to create Online Forms in MVC sites with ease.
Applies to:
Kentico 9, Kentico 10