Moving file storage from database to file system
This article describes how to change file storage from the database to the file system and optionally how to clear the previously stored files from the database.
You may decide to
store files in the file system instead of the database for performance reasons, if the number of files in your Kentico instance becomes very large. You may then wish to remove the data from the database to reduce the database size.
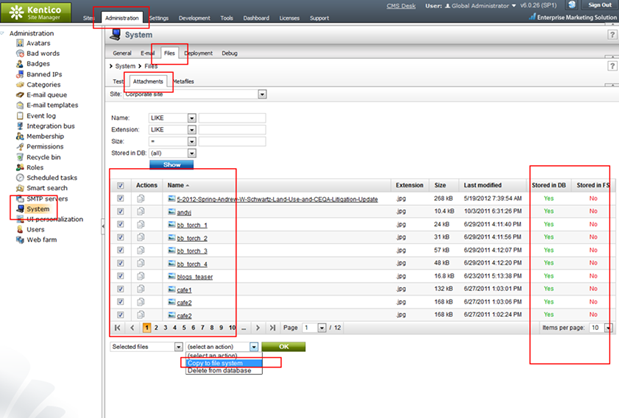
In 6.0, you can easily change this by going to
Site Manager -> Administration -> System -> Files -> Attachments.
As you can see from the below screenshot, the table on this page shows you whether a file is stored in the database and whether it is present on the file system. You can check any files you’d like to modify and choose an action from the dropdown then click Ok. The available actions allow you to copy files to the file system and also delete them from the database, if you’d like to free up space.

If you are using a version earlier than 6.0 or would like more control over the process, you can follow the below steps:
From Site Manager -> Settings, first, uncheck “Store files in database” then check “Store files in file system”. Check this at both the global and site level to be sure the setting is applied correctly.

After making this change, any time a page with an attachment is visited, the file will be copied to the file system under the CMSFiles folder within your Kentico directory. To automate this process, you can use the following code:
// Using the AttachmentManager class, get a dataset containing all attachments
AttachmentManager am = new AttachmentManager();
DataSet attachments = am.GetAttachments("", "", false);
// Make sure the dataset is not null
if (attachments != null)
{
foreach (DataRow dr in attachments.Tables[0].Rows)
{
// Check that there is a valid GUID for the attachment
Guid attachmentGuid = (Guid)dr["AttachmentGUID"];
if (attachmentGuid != null)
{
// Create an AttachmentInfo object for this GUID
AttachmentInfo ai = am.GetAttachmentInfo(attachmentGuid, CMSContext.CurrentSiteName);
// Confirm the AttachmentInfo exists for the current site
if (ai != null)
{
// Call EnsurePhysicalFile to create a file in the file system, if needed
am.EnsurePhysicalFile(ai, CMSContext.CurrentSiteName);
}
}
}
}
Keep in mind that this code will create copies on disk for all attachments not already in the file system, regardless of your current site settings.
Once you have changed your settings and run the above code, you can remove the binary data from the database, if you would like to free up space on your database.
Before doing this, be sure to confirm that files were created. Also, be sure to create a backup of your database.
To remove the binary data, simply clear the value of the column
AttachmentBinary from each row in the table
CMS_Attachment.
You can do this with a SQL update or by using the
Data Layer API.
-ag-