Membership customizations
This article provides some examples of how you can customize the membership module to better fit your needs.
Hi there,
We are sometimes asked about the membership functionality which covers the assignment of the user to sites and the behavior of this assignment.
How the system currently works
Basically, what our solution offers is a shared account storage for all web sites within single database. This is very useful when you web is distributed in multiple domains with completely different content. A great example of this is our own web.
-
There is a main domain www.kentico.com which contains our main, company web site.
-
Then, there is this devnet.kentico.com web site which is mainly for the devepopers and is completely different than the main web site.
-
In the future, there will be a new partner portal web site, which again will be different, for specific users (partners).
What really matters is that when you register on one web site, you automatically have the account on all the other web sites. That is the power of shared account storage. The site visitors always register for all the sites. You can see in the admin interface that there are checkboxes in the user details (when accessed from Site manager) where you can set to which sites the user is assigned. The important thing is that this settings do not apply for live site.
Yes, that is right, it is not a bug, this is done by design.
On the other hand, looking at the content editors, other group of people is responsible for each web site, e.g. main site has only specific admin because it is pretty static, DevNet is only managed by the people who have something to say to the developers (our Support and Developers), and the Partner web site would be managed by the Partner manager guy.
That's where the assignment of user to site applies. It actually checks if the user can access the admin interface of the web site.
It is important to say that this behavior is currently the only one possible out of the box. We haven't expected that anyone will need anything else (by that I mean some number of customers that would really really need it). Almost all the customers which gave us some feedback wanted this behavior as the default and only one and it also matched our needs.
Since there is a very slowly growing number of customers (so far I know about 3 of you at the moment, maybe, there is more) which would like to allow specific site visitors only to log in on specific site, we decided to provide you with some guidance how you can achieve this by customizing our code.
All the thanks belong to our membership team guys which provided me with these useful and nice examples, I will sure let them know if you post your thanks to the comments ;-)
How to customize the registration form to assign the user to specific sites
This is quite simple change, to make it by the book of Kentico code (in other words the recommended way), please perform the following steps:
1) Go to the
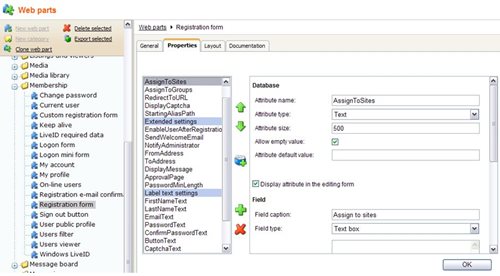
SiteManager -> Webparts -> Membership -> Registration form, the
Properties tab, and add the property
AssignToSites, which would be text, with some length that you think would be enough, e.g. 500 with textbox field.
2) Open the web part code-behind file
~/CMSWebParts/Membership/registrationform.ascx.cs and implement a new property which will reflect the new property of the web part.
NOTE: If you want to ensure that the wep part won't be overwritten by the upgrade process to new version, please clone the web part and modify the cloned one.
/// <summary>

/// Gets or sets the sites where is user assigned after successful registration

/// </summary>

public string AssignToSites

{

  get

  {

    return ValidationHelper.GetString(this.GetValue("AssignToSites"), "");

  }

  set

  {

    this.SetValue("AssignToSites", value);

  }

}
3) Modify the code of the
btnOK_Click event, replace the existing code
if (CMSContext.CurrentSite != null)

{

  string siteName = CMSContext.CurrentSiteName;

  // Add new user to the current site

  UserInfoProvider.AddUserToSite(ui.UserName, siteName);
with new one
string[] siteList = this.AssignToSites.Split(';');

foreach (string siteName in siteList)

{

  // Add new user to the site

  UserInfoProvider.AddUserToSite(ui.UserName, siteName);
4) Set-up the web part property in the design mode to the list of web site code names separated by semicolon, e.g. "CorporateSite;YourSite"
How to customize the Logon form to allow login only for the users who are assigned to the site
This own is just a little longer code, but consists only of the code modification, just add following code to the codebehind file
~/CMSWebparts/Membership/logonform.aspx.cs to the method
Login1_LoggingIn, just after the Banned IP check.
// Restrict only to users assigned to current site

if (CMSContext.CurrentSite != null)

{

  // Try to find user with specified username

  UserInfo ui = UserInfoProvider.GetUserInfo(Login1.UserName);


  // Check if user is assigned to current site

  if ((ui != null) && (!ui.IsInSite(CMSContext.CurrentSiteName)))

  {

    // Cancel logging

    e.Cancel = true;


    // Write failure text

    LocalizedLiteral failureLit = Login1.FindControl("FailureText") as LocalizedLiteral;

    if (failureLit != null)

    {

      failureLit.Visible = true;

      failureLit.Text = DataHelper.GetNotEmpty(this.FailureText, ResHelper.GetString("login_failuretext"));

    }

  }

}
It is approximately the line number 457. Of course it depends on the webpart(s) you are using for logging in, you may modify more of them the similar way.
So this is basically how you enable the other than default behavior, that is expected by some customers.
At this point, if this is enough for you, you don't need to read further. However, if you are interested and if you use the
Social networking edition, the following examples may also be very useful for you.
How to modify the registration form to assign the user to specific community groups
This is very similar to the first example, just different in the name of the property and code:
1) Go to the
SiteManager -> Webparts -> Membership -> Registration form, the
Properties tab, and add the property
AssignToGroups, which would be text, with some length that you think would be enough, e.g. 500 with textbox field.
2) Open the web part code-behind file
~/CMSWebParts/Membership/registrationform.ascx.cs and implement a new property which will reflect the new property of the web part.
/// <summary>

/// Gets or sets the groups where is user assigned after successful registration

/// </summary>

public string AssignToGroups

{

  get

  {

    return ValidationHelper.GetString(this.GetValue("AssignToGroups"), "");

  }

  set

  {

    this.SetValue("AssignToGroups", value);

  }

}
3) Add following code to the
btnOK_Click method of the webpart, to the same place where was the code for assignment to the sites above:
Add using:
using CMS.Community;
Add code:
string[] groupList = this.AssignToGroups.Split(';');


if (CMSContext.CurrentSite != null)

{

  string siteName = CMSContext.CurrentSiteName;


  // Go trough all groups

  foreach (string groupName in groupList)

  {

    // Retrieve group

    GroupInfo gi = GroupInfoProvider.GetGroupInfo(groupName, siteName);


    if (gi != null)

    {

      // Create GroupMemberInfo

      GroupMemberInfo gmi = new GroupMemberInfo();


      // Assign membership values

      gmi.MemberJoined = DateTime.Now;

      gmi.MemberRejectedWhen = DateTimeHelper.ZERO_TIME;

      gmi.MemberGroupID = gi.GroupID;

      gmi.MemberUserID = ui.UserID;

      gmi.MemberStatus = GroupMemberStatus.Approved;

      gmi.MemberApprovedWhen = DateTime.Now;


      // Store to DB

      GroupMemberInfoProvider.SetGroupMemberInfo(gmi);

    }

  }

}
And that's it. As you can see in the code, the group membership of the user is automatically approved, you can modify it by your needs. You now just set the property to the list of the group code names separated by semicolon.
How to customize the logon form to allow login only for the members of specific Group(s)
Again, this is very similar to the second example where we checked the site assigment:
1) Just add the following code to the same place of
~/CMSWebparts/Membership/logonform.aspx.cs to the method
Login1_LoggingIn you added the code for the site check:
Add using:
using CMS.Community;
Add code:
// If allowed group is set

if (!String.IsNullOrEmpty(this.AllowedGroup))

{

  // Try to retrieve userinfo and groupinfo

  UserInfo ui = UserInfoProvider.GetUserInfo(Login1.UserName);

  GroupInfo gi = GroupInfoProvider.GetGroupInfo(this.AllowedGroup, CMSContext.CurrentSiteName);


  if ((ui != null) && (gi != null))

  {

    // Check if user is member of the group

    if (!GroupMemberInfoProvider.IsMemberOfGroup(ui.UserID, gi.GroupID))

    {

      // Cancel logging

      e.Cancel = true;


      // Write failure text

      LocalizedLiteral failureLit = Login1.FindControl("FailureText") as LocalizedLiteral;

      if (failureLit != null)

      {

        failureLit.Visible = true;

        failureLit.Text = DataHelper.GetNotEmpty(this.FailureText, ResHelper.GetString("login_failuretext"));

      }

    }

  }

}
And that's it. Now you just set-up the web part property to the list of the group code names separated by semicolon. And again, you need to do this in every logon web part where you want to enable this.
Here are the sample codes:
Membership.zip
That is all for now, I hope this helped you at least a little bit, and as always, get ready for my next post.