Kentico 8 Technology – Tracking Activities and Conversions from JavaScript
This article is going to show you how to extend Kentico’s tracking capabilities in terms of Activities and Conversions. Kentico tracks the majority of user’s actions on a site straight out-of-the-box, but sometimes that in itself is simply not enough. A Visitor can perform several actions on a web entirely on the client-side, and those actions are generally not tracked by default. After reading this article, you will be able to track these actions as Activities or Conversions.
When a visitor uses your site, Kentico automatically records visitor’s actions. Those actions, called Activities, are associated with the unique identification of the visitor – the Contact. Activities tracking is a great tool that enables you to get insight into an individual Contact’s background and react accordingly to their needs. For example, if a visitor sees the pricing page he is potentially more interested in your product than the visitor who only glosses over a blog.
Kentico tracks 47 types of Activities on its own. Those include:
-
Visiting a page
-
Searching on a site
-
Submitting a form
-
Subscribing to a newsletter
-
Adding product to the shopping cart
Recorded Activities can be utilized by other Kentico modules, such as:
-
Lead Scoring - score Contacts based on actions they performed on the website
-
Personas - segment Contacts into Personas based on their behavior on the site (Personas is a new module in Kentico 8. Read more in the documentation)
-
Content Personalization - display different content to the visitor who performed some actions
-
Marketing Automation - nurture leads after they perform certain action on the site
Conversions and how they are different from activities
Alongside Activities, it is possible to track Conversions in the Kentico EMS as well. Conversions data may seem similar to Activities as they track similar things, such as:
-
Product purchase
-
Newsletter subscription
-
Form submission
-
User registration
In reality, Activities and Conversions serve a completely different purpose. Activities are intended to provide a focused view on the one visitor and his actions on the site. On the other hand, Conversions (and other statistics collected by Web Analytics module) are aggregated and provide a view of the behavior of the crowd – all visitors together. Because of this difference, analytics data cannot be used to work with Contacts. On the other hand, analytics data are optimized to display statistics in very interesting views such as graphs with various precisions. Displaying such graphs from saved Activities would not be possible because Activities are not aggregated, and querying them would be heavy on performance.
Logging events that occur on the client-side only
Even though Kentico tracks several events on its own, every project is different, and it’s very possible that some other kinds of actions will have to be tracked as Activities too. Kentico 8 documentation describes how custom action can be tracked on the server as Activities or Conversions; but recently, we have been receiving more and more questions regarding tracking events when an action occurs on the browser side without even contacting the server. This need may arise in the following situations:
-
While watching a YouTube video
-
When liking a page on Facebook Like Button
-
By clicking on a link leading to the external site
-
While using live chat different than the Kentico’s built in chat
A step-by-step guide will be shown on how to track an event when a visitor watches a YouTube video. Getting a visitor to watch a video on a site is one of the most common conversion goals of a site, so being able to track this event is very valuable. Nevertheless, technique shown in this article can be used to track any event that happens on the client-side.
Tracking event when visitor watches a YouTube video
Finally, we are getting to the practical example of how to track an action that is not supported by Kentico out-of-the-box. Specifically, we will record an Activity when the Contact plays a video on a page. The proper way to record an Activity that takes place only on the client-side (on the browser) is to create a web service that will log the event. The service will be invoked by the AJAX call made by JavaScript. The web service can be implemented using various tools such as Web API, WCF, .ashx handler, web method, etc. Just choose whatever suits you best. Web API service will be created in this example.
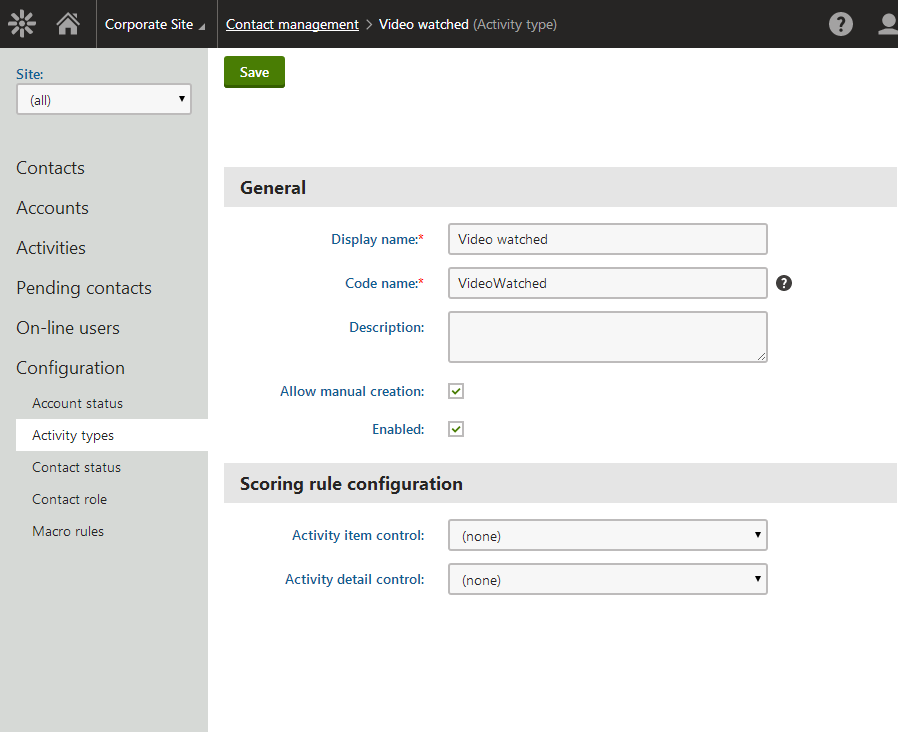
First, a custom Activity Type has to be created. To do it, just go to Administration -> Contact Management -> Configuration -> Activity Types and create a new Activity Type with the “Video watched” name.

Next, the Web API logging service will be created. In Kentico 8, there is a special project CMSApp_MVC where ASP.NET MVC and Web API code can be placed in order to separate it from the main CMS project. First, let’s create a simple Web API controller that will log the activity. A very similar controller can be used to track Conversions or other web analytics data as will be shown later in this article. Create an ApiControllers folder and put a LogVideoWatchController.cs file inside it with the following content:
using System.Net;
using System.Web.Http;

using CMS.OnlineMarketing;
using CMS.SiteProvider;

namespace CMS.Mvc.ApiControllers
{
    public class LogVideoWatchController : ApiController
    {
        public string Post([FromBody] string videoName)
        {
            var currentContact = OnlineMarketingContext.CurrentContact;

            // Do not proceed, if OnlineMarketing is disabled
            if (currentContact == null)
            {
                throw new HttpResponseException(HttpStatusCode.Forbidden);
            }

            ActivityInfo newActivity = new ActivityInfo()
            {
                ActivityType = "WatchVideo",
                ActivityTitle = "Video '" + videoName + "' watched",
                ActivitySiteID = SiteContext.CurrentSiteID,
                ActivityValue = videoName,
                ActivityOriginalContactID = currentContact.ContactID,
                ActivityActiveContactID = currentContact.ContactID,
            };

            ActivityInfoProvider.SetActivityInfo(newActivity);

            return "OK";
        }
    }
}
Creating an
ApiControllers folder and placing classes deriving from
ApiController there is good practice. Now a route has to be configured, so that the controller methods can be called from the outside. Routes for the Web API are defined in the
WebApiConfig class in the
App_Start folder. A specific route for the only API controller we have will be enough here:
public static void Register(HttpConfiguration config)
{
    config.Routes.MapHttpRoute(
        name: "LogVideoWatch API",
        routeTemplate: "api/logvideowatch",
        defaults: new { controller = "logvideowatch" }
        );
}
Now when a HTTP POST request comes to the
<project url>/api/logvideowatch URL a
Post method defined in the
LogVideoWatchController class will be called in order to handle the request. That’s all that has to be done on the server side, now the client-side code that actually calls the service will be written.
First, let’s put a YouTube video on a live site. In order to be able to react to the video events, embedded HTML code of the video has to be slightly different than normal and that’s the reason why we won’t use Kentico’s YouTube web part of the widget in this article. It would certainly be possible to modify output generated by the built-in web part by customizing the MediaHelper, but this particular topic is not pertinent to this article. If you are interested in getting more information about how YouTube API works, check the documentation. If you are using a different provider to host your videos (such as Vimeo), just check their documentation in order to learn how to react to the video events. Put the following HTML placeholder to the area of your site where you want your video to appear:
<div id="player"></div>
The video itself will be asynchronously loaded into the div by JavaScript. Place the following JavaScript code somewhere on the page. It can be placed even directly after the “div” element.
var tag = document.createElement('script');
tag.src = "http://www.youtube.com/player_api";
var firstScriptTag = document.getElementsByTagName('script')[0];
firstScriptTag.parentNode.insertBefore(tag, firstScriptTag);

function onYouTubePlayerAPIReady() {
    new YT.Player('player', {
        height: '390',
        width: '640',
        videoId: '0vkTXiK9rn8',
        events: {
            'onStateChange': onPlayerStateChange
        }
    });
}

function onPlayerStateChange(event) {
    if (event.data === 1) { // 1 means that video is playing
        jQuery.post("<project root>/api/LogVideoWatch", { videoName: "HomePageVideo" });
    }
}
The videoId parameter has to be changed to the ID of the video you want to embed. Video ID can be copied from the video URL: www.youtube.com/watch?v=0vkTXiK9rn8. Please replace <project root> with the actual URL of your site.
The above function is executed when the website visitor clicks “Play” on the video. It sends an AJAX request to the previously created controller, which in turn logs the custom activity with the video code as the Activity value.
Tracking conversions instead of activities
The example above shows how custom activity can be logged. However, if for example, you use A/B testing and want to evaluate which version of the page drives more video watches, you should track Conversions instead of Activities. Luckily, the process is almost identical.
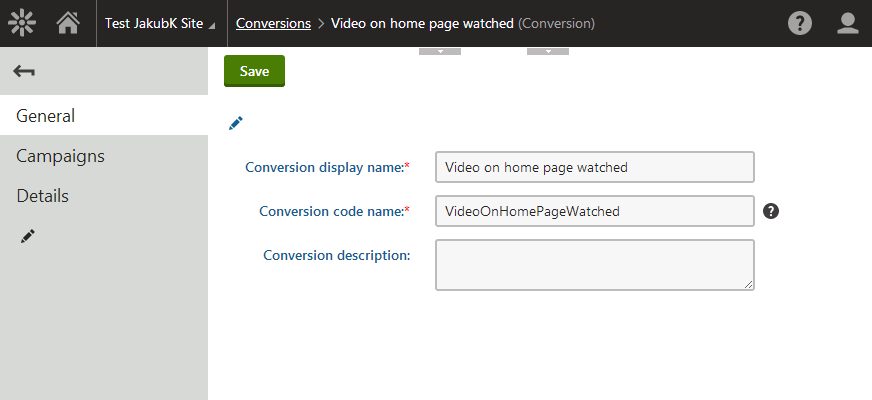
At first, conversion should be created in the Conversions application. Let’s create conversion with the name “Video on home page watched”:

The code of the LogVideoWatchController.cs file should be changed as follows:
using System.Net;
using System.Web.Http;

using CMS.Localization;
using CMS.SiteProvider;
using CMS.WebAnalytics;

namespace CMS.Mvc.ApiControllers
{
    public class LogVideoWatchController : ApiController
    {
        public string Post()
        {
            string siteName = SiteContext.CurrentSiteName;

            if (!AnalyticsHelper.TrackConversionsEnabled(siteName))
            {
                throw new HttpResponseException(HttpStatusCode.Forbidden);
            }

            HitLogProvider.LogConversions(siteName, LocalizationContext.PreferredCultureCode, "VideoOnHomePageWatched", 0, 1, 1);

            return "OK";
        }
    }
}
JavaScript line calling the service should be changed as follows:
jQuery.post("<project root>/api/LogVideoWatch");
Now when a website visitor watches a video the Conversion is tracked. As Conversions are only one kind of web analytics data, in order to log a different kind of web analytics logs, just use the HitLogProvider.LogHits(…) method with the appropriate analytics code name.
As you can imagine, the possibilities are countless. You can even create a universal Controller that is able to log any kind of Activity or Conversion.
Wrap up
Now you are able to extend tracking capabilities of Kentico so that events that happen on the client-side only can be recorded as easily as classic events handled by the server-side code.
If you happen to encounter an event that is “untrackable” with the proposed steps, feel free to write a comment under this article and I am sure that we will be able to figure out a viable solution.