Kentico 8 Technology - Form engine improvements
Kentico 8 provides many improvements in the form engine to simplify your work with forms – from simple drag & drop form creation in the brand new form builder to advanced options for customization of visual and behavioral aspects.
With the form engine improvements for Kentico 8 we were mainly focused on two goals: Our first goal was a tool that would allow even non-technical people to create and edit online forms without any help from an “IT guru”. Regardless of whether you are a developer, editor or marketer, I believe that you will be impressed by our new form builder. It’s very easy to use, with a simple and clear UI that still offers all necessary settings for usual scenarios.
The second thing we focused on was the whole form engine API. We decided to bring you a simplified way of how to work and customize forms via API, more options for automatic and custom layouts as well as stable and unified lifecycle.
In this article I would like to introduce you to the improvements made from the second part of our work – the form builder tool is so easy to use that it doesn’t need any deep dive article :-)
Changes in API
Significant change were made in classes in the
CMS.FormControls library. If you recall in previous versions, advanced server controls for online forms, content forms, general forms and custom table forms – namely
BizForm,
CMSForm,
DataForm and
CustomTableForm – were composed of the base component
BasicForm. This approach made things complicated since you had to know which properties and events are in the advanced component, and which ones are located in the base component. It was also important to set properties or register events in specific, limited moments in the lifecycle of a form component.
We decided to follow the way
UIForm – the lastly implemented advanced form component for UI forms – was made. So now all advanced form components inherit from
BasicForm and “decorate” it with custom properties, events and behavior.
The previous change – unification of advanced form components – allowed us to take another important step: Part of the refactoring in the
CMS.FormControls library covered stabilization and unification of the
forms’ lifecycle so that they behave predictably in
GET and
POST requests in all possible scenarios.
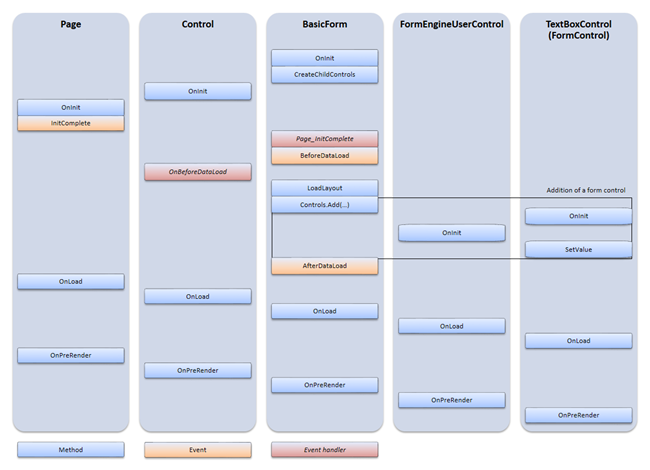
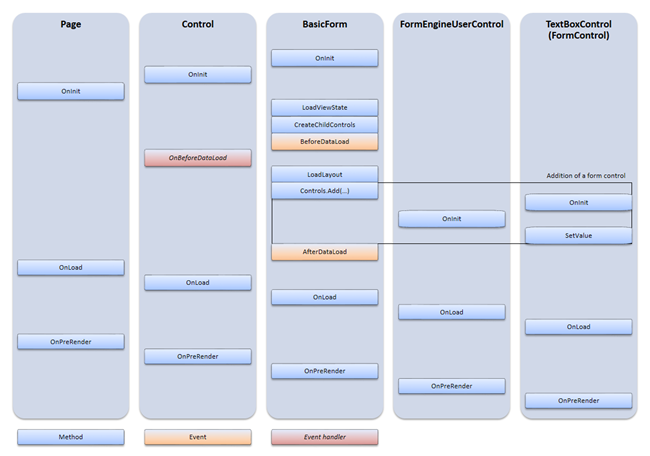
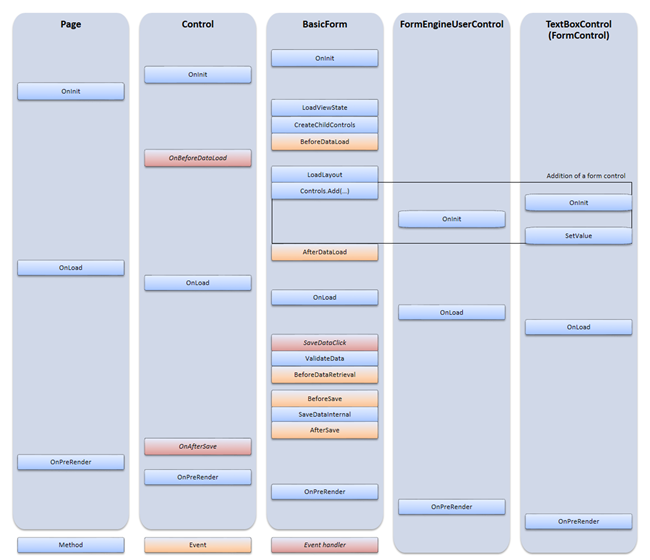
You can check the new life-cycle of form engine components in the following diagram.
GET request:
POST request:
POST request with save action:
Form layouts
All forms generated by form engine are displayed either by
automatic layouts or
custom layouts. Both approaches for form visualization were improved in Kentico 8. I will start with automatic layouts.
Firstly, I’d like to introduce you to all of the possible types of automatic layouts.
Automatic layout is defined by two settings:
form layout and
field layout. The first setting defines outer layout, and indicates how the form and its categories are rendered. There are four options; the first three are table layouts, and the last one is a DIV layout:
-
Single table – whole form is in a single table, headers of categories are rows of that table
-
Table per category – each category has its own table
-
Field sets – each category in field-set with inner table
-
Divs – each category in DIV and all together covered in “form” DIV (new in Kentico 8)
The second setting, field layout, defines the layout of a single field “row”. We have three options here:
-
Inline – label, input control and error label are rendered without any additional layer elements
-
Two columns – label is in one “cell” and input control with error label are in the second “cell” (“cell” means TD in table layout or DIV in DIV layout)
-
Three columns – label, input controls and error label are all in their own “cell”
By default, BizForm server control (advanced form component for online forms) uses a “Single table” form layout to ensure backward compatibility. Other form components (CMSForm, DataForm, UIForm, CustomTableForm and BasicForm) have form layout changed to “Divs”. Field layout is set to “Two columns” by default, except for the UIForm which has this setting set to “Three columns”. Both settings may be customized via the following properties of
BasicForm:
DefaultFormLayout (CMS.FormEngine.FormLayoutEnum) and
DefaultFieldLayout (CMS.FormEngine.FieldLayoutEnum).
When you need more control over the final form design, you can define your
custom layout. Previous versions allowed only
HTML layout, which may have been limiting in some situations. In the new version, there is also an
ASCX layout, which provides full control over the form. You can include extra controls and work with it in the same manner as you would with ASCX transformations. ASCX layout may be specified in form management UI or directly in markup on an ASPX page or ASCX user control.
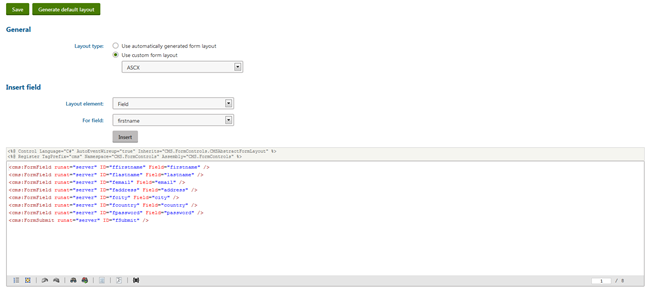
Form engine brings a set of new server controls in
CMS.FormControls namespace, which can be used to build ASCX form layout:
-
FormCategory
-
can be used to categorize form in custom layout
-
allows to change DefaultFormLayout and/or DefaultFieldLayout in the form’s sub-section
-
cannot be connected with a category element in form definition
-
FormField
-
generates form “row” with a field label, input control and error label
-
layout of the row depends on Layout property, it inherits value from form’s DefaultFieldLayout by default
-
can be linked with a specific field from form definition via Field property. It is then configured by the field’s definition
-
FormControl property can be used to specify custom form control for the field
-
FormLabel – can be used to define the field’s label separately
-
FormControl – can be used to define the field’s input control separately
-
FormErrorLabel – can be used to define the field’s error label separately
-
FormSubmit – generates the whole form “row” based on the specified layout with submit button
-
FormSubmitButton – can be used to define separate submit button
To demonstrate the ASCX layout, I have prepared a form with accordion control and a few more customizations defined via layout:
<ajaxToolkit:Accordion ID="Accordion1" runat="server">
<Panes>
    <ajaxToolkit:AccordionPane ID="pane1" runat="server">
        <Header>
          <h4 class="editing-form-category-caption anchor">Personal info</h4>
        </Header>
        <Content>
          <cms:FormField runat="server" ID="ffirstname" Field="firstname" />
          <cms:FormField runat="server" ID="flastname" Field="lastname" />
          <cms:FormField runat="server" ID="femail" Field="email" />
        </Content>
    </ajaxToolkit:AccordionPane>
    <ajaxToolkit:AccordionPane ID="pane2" runat="server">
        <Header>
          <h4 class="editing-form-category-caption anchor">Password</h4>
        </Header>
        <Content>
          <cms:FormField runat="server" ID="fpassword" Field="password" Layout="Inline">
            <div class="form-group">
              <div class="editing-form-label-cell">
                <cms:LocalizedLabel runat="server" ID="lpassword" ResourceString="general.password" CssClass="control-label" DisplayColon="true" />
              </div>
              <div class="editing-form-value-cell">
                <cms:FormControl runat="server" ID="ipassword" Field="password" FormControlName="PasswordConfirmator" />
              </div>
            </div>
          </cms:FormField>
        </Content>
    </ajaxToolkit:AccordionPane>
</Panes>
</ajaxToolkit:Accordion>
And the result looks like this:
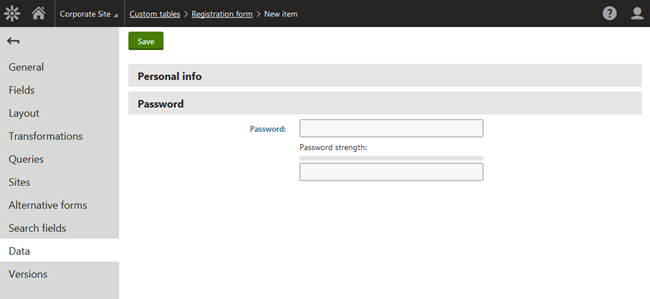
Also, I would like to mention the other new thing in Kentico 8 connected with form layouts. Custom ASCX layouts of main forms or their alternative forms can be treated like other virtual objects in Kentico. This means that the layouts may be
deployed into the file system and edited in external editors or stored in a source control system, moreover, alternative forms support
the team development too. You may find more information regarding these topics in our documentation:
Preparing your environment for team development
Field editor improvements
Though we prepared a totally new tool for form creation (form builder), the other tool for advanced users – the
field editor – was not left behind. This tool is the only way to access all of the options of the form components (fields, categories) and arrange advanced scenarios.
Most of the field editor options can be switched to macro mode, which allows forms to behave dynamically based on the context the form is displayed in.
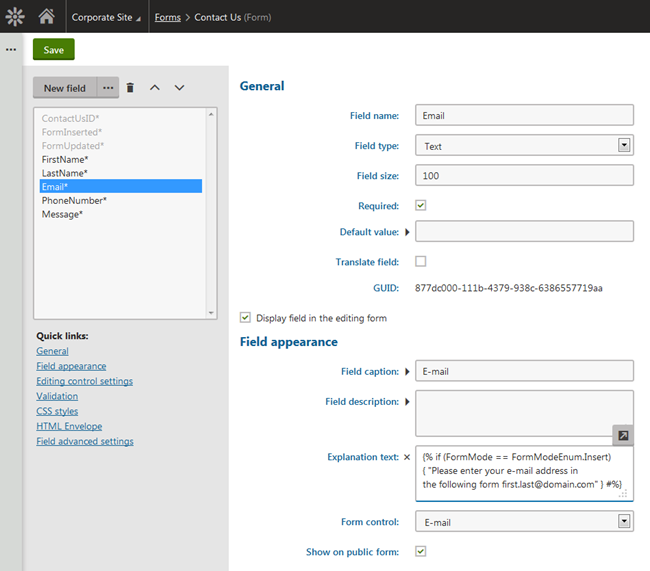
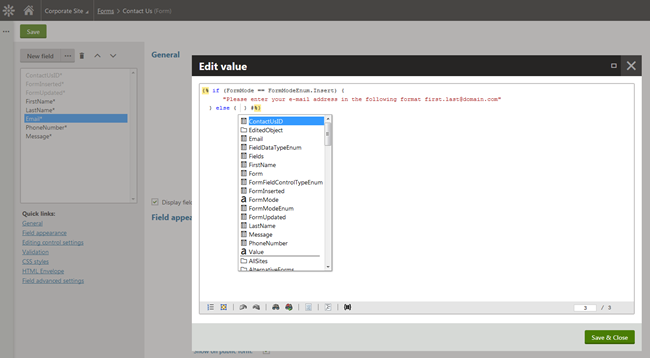
As you may already know, macro editors offer autocomplete. You can use it in field editor to get to the form-related macros quickly as they are listed at the top. The form-related macros contain:
-
fields, e.g. FirstName
-
provides access to field properties, e.g. FirstName.Enabled
-
used separately, like FirstName, returns the same value as FirstName.Value
-
EditedObject – provides access to the properties of info object of edited record, e.g. online form record, custom table record, content document…
-
FormMode or Form.FormMode
-
returns current state of the form (insert, update…)
-
can be used in IF statement like this: if (FormMode == FormModeEnum.Insert) { … }
-
Value – returns value of the current field
Forms which store data into a database may benefit from the support of new field
data types:
-
Date
-
Decimal number – true decimal, the former was renamed to Floating-point number
-
Time interval – TimeSpan data type in .NET
Another change is connected with data types – all datetime fields in the database were changed to
datetime2 type which has an extended value range.
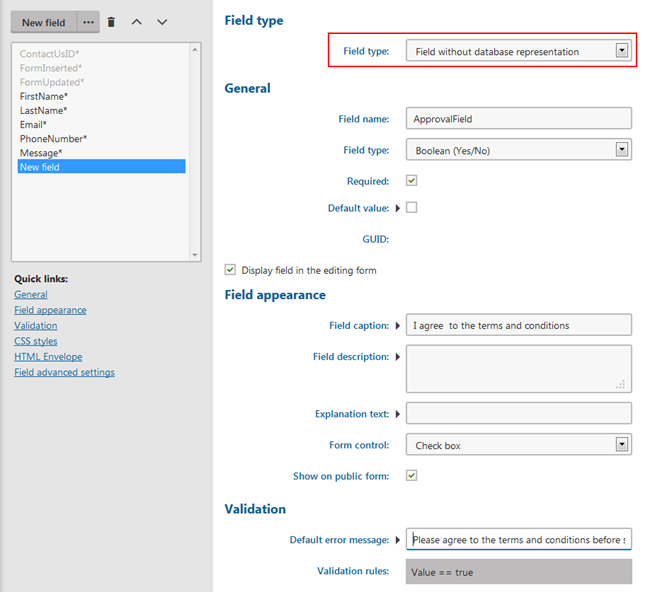
There are situations when a form requires a “single purpose” field, e.g. some term approval/confirmation checkbox, which value is important only at the time of the form submission and it is not necessary to store the value into the database. In previous versions you have two options, either store all values to the database or create custom form control.
In Kentico 8 we extended the field editor with the ability to create
“Fields without database representation” for such scenarios. These types of fields are allowed not only in the main forms, but also in alternative forms. Beside these “extra” fields, you can create “extra” categories in alternative forms too.
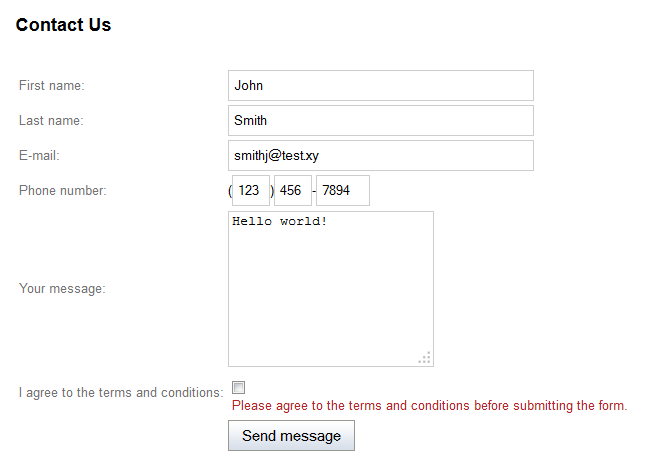
I’m going to demonstrate the new feature in the following example where I have added an “extra” field to the sample “Contact us” online form to ensure that the user checked the checkbox before submitting the form.
And the result can look like this:
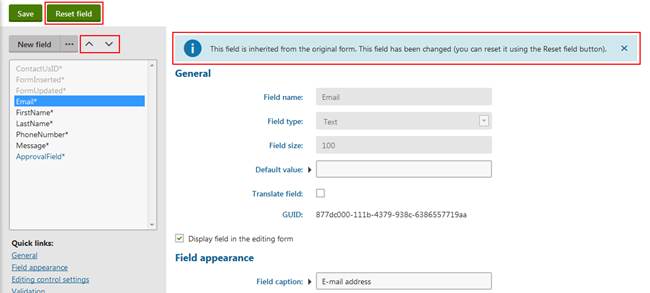
From time to time it is handy to use one form on more pages with different field order, captions, etc. This could be already handled in previous versions by alternative forms, but changing field order in an alternative form required a custom form layout. We decided to bring a better solution for such a simple operation – so from now you can easily change the order of form components in alternative forms.
Moreover, fields and categories which have some changes to the original definition are labeled with an information message at the top, and the changes may be restored to values from the original definition by pressing a Reset button in header actions. You can see both actions for changing component order and resetting values bellow:
There are a few more minor improvements in the field editor, mainly new field properties such as explanation text, content before/after and new styling properties.
New form validation
If you are familiar with previous versions of Kentico, you may have noticed in upper screens of field editor that its validation part looks differently. When the new form builder was prepared it required a flexible, simple and clear way to specify form validation with possible extensibility. Existing macro rules seemed to be a good starting platform to build on. It offered both flexibility and extensibility, the last requirement, simplicity, was added with the help of our UX team :-) We decided not to complicate validation by adding a new method, but we unified all form validation under the new one. Don’t worry about your existing form validations they are automatically transformed to the new form.
To specify the field’s validation, you can just select one or more rules from predefined list, fill the rule parameters (if any), and optionally, you can override the default error message in every rule.
Default validation rules contain:
-
Minimum/maximum value/length
-
Date from/to
-
Compare to another field – provides comparison between current and another field from the form
-
Email
-
Phone number (US)
-
U.S. ZIP code
-
Regular expression – allows you to specify any regular expression to limit inputs
-
General condition – allows you to use general macro rules or macro expressions for validation
If the list with validation rules was fixed, the validation would not be extensible, but actually it is, as I have mentioned earlier. Rules can be modified and extended with new ones in the Form validation section of the Macro rules application.
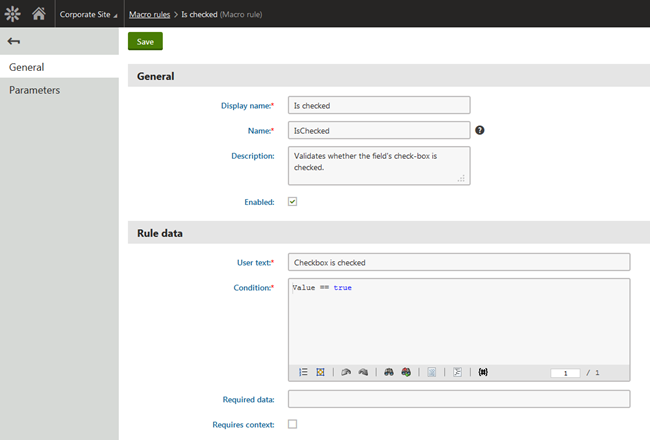
In the following example, I will show you how to create a new form validation rule. I will follow up with the previous example for “extra” fields. To ensure that a visitor checked the checkbox before submitting the form, I have used “General condition” rule with this expression: “Value == 1”. Though this expression is pretty simple, it is not a good idea to force editors or marketers to write anything similar. A new validation rule is created in Form validation management; the original expression from the General condition rule is used in the Condition property of the new rule as you can see on the screen that follows. Furthermore, we need to specify a User text which will be displayed in the field editor or form builder if the new rule is selected. And now, the new validation rule is ready and it is offered among other validation rules.
Revision of form controls
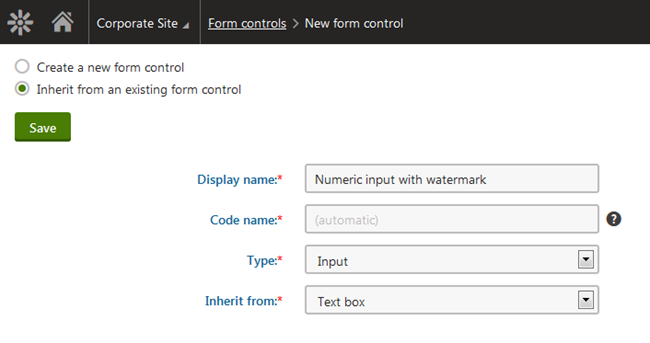
The number of form controls was rapidly increasing from version to version. Many of the controls differed only in tiny things, e.g. one or two properties. But even such a small difference required separate controls. We asked ourselves what we could do to change the unpleasant trend and we found the answer in one of the web parts’ properties – inheritance! We added this ability to form controls and it allowed us to merge many controls together and decrease the overall number. Inherited form controls can have custom general settings and inherited properties modified so that you can use general form controls with many properties (like text box) to prepare narrowly focused controls with simplified settings that can be easily used by editors.
For example, in Kentico 8 you can easily create a numeric input form control with watermark property without the need to write a line of code. This can be achieved in form controls management by creating a new form control and inheriting it from the existing “Text box”, which provides the watermark out-of-the-box. Then, all of the properties except the watermark ones can be made hidden, and the default value of “Filter type” property should be set to 0 (numbers).
Summary
I hope you will enjoy new form engine improvements and find them helpful when working with forms. Any feedback regarding the form engine and form management tools, like form builder or field editor, is highly appreciated. You can leave us a comment below or make a suggestion on
ideas.kentico.com