How to create web site from scratch
This post will give you a simple tutorial how you can create your simple web site using the predefined HTML code and CSS.
Yes, Kentico
CMS is delivered with some predefined templates and there are some more on the Market place section. But what if someone has his own design template and want to implement the web site from scratch. What if he wants to have the complete control over the page markup? We had recenly a lot of prospective clients who wanted to show specifically this and that's why I will now show you how exactly you can do this in a simplest and easy way, as short as possible.
Prepare your materials and project
You will need:
-
One web site design consisting of the HTML code and CSS styles. Or maybe just an image if you are an experienced web developer and can do the things on the fly.
-
One installation of Kentico CMS 4.0 setup on your computer (I am doing it on the latest version but the same thing is possible with any version of course, but I always recommend the latest).
-
Just enough time to read this post and do the exact things with your project (don't worry, you won't be late for dinner, unless the dinner is almost ready in the oven).
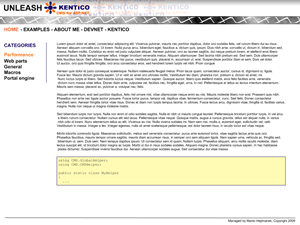
So here is what I started with, I opened the Paint.NET application, and in the matter of few minutes created this simple design for my web site (don't be scared by the menu stripe to go down on the right side, that turned out to be just optical illusion:-) ).
 Install the Kentico CMS web site and create a blank web site
So, what you need to do first is to install a blank site out of the box of Kentico CMS. Just go through the Web installer as always (I expect you know the basics or that you are able to accomodate quickly to the installer), install the database and select that you don't want to import any existing template, that you want to open the
New site wizard. Now, just install the web site (click on next unless you want to change anything specific, I recommend you to set your site name, but you can change it later). Since we are creating a new, completely blank web site, and for that reason we will forget about the predefined templates (because you have your own, right?), just select that you want to use the
Blank master page for start. Skip the next step where you can define the site structure, we are not using predefined templates so we don't need it and then go straight to
Edit the new web site.
What you have now are two windows, one is
Site Manager, which is the global administration interface where you can edit all the core objects and objects which are shared between sites. That's where we started, because we didn't have any site yet. The other is
CMS Desk, which is the administration UI of the particular site (based on the domain from which you open the CMS Desk). For now, just remember that the Site Manager is used mostly for development purposes and the CMS Desk for the content editing purposes. You will need to switch between these two windows during the development.
Define the master page layout
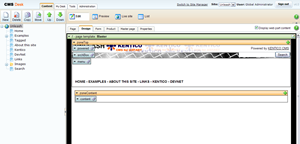
When you look at the CMS Desk, there is only one item in the tree, which has the same name like the site. That is called the
Root document and it is basically the document which defines you master page for the entire site (with some exceptions but they don't matter now). When you click on the
Design tab, you can see some components on the page. These are:
-
Page placeholder (the green one), which states for the specific document and its template. The one on the root is there always but you can add additional ones to allow the child documents to inject their content into the page.
-
Web part zone (the orange one), which is basically the container for placing and managing the web parts. If you have the zone in your layout, you can add the web parts to it within this Design tab, simple isn't it?
-
Web parts (blue ones), which are the actual components that display the content. Our site has blank master template so there are no web parts yet.
Now we should define the layout of the master page. But since we don't want to influence the predefined templates, we will be creating everything ad-hoc. So click on the context menu of the Page placeholder (the arrow in its left part) and select
Clone template as ad-hoc. That makes the copy of the template specific for the document only. Now we can edit the template without influencing the original one. Click on the right side of the Page placeholder on the button
Edit layout. Now you can edit the layout of the page. If you know ASPX, you will see that the code is standard ASPX code with some special controls. If you know just HTML, know that it is just HTML code which allows some additional markup. So you may place here the part of your HTML code which you want to be on all the pages. In the places where you want to be able to place the web parts, just place the code
<cc1:CMSWebPartZone ID="zoneTop" runat="server" /> with some unique ID. It is an active control so the ID must be unique for the given template. If you close the layout window, you will see that the orange web part zones are populated as active controls and you can add web parts to them. Our layout will look like:
<div class="mainDiv">
<div class="topBlock">
<cc1:CMSWebPartZone ID="zoneTop" runat="server" />
</div>
<div class="mainBlock">
<cc1:CMSWebPartZone ID="zoneContent" runat="server" />
</div>
<div class="footerBlock">
<cc1:CMSWebPartZone ID="zoneBottom" runat="server" />
</div>
</div>
So that is how you define the layout of the page. Now is the time to place your CSS file in somewhere. That somewhere is the
Site Manager, the
Development tab (where is virtually anything you need for the development of the web site) and there you can find the
CSS Stylesheets section. Just create a new one and insert your prepared CSS. That's how you register CSS file within Kentico
CMS. Now you need to select it for the site, so go to the
Site tab, edit your web site and select the
Default CSS stylesheet for it (select your new stylesheet). Now when you go to the CMS Desk and refresh your preview or live site, you can see the stylesheet was applied and your layout is starting to look the way you want.

Here is the stylesheet code:
unleash.css (it is final so I don't have to write parts of it in here, I actually created it on the fly as I wrote this post)
Upload the images
Now it depends how complicated you styles are and how many images they contain. Let's pretend that they contain only one image like mine does so we an upload it to the Kentico's content repository. Create a new document of type
Folder (it doesn't really matter which type, but folder looks nice) named
Images (can be any name)
and then create new document of type
File in it and upload your logo (or whatever the main image is, mine is
header.png). If you open it, you can see it's URL so copy this one to your CSS stylesheet if you use it in it. If you have much more design images, you should probably put it in the filesystem to get faster response for them. You may place them anywhere but the best place is the
~/App_Themes/<code name of your stylesheet> folder which can be exported to the package with our export feature ("~" states for the root of your web project). You can use the "~" character also in the CSS stylesheet, it will be automatically resolved to the root of your web site so your web site will be better transferable between virtual directories or web sites without them.
So now your master page contains the layout, including styles (I expect that you fixed anything that wasn't what you needed), mine certainly does. You may notice that the design mode is influenced by the design mode controls (Page placeholder, etc.), that is OK, it won't happen on live site. Now you can add the web parts to the master page. My master page contains three zones, one for the top menu and stuff, one for the content (of subpages) and one for the footer.
Put the web parts on master page
My master page will contain:
-
Menu (very simple one, made by repeater)
-
One static text (to inform you that it runs on Kentico CMS)
-
Search box
-
Page placeholder (to create a window where the documents (pages) will inject their HTML code)
-
Static text in the footer (again, some static information)
So I put the static text web part (static means that this is the same for any document using the template) and type in the text "Powered by Kentico CMS". I will also add some content before and after (just HTML code which will envelope the text) to add some styles and do not influence the text itself (that would be <span class="poweredBy"> and </span>). You would do the same for any of your static text which is on the page. I did the same for my footer, which is also static. It can be HTML text (WYSIWYG editor based). So this way, you can cover anything static from your layout.
I will also put search box web part in there, and just fill as the Search title because I don't want to see any. Again, I will add some content before and after to be able to add styles to it and position it. Content before would be <div class="searchBox"> and after </div>.
For the placeholder, is is enough to place it to the location where you want the subpage content to be rendered which is the Content zone in our case.
Menu (Repeater control)
Now comes the hard part. You can either use some predefined menu control and assign the styles to it or use Repeater control to render the exact markup you want. Since I promised you the implementation of your template, you want your exact markup and I also didn't wanted normal menu control which is kind of too robust for my simple menu, so I will go with repeater (anybody can use some predefined menu's and we will need to know the repeater anyway). You will see later that the repeater is probably most useful control for your dynamic content.
What repeater does is that it takes some predefined template (called transformation within Kentico CMS) and renders this template for each item which is in the data source in the context of the item. Those of you who know ASP.NET controls, it is just standard asp:Repeater bounded to our content repository. So we put the repeater web part on the template and we need to say what we want to display. At this point you should know something about the document types if you don't know already.
Document types
Document type is something that identifies the type of a piece of content and also the fields that it contains. You can define your own or you can use our predefined, it doesn't really matter. The important thing is that you may use it as well for defining the content and for filtering, to keep track on your web site architecture. So you should divide them by their purpose. What we do is that we have some main, predefined document type called Page (menu item) which we recommend to use for the main navigation of the site. So we usually recommend to use this one for the main sections and basically for the items that appear on the main menu, but that is optional of course, you can use any document type for that including your own. So at this point we are fine with the predefined one because we don't need any specific fields.
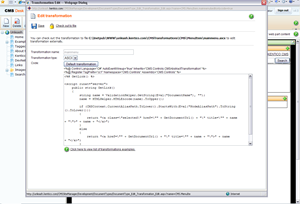
Back to my repeater. In the repeater properties, we need to set what it should display. I will skip the not-important stuff and go straight to the main properties. One is the Path which can contain wildcard "%" for any string so we enter "/%" to cover just any document on the web site (they are all starting with slash and then something). I told you my main site structure will consist of Page (menu item) so I will choose that as the only document type to the Document types property that my repeater should display, I obviously want to display only the main navigation in my main menu. Then I set Maximum nesting level to 1 to limit the selection of documents only to the first level in my document tree since I am displaying only the simple flat menu. And I will add Where condition "DocumentMenuItemHideInNavigation = 0" to get only those items which are allowed in navigation (that is something that menu components do automatically but repeater doesn't). Now comes the tough part, which is very important. We need to define the Transformation for the particular menu items. The repeater has more transformations but since we are displaying the same content and not details of documents, we need only the main one. We need to select one and since the document types have some predefined transformations, we can use one of them. So select the transformation for Menu item document type, the default one. You can edit it to change the template for the item. In my case I want to display menu as a link to the document which is highlighted when I am in specific section so my transformation code is:
<%# GetLink() %>
<script runat="server">
public string GetLink()
{
string name = ValidationHelper.GetString(Eval("DocumentName"), "");
name = HTMLHelper.HTMLEncode(name).ToUpper();
if (CMSContext.CurrentAliasPath.ToLower().StartsWith(Eval("NodeAliasPath").ToString().ToLower()))
{
return "<a class=\"selected\" href=\"" + GetDocumentUrl() + "\" title=\"" + name + "\">&quo&; + name + &quo&;&&a&";<&r /> &nbs&p;nbs&p;nbs&p;nbs&p;nbs&p;nbs&p;nbs&br /> &nbs&p;nbs&p;nbs&p;nbs&p;nbs&p;nbs&p;nbs&se
&nbs&p;nbs&p;nbs&p;nbs&p;nbs&p;nbs&p;nbs&br /> &nbs&p;nbs&p;nbs&p;nbs&p;nbs&p;nbs&p;nbs&p;nbs&p;nbs&p;nbs&p;nbs&turn "&a&p;lt;&f=\"&q&ot; +&GetDocumentUrl() + "\&&uot; t&tle=\"&q&ot; +&name + "\&&uot;&a&p;gt;&; +&name + "&a&p;lt;&p;gt;&;;<&r /> &nbs&p;nbs&p;nbs&p;nbs&p;nbs&p;nbs&p;nbs&br /> &nbs&p;nbs&p;nbs&br /> <&&mp&n&g& &>
It basically is a server side function that checks the current path context property and if it starts with the displayed document it displays it with CSS class name "se&ect&ot; o&her&it will produce a regular link to the document. This is something that menu web part can do for you but I wanted you to see how you can evaluate the content values and produce the code dynamically.
So I am saying that each of these main&nbs&ume&n the&nbs&st & which are allowed in navigation will be displayed as list of&nbs&ks & the selected one is marked with special class. There is nothing else in it and nothing will be more complicated about this simple site than this.
Of course you may use the predefined menu control if you still don'&el &using the transformations or C# code, that'& to&
Now the only thing that'&ft & set the item separator for my menu&nbs&das&rong>" -&&qu&&-&tro&&nbs& su&d my menu&nbs&h a&n style="font-family: Courier New"><div class="mainMenu"> and </div> block (content before and after again) to be able to style it better with CSS. That's what are the content before and after properties for, to just add some HTMl envelope to web parts.
Defining the main sections
Now, when we have the menu web part defined, we should define the main menu items. Just create a few documents of type Page (menu item) in the first level of the document tree and you will see your menu is populated with them. I only selected the of predefined text templates since they are very simple, but it is also possible that you create one based on simple layout and put the editable text web parts to them. When you go to the Properties -> Menu tab of the document and uncheck the Show in navigation checkbox, such item will hide from menu (that is because of the where condition). I created the items for Home, About this site, Kentico, DevNet and Links.
Because the background of the page if black, I created a small CSS stylesheet named Unleash editor:
/*#Global#*/
body
{
background-color: #ffffff;
font-size: small;
font-family: Arial;
margin: 0px;
padding: 0px;
}
a
{
color: #000000;
}
h1
{
font-family: Verdana;
font-size: 18px;
color: #100063;
margin-top: 5px;
}
And assigned it as the Editor stylesheet in the site properties to get proper look and feel of the editor.
The only thing left for the main menu pages was to fill in the text and just slightly update the stylesheet.
Lists of documents
The only section left is my examples section where I will show you the main purpose of the repeater control and also how easy is to use the menu control. But first, we need to create some new document types. So I created document types Example category and Example, each one with some name and text(s) and allowed the category to be created under the Page (menu item) document or another category and example under the category document (the child types settings of the document type). I will need that to filter my content. Nothing complicated about it.
Now I need to create a new template and the section itself, so I create a new menu item document under the root, with the new template based on simple layout. Then I modify the layout the same way like for the master page, having two columns with the web part zones. Layout is:
<div class="leftMenu">
<cc1:CMSWebPartZone ID="zoneLeft" runat="server" />
</div>
<div class="rightContent">
<cc1:CMSWebPartZone ID="zoneRight" runat="server" />
</div>
My left zone will contain:
-
Static text for the categories header (text "<div class="categories">CATEGORIES</div>") so you can see you can put HTML in there too, not only to content before and after.
-
CSS list menu for the left menu of the categories
While my right zone will contain:
-
Breadcrumbs to be able to navigate back through my current path and see where I am, surrounded with <div class="breadcrumbs"> and </div>
-
Editable text (textbox) for the header, surrounded with <h1> and </h1>
-
Editable text (WYSIWYG) for the introduction (I need that for the category description), surrounded with <div class="text"> and </div>
-
Repeater for displaying the examples
All my subdocument will use this template from the section document. So just create few categories and examples in them.
I don't need to do much for the texts, they are the simplest components you can use, you just enter the text and it is displayed, so I will go straight to the menu. CSS list menu produces <ul>, <li> structure which only needs some CSS styles to look good. The Path will be "/{0}/%" which means all documents under first level (it can also be "/Examples/%") but mine is using macros to evaluate the first part dynamically. And the Document types will be Example category, which is what I use for the left menu items. I can also select whether to render the IDs/CSS classes and whether to render special class for highlighted item, which is something I will use.
Now I only need to configure the repeater. It will display all documents from current path (leave the Path blank), the Document types will be Example and the transformation will be preview from my example document type:
<div class="example">
<h2><%# GetDocumentLink() %></h2>
<p>
<%# Eval("ExampleSummary") %>
</p>
</div>
I also need to set the Selected item transformation because I want to display the document differently when I am on its detail. That one will be the default transformation of my example document type:
<h1><%# Eval("ExampleName") %></h1>
<p class="summary">
<%# Eval("ExampleSummary") %>
</p>
<p class="text">
<%# Eval("ExampleText") %>
</p>
As you can see, these two are just evaluating the fields of the document to be displayed. Few more styles to my stylesheet, and it's done.
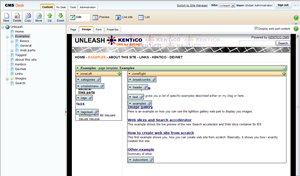
Now when you display the main menu item or category, you get the list of examples, and when you click the specific example, you get its detail. That is basically what you need on most web sites, to be able to display list of documents and their details, and this is exactly how.
Just populate the Examples section with some categories and Examples in them, and you will see how they are displayed.
Search
Probably the only thing missing (since my master page contains the Search box) is the search page. We don't need anything special so just create a new Search document (menu item), with the standard Search page template. Go to the Properties -> Menu and uncheck the box Show in navigation. You can see that it disapeared from the menu because our menu (repeater) has the where condition set. The last step is to go to the master page, to the Search box properties and enter ~/Search.aspx as the Search results page URL.
And that's it. Behold, our very simple web site is living, and we were able to define the exact markup for every part of it and the styles. I didn't want to make this post too complicated, so I tweaked my life site a little so it is just a little better. I will descibe some of the tweaks sometimes later.
You can download the site export package to try it (just import it into the blank installation. The package is here: UnleashKentico40_v1.zip
If you need any help with that (you shouldn't, it is very easy), just contact our support as usually at forums or through the e-mail as usually, they will help you, I won't have enough time to solve technical issues over here so I won't just let them go through to live site. Thank you
Now comes the surprise
Obviously I didn't do a new web site for nothing, so this new web site is becoming my official web site for the live site examples from my blogs, and you can find it as unleash.kentico.com
Enjoy and look forward to my next posts, they will come soon!
P.S.: Sorry if you got the post through your RSS too soon, I accidentally published it before it was ready and not yet complete ;-)