Developing Applications Using Microservices and Azure – Part 1
As more companies transition to a modular development model, integration with different services and platforms has become a common approach in many projects. By leveraging multiple systems, developers can build out complex applications, incorporating functionality from several sources to accomplish their goals. Many of these systems are small, light-weight services designed to perform a single function or purpose. In this article, I’ll walk you through the process of building an application using these microservices and Microsoft Azure.
Microservices are certainly popular these days. From web to mobile applications, integrating multiple systems into a single application can significantly increase functionality while reducing development. As companies move away from a mono-lithic, single application approach to this modular structure, architecting solutions becomes an even more critical part of the development process. But how do you go about building a site based on a collection of services? In this article, I’ll give you my take on it.
What are microservices?
Before I get into the article, I thought it might be best to start with some basics. There’s no shortage of definitions of what microservices are (and aren’t). While everyone may have a different idea of what the term means, a common theme is usually present. A microservice architecture is one based on building applications using multiple, smaller systems and services. This means encapsulating functionality to accomplish a single goal or feature. This could include a service to return pricing for a website. Another common example is an external SMTP service for sending mail. Regardless of the functionality, a microservice is designed to be a lightweight, easy-to-integrate component with an application.
Plan the architecture
When planning your development with microservices, you need to completely change the way you architect your solutions. Because there is no “central” location for all your data and functionality, you should think about how (and when) your services will interact. This will largely depend on what systems you choose, and how accessible they make themselves to other applications; because of the number of variables, planning your architecture is a critical step in the process.
Here’s a few simple questions you should answer when you start your planning.
What services are you going to use?
Knowing the functionality you’re going to need will go a long way in determining which services will suit your needs. Once you know the type of features you will need, you can find the best service/provider to integrate into your application.
How will your services interact?
Most modern systems can communicate with each other over “industry standard” channels such as REST, JSON, and APIs. Part of your architecture planning should be understanding how accessible the systems you want to use are and how you will connect all the pieces. If real-time communication is key, you need to select services that have robust scaling capabilities to keep up with demand.
Where are your services located?
While most of your systems will (should) be cloud-based, it’s still important to know where they are. Leveraging multiple cloud providers is certainly doable, but you may lose out on some cost savings if they are all not with the same vendor. Additionally, you’re sure to get some performance improvements by having your systems within the same geographical region or data center.
For me, I knew I would be leveraging Kentico Cloud for my content, so that simplified a lot of the architecture right out of the gate. By using Kentico Cloud, I knew I would be able to use the Deliver API to easily pull my content and display it in my application. This Azure-hosted platform provided my central content repository and allowed me to integrate quickly using a REST API.
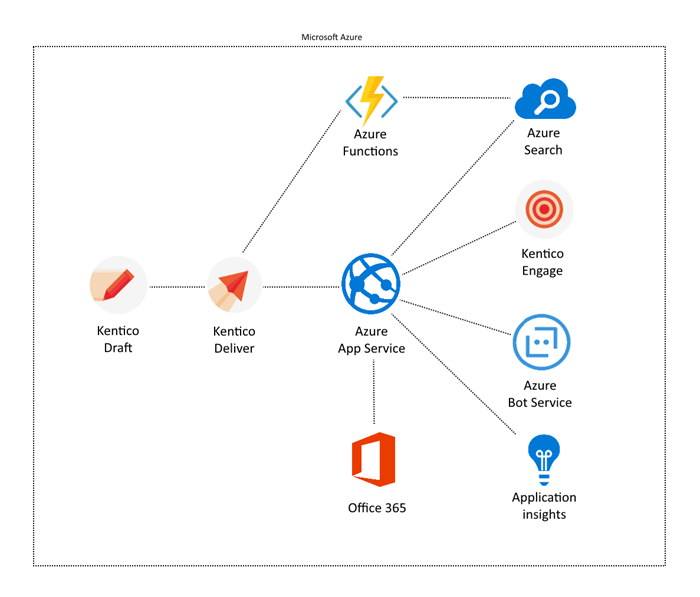
In addition to my content storage, I wanted to use as many aspects of Azure as I could. This included hosting my application in Azure App Services, using Azure Search for indexing my data, leveraging Azure functions to automate some processing, and incorporating an Azure Bot Service, just for fun! Because those are all Azure services, I planned on selecting the same data center for each, to get the optimal performance and minimal latency. With all the services hosted within in Azure, I knew I would benefit from the amazing scalability and performance of Microsoft’s cloud platform.
Here’s an overview of my architecture.
Create content
With a solid architecture planned, you should be ready to start creating your content. By leveraging a microservice for your content repository, this means you can start this process even before the first line of code is written. This can expedite your development by allowing your editors to get started on your content as soon as possible, without having to wait for the application to be built. Using your architecture plan, build out your data structure to suit your needs.
In my case, I defined several content types in Kentico Cloud and started creating my data structure. My “base” data structure consisted of a generic Content Page type, which I planned to use throughout the site. I also added more types to store my various types of data.
You can learn more about my content types in my Building an MVC site with Kentico Cloud blog series here.
Create an MVP
Once your content is in place, your next thought should be making an MVP (Minimal Viable Product). This means developing something that will produce the minimum amount of results that demonstrate a successful implementation. This is a good step to take when creating a newly architected solution as you often will identify any problem areas before too much time is put into the development. You should come up with a baseline set of features you want to include, to limit the scope of your development.
In a previous blog series, I covered my development using .NET Core, MVC, and Kentico Cloud. This “base” architecture provided me a flexible foundation that I could use for future development. For my MVP, I came up with the following list of basic requirements:
- Display 5-6 main areas of the site
- Make each area consistent and clean
- For each area, allow a title, images, and content
- Display Speaking Engagements and Blogs
- Only include the assemblies / libraries I would need (leverage .NET Core)
Validate the MVP
Once your MVP is developed, you should test it thoroughly to evaluate its capabilities. The “Minimal” part of MVP is key here, as you should only be building a Proof of Concept to prove your solution is viable. This may mean ensuring your content displays correctly and quickly, and that any integrations you included function properly. And unless your project is like every other project in history, this shouldn’t be a final version of the code and you will have plenty of time to continue building out the functionality.
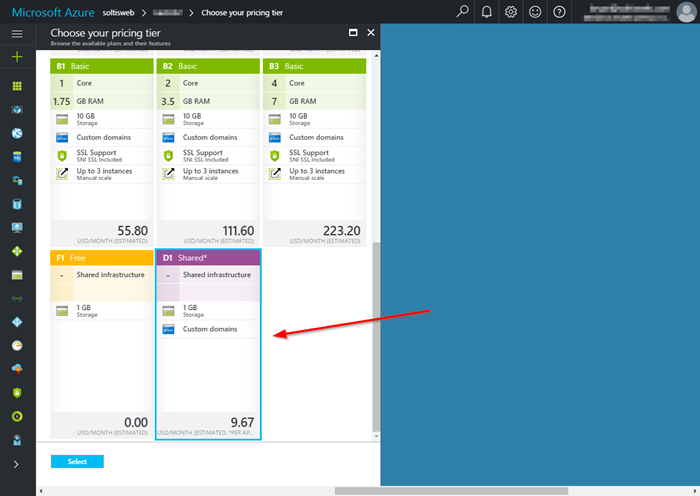
As I demonstrated in my previous blogs, I deployed my site to an Azure App Service and confirmed everything was displayed correctly. I chose the Shared plan, which gave me the ability to use a custom domain (http://soltisweb.com) at the lowest price point. Because of the simplicity of my application, this plan offered plenty of resources to run my application just fine.
Connect microservices
With your base application developed, you can start working on integrating your other services. Depending on the functionality you need, this may entail using 3rd party assemblies and services within your site. Most of these integrations will require you to authenticate your requests, so plan for how you will store your credentials. They should be easily configurable, but secure enough so that they are only accessible by approved users. If hosting in Azure, App Service Application Settings are a great repository as you can change them quickly from within the Azure portal.
Because of Azure’s flexibility and architecture, deploying to the platform allowed me to integrate other services and functionality quickly and easily. Since those services were also hosted in Azure, I could reduce latency and improve performance while leveraging very powerful capabilities of the cloud. Additionally, I could leverage Application Settings, auto-scaling, and Application Insights to maintain and monitor my application in real-time. But more on that later in the series!
Moving Forward
Hopefully, this blog started you on a good path for planning and developing your site using microservices and Azure. Because of the differences in implementation and functionality that this model brings, planning and architecting your solutions properly will be key in building a successful and usable solution. In my next blog, I’ll show you how I incorporated the various services into my main personal site. See you next time!