Creating a New User Programmatically with Kentico
The UserInfo object is used to access the security objects within the Kentico API. As an example lets create a user programmatically using an ASPX page.
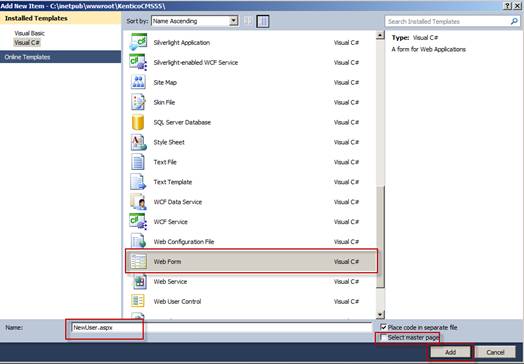
1. Right click on the Kentico CMS Web Project, select Add New Item, add a Web Form, enter the form Name of NewUser.aspx, uncheck the Select master page checkbox and select Add as shown below
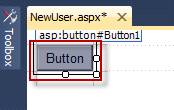
2. Select Design view and add a Button to the NewUser.aspx form as shown below
3. Double click the Button to access code view and enter the following using statement
using CMS.SiteProvider;
4. Enter the following code into the Button1_Click event
protected void Button1_Click(object sender, EventArgs e)
{
// Create UserInfo
UserInfo user = new UserInfo();
// Set properties
user.UserName = "Alice";
user.FirstName = "Alice";
user.LastName = "Cooper";
user.FullName = "Alice Cooper";
user.Email = "alice.cooper@domain.com";
user.IsEditor = true;
user.PreferredCultureCode = "en-us";
user.Enabled = true;
// Create new user
CMS.SiteProvider.UserInfoProvider.SetUserInfo(user);
}
5. Select the project Start button from the Debug toolbar menu, click the button on the NewUser.aspx form as shown below

Start up Form Note
If you select the newuser.aspx form in the solution explorer it will automatically be used as the start up form when the application starts.
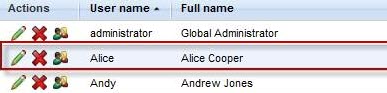
6. Open a new browser and log into CMS Desk, Select Site Manager, Administration tab, Users to view the new user as shown below