Claims-based authentication: Preparing Virtual Environment and Initial Configuration
Hi, my name is Roman Konicek and I would like to welcome you to my knowledge base article series on claims-based authentication. Let me give you a bit of an overview of some of the things we are going to cover in this series. I want to start by briefly talking about how to prepare a virtual environment. The second thing I would like to focus on is how to configure your environment to use claims-based authentication—in this specific case we are going to use Active Directory Federation Services (AD FS). Next, I want to discuss how to configure your Kentico application to use the claims-based authentication. In the last part, we are going to look at the most common issues when you are using claims-based authentication in Kentico. So let’s go and have a look at all of that.
Preparing a virtual environment
In the first part of this series we are going to build a lab so that we can get to play around. We are going to do this in a virtualized environment. In the lab, there will be only one virtual machine and in order to set this up you are going to have to come up with some type of virtualization technology and that will be installed on a host machine. As far as the virtualization is concerned, you can use whatever virtualization technology is comfortable for you. You can use Hyper-V, you can also use VMware. In this particular case, I will use the VirtualBox. VirtualBox is free and you can download it from their official site (https://www.virtualbox.org). Once the download is finished, install VirtualBox.
We are going to go through, in this chapter, the installation and configuration of a Windows Server virtual machine, so you can practice without affecting production environment machines.
First, we are going to download an operating system, and with Microsoft platform, you can install and run a 180-day eval of a particular OS. Simply go to the TechNet Evaluation Center (https://www.microsoft.com/en-us/evalcenter). You will have to log in. It requires a Microsoft account. After logging in simply download Windows Server 2012 R2.
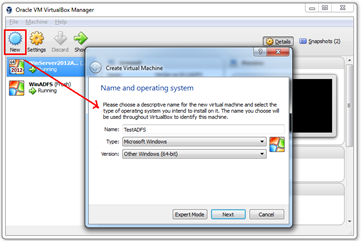
Okay, so I’m in my VirtualBox here. I am going to create a new virtual machine. I’m going to select New, and it’s going to walk me through the wizard. For the Name you can pick any name you want, for the Type select Microsoft Windows, and Version should be Other Windows (64-bit).
On the second screen, again you can allocate as much memory as you want, the recommended memory size is 512 MB. I’m going to select 2048 MB.
On the third screen, leave the default option and click Create. Next, leave the default VDI option and click Next. On the following screen leave the default option (Dynamically allocated) and click Next. For this purpose, you can use the default option 20 GB and click Create.
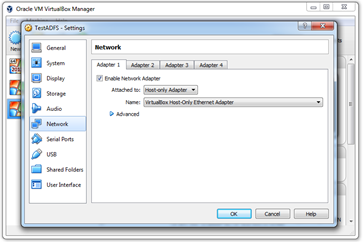
I am going to do one more thing before I start the installation. I will add another network interface to my machine. So, I am going to have two network interfaces—you can see the details on the screenshots below.

Configuration of the virtual machine
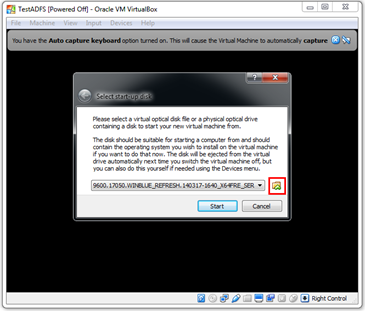
Now, we can fire up this virtual machine by clicking the Start button. Once you start the virtual machine, you will need to select a start-up disk. You need to click the Folder icon and select the ISO image you downloaded previously. After that, click the Start button.
On the Windows installation screen select Next. It’s going to come up and ask which operating system you would like to install. I’m going to do a Server 2012 R2 Standard Evaluation, but make sure you are not using Core, we are going to use GUI. Once the installation is finished, we are going to log in here.
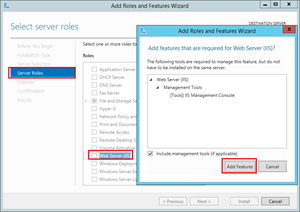
First, we are going to install Web Server (IIS). In server Manager, click Manage and select Add Roles and Features. I’m going to click Next here, it’s role based, and it’s going to be on my particular server. In the Server Roles section select Web Server (IIS).
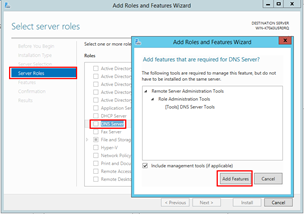
On the Features tab, leave the default, click Next and finish the installation. Next thing we need to install is DNS server. We are going to follow the same steps as outlined before, the only difference is that we will select DNS Server instead of Web Server (IIS).
If you get a warning “No Static IP addresses were found on this computer” during the installation, you can ignore this and continue with the installation.
The next step is to install Active Directory Domain services.
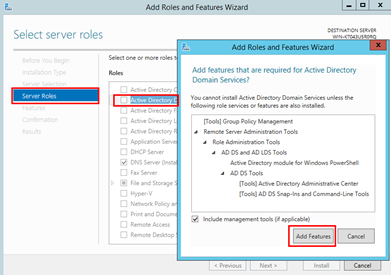
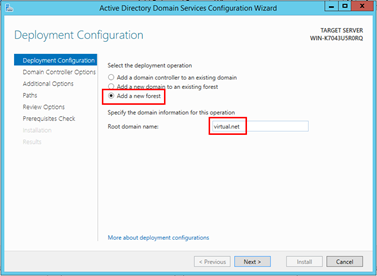
After the installation process has been completed, click the Promote this server to a domain controller. In the Deployment Configuration section, select option Add a new forest and set the Root domain name to virtual.net.
On the next screen, choose your password and click Next. You can leave the rest of the options as default and finish the configuration. At the end of the promotion operation, the server will automatically reboot. From now on, you should not reboot the server anymore, because when you do it is most likely that you will have an issue with the AD FS service which we will install in a few moments. When you want to exit the virtual machine you should always use “Save the machine state” option.
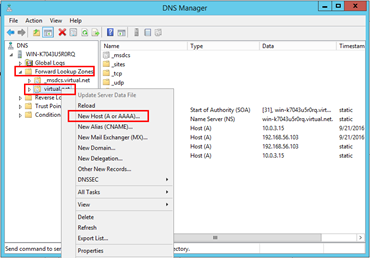
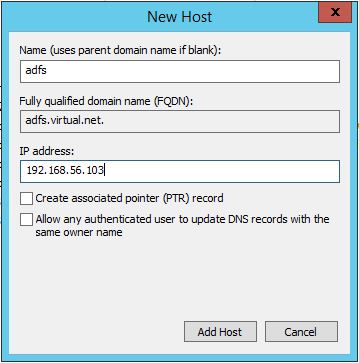
Now we need to create a DNS record for AD FS. In Server Manager, click Tools and select DNS. Expand Forward Lookup Zones, right-click virtual.net, and select the New Host (A or AAAA) option.
In order to add a new host, you will need to find out what your IP address is. You could do this by opening the Command prompt and issuing the ipconfig command.

In the new host dialog, set Name to adfs and in my case the IP address will be 192.168.56.103.
In the next steps, we need to create a new user. In order to do that, open the Active Directory Users and Computers application. Details are shown below.
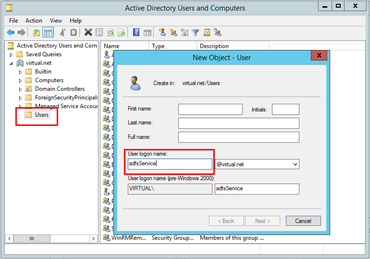
After you create the adfsService user account, create one more user accounts called, for example, testUser. We are going to use this user account to test the claims-based authentication.
That is all for the first part of this series. In the next part, we will finish the configuration of the virtual machine and we will take a look at Kentico configuration as well.