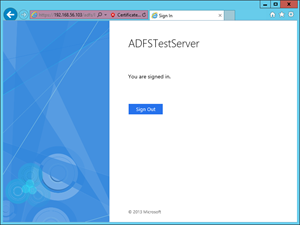
Now you should be able to browse your website using HTTPS protocol. Since you are using your own certificate, most probably you will get a certificate error and you will need to add an exception, but for our purpose that is completely fine. To verify the AD FS functionality open the web browser and visit the following URL, https://192.168.56.103/federationmetadata/2007-06/federationmetadata.xml . If the file loads successfully, that means the AD FS is configured properly. Note that you will need to change the IP address in the URL and use the IP address of your machine. The other way to check whether the AD FS is configured properly is to visit the following URL, https://192.168.56.103/adfs/ls/idpinitiatedsignon.htm and after the page loads click the Sign in button. We will use the credentials of the testUser we created before. You should see a screen similar to the picture below.
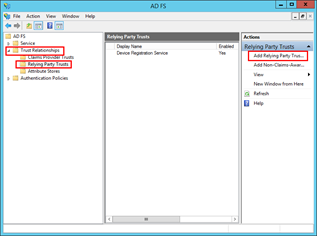
After you verified that AD FS is configured properly, open Server Manager, choose Tools from the menu, and select AD FS Management. In the left navigation tree Expand Trust Relationships and select Relying Party Trusts. In the right column click Add Relying Party Trusts.
On the Welcome interface click Start. On the Select Data Source interface choose the option Enter data about relying party manually and click Next. Next, specify a display name for the relying party. On the interface, Choose Profile, select AD FS Profile. After you move to the Configure URL interface, enable support for the WS-Federation Passive protocol and insert the URL. In my case, I am going to use https://localhost/Kentico_9_test. On the Configure Multi-Factor Authentication Now? interface, select I do not want to configure multi-factor authentication settings for this relying party trust at this time and click Next. On the Choose Issuance Authorization Rules interface, select the option Permit all users to access this relying party and go Next. At this point, the relying party should be added. After you click the Close button, it will open the Edit Claim Rules dialog for that relying party.
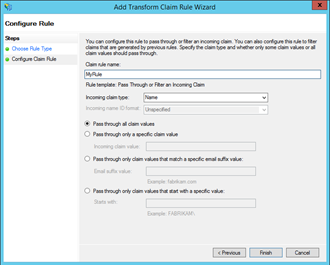
In the newly opened dialog window click the Add Rule button. On the Choose Rule Type interface select Pass Through or Filter an Incoming Claim from the drop-down list as the rule template and click Next. On the next screen choose a name for the rule (in my case I will use simply, MyRule, as a rule name), set incoming claim type to Name, select the Pass through all claim values option, and click the Finish button.
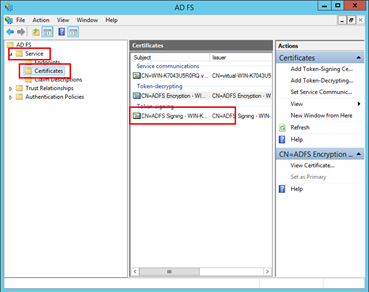
At this point, our AD FS is configured and there is one more thing we need to do on the virtual machine. We are going to export the certificate which we created before and use it on the machine with Kentico. In order to do that, stay in the AD FS Management application, expand the Service folder, and click the Certificates folder. In the Token-signing section, there should be a certificate we created. If that is the case double-click it.
In the Certificate dialog, switch to the details tab and click Copy to File—you can leave the default option and export the file. After you transfer the certificate file from the virtual machine, you can switch to the Kentico box.
Configuration of the host machine
During the next steps, we will need to install the previously exported signing certificate. For this purpose, we will run the mmc.exe command. After you run the MMC application, click File, then Add/Remove Snap-in, select Certificates, and click Add button. In the Certificates snap-in dialog, choose the Computer account option and click Next. On the next screen select Local computer, click the finish button, and click OK.
Now in the Console Root tree select the installation location if the Certificate validator is set to Chain trust—select Certificates, then Local Computer, Trusted People, and Certificates folder. If the Certificate validator is NOT set to Chain trust, then select Certificates, Local Computer, Personal, and Certificates folder. At this point, we did not set the certificate validator yet. We will do it in the Kentico administration interface, so if you are not sure what option to use, you can import the certificate in both locations. As for the import process itself, you will need to click More action in the right column, then All Tasks, and select Import. Then all you need to do is select the location in which you stored the certificate and finish the process.
There is one more thing we are going to do in the MMC application. We need to get a certificate thumbprint. Open the imported certificate by double-clicking it, switch to the Details tab, select the Thumbprint in the list-box and copy the thumbprint.
Before we can start configuring claims-based authentication in Kentico, we need to make sure that our site is configured to use SSL. For more information how to configure your site to use SSL please check the previous section to see how we configured it on the virtual machine or visit the following link https://docs.kentico.com/display/K9/Configuring+SSL for more information.
Configuration of claims-based authentication in Kentico
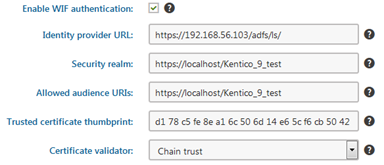
The last step is ahead of us—we need to configure Kentico to use claims-based authentication. Sign-in to Kentico and in the administration interface, open the Settings application and go to the Security & Membership, Authentication, and Claims-based authentication section. In the first place you need to enable WIF authentication, then you need to configure the Identity provider URL, in my case that would be https://192.168.56.103/adfs/ls/ (make sure that you use the correct IP address). Security realm and Allowed audience URIs will be set to https://localhost/Kentico_9_test in both cases. Then we will need to copy our certificate thumbprint and select the Certificate validator—this option is based on where you imported the certificate in the MMC application.
And that is all. We have completed claims-based authentication in Kentico from scratch. From now on if you try to sign-in you will be authenticated against AD FS server. In my case, I will use VIRTUAL\testuser as the username. In the last part of this series, we will take a look at some of the most common issues which are related to claims-based authentication in Kentico.