Adding columns to the user listing in Users app
Important notes:
- Make sure to document this customization well in your project documentation to avoid confusion and issues when upgrading or hotfixing your Kentico admin app in the future. Some system default files will be edited, and may be overwritten when upgrading or hotfixing
- The below steps are just proof of concept, and may not cover all possible use cases
- Make sure you have project and DB backups before making any of the changes described below
- In the samples below it is assumed there is only one site in the Kentico admin instance
Since you will be adding the logic to the admin app, open the admin app solution in Visual studio (by default WebApp.sln).
Create a new class in the Old_App_Code folder and name it e.g., CustomUserListExtender.cs. The recommended way is to use a custom subfolder. In this sample we will use: \Old_App_Code\CustomClasses\CustomUserListExtender.cs
(In this case, a custom class library/assembly will not work, though it is normally the best practice for custom code)
The class you need to override is the ‘UserListExtender’ class. This class has a method in which the columns are registered. Here is a snippet from the source code, to give you an idea of how it works:
public override void OnInit()
{
    string[] columns = {
        "UserID",
        "UserName",
        "FullName",
        "Email",
        "UserNickName",
        "UserCreated",
        "UserEnabled",
        @"(CASE
            WHEN UserPassword IS NULL OR UserPassword = '' THEN 0
            ELSE 1
            END) AS UserHasPassword",
        "UserIsExternal",
        "UserIsDomain",
        "UserPrivilegeLevel"
    };
    Control.Columns = columns.Join(", ");
    //...
}
You need to create a custom extender which will add the required columns into that list. In this sample, we will add the ‘LastLogon’ column from the CMS_User table. In the same way, you can use any column from the CMS.User and CMS.UserSettings classes, including any custom fields you may have added. This is how the custom extender class should look:
using CMS.Membership.Web.UI;
...
[assembly: CMS.RegisterCustomClass("CustomUserListExtender", typeof(UsersExtender.CustomUserListExtender))]
namespace UsersExtender
    {
        public class CustomUserListExtender : UserListExtender
        {
            /// <summary>
            /// Adds custom code that occurs during the initialization of the extended control.
            public override void OnInit()
            {
                base.OnInit();
            Control.Columns += @", LastLogon";
        }
        }
    }
The next and last code step in this example is adding the column into the UniGrid’s XML listing. Go to \CMSModules\Membership\Pages\Users\User_List.xml and add new column to the list:
<column source="LastLogon" externalsourcename="LastLogon" caption="Last logon" wrap="false" />
Save the changes and build the solution.
Now, you need to adjust the UI to use your extender.
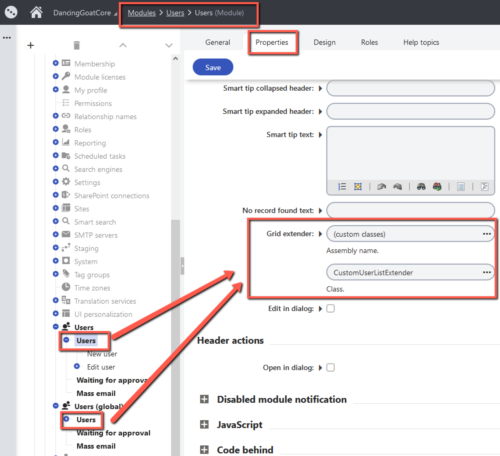
Go to Modules > Users > User interface and then find the Users UI elements. On the General tab click the Customize button, then switch to the Properties tab to select your extender.
Note: there are two UI elements! Do the same for both!

The result looks like this:

This was easy, right? But what if you want to display column which is not in the above-mentioned DB tables? Let’s update the extender code a bit and add some more complexity. In this example we will add the Role name to the list. This example assumes the user is assigned to one role only. If the user is added to more roles, the record will be listed multiple times. (More logic would be necessary to filter out the duplicates and decide which role you want to display, which goes beyond the scope of this proof of concept.)
The first steps are the same as above: add a new column to the custom user list extender:
Control.Columns += @", MyColumn, LastLogon";
Then, you need to also adjust the XML and add those columns:
<column source="MyColumn" externalsourcename="MyColumn" caption="User Role" wrap="false" />
And now it gets interesting. Since we want to add information based on other DB table, we need to use a custom query for the UniGrid control. This means you need to remove/comment out this
<objecttype name="cms.userlist" />
and use this (with the custom query code name)
<query name="cms.user.customuserlist" />
instead in the in the User_List.xml.
Build the solution.
Now, we need to create the ‘customuserlist’ SQL query. It will basically be a copy of the View_CMS_User view with the new columns added. Go to Modules > Membership > Classes and edit the User class, go to Queries > add new query and name it ‘customuserlist’. Now, another complication is that the CMS_User and CMS_UserRole tables both contain the UserID column. So, we need to play with the column names to avoid ambiguity (changes marked blue) and the actual custom column we added to the extender is marked orange:
SELECT ##COLUMNS##
FROM CMS_User
LEFT OUTER JOIN CMS_UserSettings ON CMS_User.UserID = CMS_UserSettings.UserSettingsUserID
LEFT OUTER JOIN CMS_Avatar ON CMS_UserSettings.UserAvatarID = CMS_Avatar.AvatarID
LEFT OUTER JOIN (SELECT UserID as UR_UserID, RoleID as UR_RoleID FROM CMS_UserRole) as UserRole_UserID ON CMS_User.UserID = UserRole_UserID.UR_UserID
LEFT OUTER JOIN (SELECT RoleID, RoleDisplayName as MyColumn FROM CMS_Role) as Role_MyColumn ON Role_MyColumn.RoleID = UserRole_UserID.UR_RoleID
WHERE ##WHERE## ORDER BY ##ORDERBY##
Save the query and reload the Users app. It should look like this:

Using the steps and concepts above, you can create your custom extenders for any part of the admin UI where the UniGrid control is used.
Following these steps will also ensure that the UniGrid actions like deleting the record will work.