How to Create Custom Workflow Action
In my
previous blog post about the new Advanced Workflow module, I gave you a quick overview on how to register a custom workflow action. Today, as promised, I will guide you step by step through the complete process of implementing and registering the custom action. As you will see, it's pretty simple and straightforward.
Intro
The workflow actions are available only for the Advanced Workflow module. They are represented by action steps which are special type of workflow steps.

When the workflow process moves a document to one of these action steps, an extra code is executed based on type of the action.
Kentico EMS brings several predefined action steps out of the box, e.g. Move document, Copy document, Synchronize document, etc., to integrate the workflow even with other modules. In addition to the wide list of actions, you can easily implement your custom action to integrate your custom code into the workflow process. Let's take a look how...
1. Define the goal
First of all, you need to define the goal you want to achieve. What do you want done when the process reaches your action step?
My goal is to implement support for
Parallel approval. This means that the document needs to be approved by multiple managers before it is moved to the next step of the approval process, but I don't care about the order of approval. This behavior isn't supported by the Advanced Workflow module out of the box. Currently, you would need to define one step for each approval and you would lose the independence of approval order.
The first thing is to decide whether the action needs any parameter defined by the user. For my
Parallel approval action, I want the user to be able to define the list of managers who need to approve the document before it's approved. This means that I will need one action parameter - the list of managers.
Let's register the action in the system...
2. Register the action
Now if you already know what you want to implement and which parameters you need for your action, you can register the action in the user interface. The list of predefined actions can be found in
Site Manager > Development > Workflows section on an
Actions tab.

Here you can create the new action by clicking the
New action button.
Definition
To define the action you need to provide several properties. The most important properties are the
Assembly name and
Class name. By specifying the values, you define the assembly and class which implements the action logic. You can also place the code of your custom action in the
App_Code folder. In this case, you need to provide the 'App_Code' value in the Assembly name property.
For my action I will use these settings:

As you can see, the class with code of my action is named
ParallelApprovalAction and is placed in the
App_Code folder.
Parameters
The next step is to define the action parameters which can be managed on the
Parameters tab. Defining the parameters here is similar to defining those of, for example, a web part. You need to provide at least the name, data type, caption and type of control which will be used to edit the parameter value.
I need only one parameter for the action to define a list of managers (users). For this reason I will create a
Managers parameter of Text type with a size of 200 characters. I will use
Uni selector control as an editing control with a predefined object type that has the value '
cms.user'. As a return column name I will use the
UserName column. Also the selection mode will be
Multiple since I want to allow selecting multiple managers.

Using these settings the control will store the selected users in the format:
"<username1>;<username2>" (list of user names separated by semicolon).
3. Implement the magic
Now as the action is registered, I need to implement the logic of the action. Here are the main three pillars of the logic:
-
The action will store the list of managers who already approved the document into the document custom data field.
-
Until the list of specified managers (action parameter) is not same as the list of managers who already approved, the action returns the document to the previous step.
-
When the lists match, the action moves the document to the next step.
First, I need to inherit the class from the document action base class:
/// <summary>
/// Parallel approval action class
/// </summary>
public class ParallelApprovalAction : DocumentWorkflowAction
{
To get the value of a parameter, you can use this code snippet:
    private List<string> mManagers = null;

    /// <summary>
    /// Managers who can approve
    /// </summary>
    public List<string> Managers
    {
        get
        {
            if (mManagers == null)
            {
                mManagers = GetResolvedParameter<string>("Managers", "").Split(new char[] { ';' }, StringSplitOptions.RemoveEmptyEntries).ToList();
            }

            return mManagers;
        }
    }
Using this approach, I'll get the list of managers defined through the parameter.
To execute the custom logic of the action, the only thing you need to do is to override the
Execute() method of the base class with your code.
The implementation of parallel approval logic looks like this:
    public override void Execute()
    {
        if (Managers.Count > 0)
        {
            // Get list
            List<string> approved = ValidationHelper.GetString(Node.DocumentCustomData["Managers"], "").Split(new char[] { ';' }, StringSplitOptions.RemoveEmptyEntries).ToList();

            // Add current manager
            string userName = User.UserName;
            if (!approved.Contains(userName))
            {
                approved.Add(userName);
            }

            // Store manager
            Node.DocumentCustomData["Managers"] = approved.Join(";");

            using (CMSActionContext ctx = new CMSActionContext())
            {
                ctx.DisableAll();
                Node.Update();
            }

            // There are still managers to approve
            var missingManagers = Managers.Except(approved);
            if (missingManagers.Count() != 0)
            {
                Arguments.StopProcessing = true;
                using (WorkflowActionContext ctx = new WorkflowActionContext() { CheckStepPermissions = false })
                {
                    Arguments.Comment += string.Format(" | Document needs approval also from these manager(s): {0}", missingManagers.Join(", "));
                    WorkflowManager.MoveToSpecificStep(Node, Arguments.OriginalStep, Arguments.Comment, WorkflowTransitionTypeEnum.Automatic);
                }
            }
        }
    }
First of all, I get the list of already approved managers. Then I add the current user (who is the current manager) to the list, and store it in the document's data. Finally, I compare the list of defined managers with the list of managers stored in the document. If there is still a set of users who have yet to approve the document, the processing of the workflow is stopped, custom comment is stored, and the document is moved back to the previous step which is the one before the action step.
Please note: One extra step needs to be taken when using the class placed in the App_Code folder - you need to register your custom class. The import package, which can be downloaded at the end of this blog post, already contains the additional code snippet to register the class.
Action in "action"
To better understand the action logic, let's take a look how the action is used in the workflow process. In the figure below, you can see the sample workflow process with one custom approval step and the implemented action step.

For this example let's have two managers (users):
manager1 and
manager2.
Here's the settings of the
Managers approval step:

As you can see, there are additional values in settings to preserve better UI integrity. The defined macro condition disables the approving when the current user is a manager who has already approved the document. The tooltip just provides additional information to the user.
I now need to set up the security settings to allow only
these managers to approve the document to the next step:

The detail of the action step with the selected managers can be seen in the screenshot below:

Finally here's the document UI after the document has been approved by one of the managers:
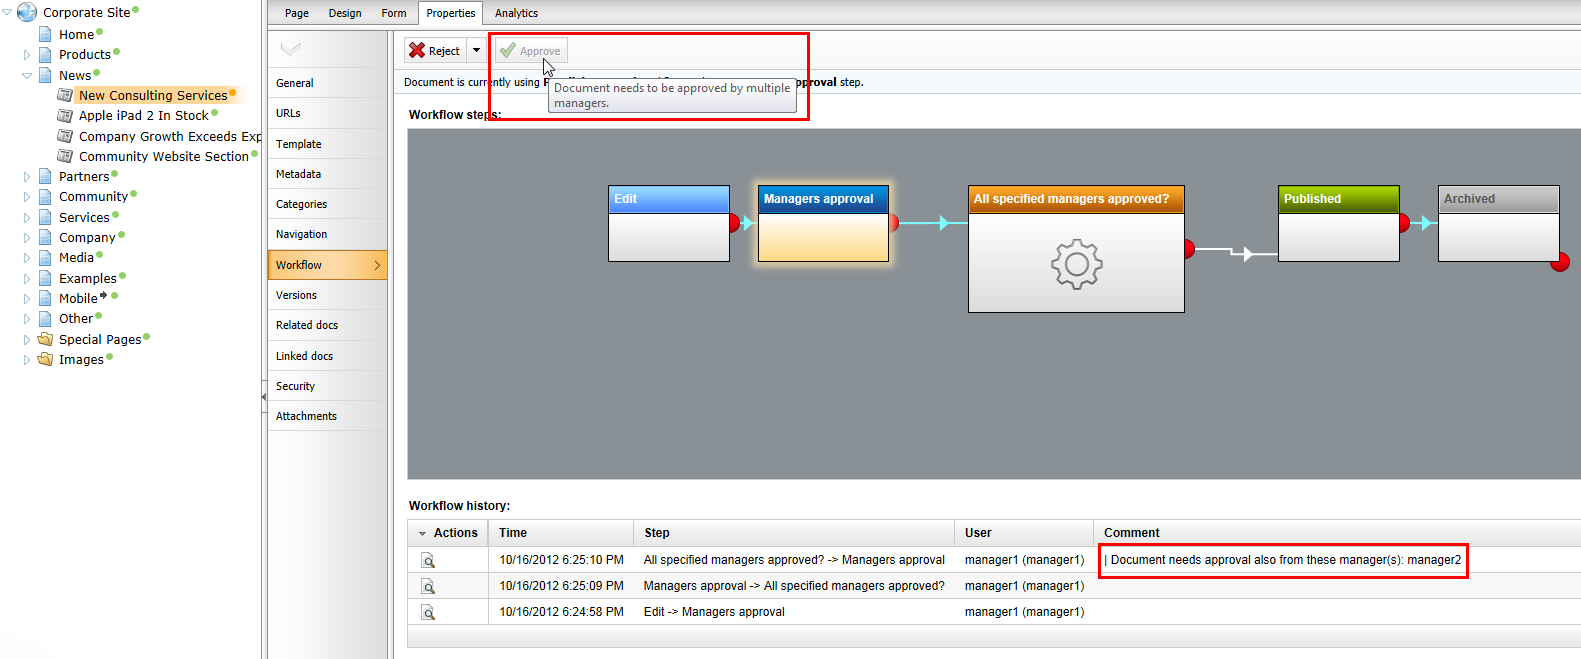
The
Approve button is disabled, providing an explanatory tooltip. There is also the custom comment in the workflow history with additional information about managers who have yet to approve the document. In our example, approval from
manager2 would result in the document being published.
What's missing?
Let me warn you that there is room to improve the code in the action logic. To keep the provided code as simple as possible, I haven't covered all special cases.
Also there is still one missing piece in the puzzle. If a manager rejects the document, the list of managers who already approve it is still stored in the document's data and is not cleared. This means our parallel approval logic wouldn't work for the next approval.
This is the focus of my next blog post, in which I would like to show you how to easily customize the
WorkflowManager (the manager of all workflow logic) to execute your custom code.
Give it a try!
The import package with the
Parallel approval action can be downloaded
here. Please feel free to use it as a base for your own implementation.
That's all for today. Pretty easy, huh? So why don't you give it a go; create your own workflow action and add it to the market place? ;)