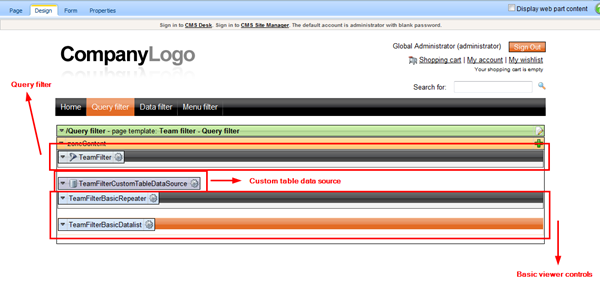
Scheme displaying interconnection between filter, data source and viewer web parts.
NOTE: Filters also work with viewer web parts directly, however, to accomplish the best scalable and optimized solution, we recommend you to use a filter in combination with a data source attached to a basic viewer web part instead.
I’ve prepared sample custom filter controls for every custom filter type (query, data and menu). You can download them along with the export package of my sample website demonstrating their usage and functionality.
Please download the package from
here.
The package contains:
1. CustomFilter_export_20110302_1523.zip - website export package,
2. \CMSWebParts – folder contains filter controls code files. Please copy it to the root of your website project folder.
How to actually integrate custom filter in Kentico CMS?
Let’s get back to the requirements from the beginning of this post.
In Kentico CMS Site manager, I’ve first created two custom tables:
1. Team custom table – stores names of home teams,
• Code name: customtable.team,
• Custom fields: TeamName (Text, 450, Text box),
2. Game custom table – stores information on games played by any of the home teams, result of the games and the date and time of each game,
• Code name: customtable.game,
• Custom fields: GameTeamID (Integer, Drop-down list), GameAwayTeam (Text, 450, Text box), GameScore (Text, 50, Text box), GameDate (Date and time, Calendar).
I’ve also created the ‘custom.game’ custom document type which contains the same fields as the game custom table.
In CMS Desk, I’ve created a new page where I placed the ‘Filter’ web part which is used to load a custom filter control in the Portal Engine (by specifying its ‘Filter name’ and ‘Filter control path’ settings). The page further contains the ‘Custom table data source’ web part loading data from the Games custom table. Data source is connected with the filter through the ‘Filter name’ property which match the ‘Filter name’ identifier set in the filter web part configuration dialog. The template also contains basic viewer web parts like ‘Basic repeater’ & ‘Basic data list’ displaying source data.

Figure 2 Page template displaying filtered data from a source web part using basic viewer web parts.
The whole setup can be summarized as following:
1. Insert the ‘Filter’ web part on the page template. Set the filter unique identifier in the ‘Filter name’ property. Define path to the control in the ‘Filter control path’ property,
2. Place data source web part on page template. Configure data source properties – do not forget about the ‘Filter name’ which should refer to the identifier used for the ‘Filter’ web part from previous step,
3. Use basic repeater or data list to display source data. Do not forget to specify the ‘Data source name’ setting.
Custom query filter
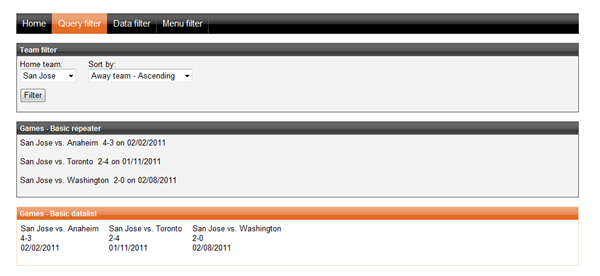
Custom query filter displays two drop-down lists. The first one containing all home teams, the second one with sorting options for results displayed underneath it. In addition there is a filter button which is used to fire filter action.
 Figure 3
 Filter displayed on the live site with game results underneath.
The filter control initializes its inner controls (drop-down lists) in the
OnInit() event like:
/// <summary>
/// Child control creation.
/// </summary>
protected override void OnInit(EventArgs e)
{
SetupControl();
base.OnInit(e);
}
/// <summary>
/// Setup the inner controls.
/// </summary>
private void SetupControl()
{
if (this.StopProcessing)
{
this.Visible = false;
}
else if (!RequestHelper.IsPostBack())
{
// Load teams options into filter drop-down list
InitializeTeams();
// Initialize sort direction drop-down list
IntializeSort();
}
}
In the
InitializeTeams() and
InitializeSort() methods, I just retrieve data for selection lists and bind the data.
An important part of the filter comes in the
OnPreRender event handler:
/// <summary>
/// Pre render event.
/// </summary>
protected override void OnPreRender(EventArgs e)
{
// Set filter settings
if (RequestHelper.IsPostBack())
{
SetFilter();
}
base.OnPreRender(e);
}
/// <summary>
/// Generates WHERE condition and ORDER BY statement based on the current selection.
/// </summary>
private void SetFilter()
{
string where = null;
// Generate WHERE condition based on team selected
if (this.drpTeam.SelectedValue != null)
{
int teamId = ValidationHelper.GetInteger(this.drpTeam.SelectedValue, 0);
if (teamId > 0)
{
where = "GameTeamID = " + teamId;
}
}
// Include sort direction
string order = null;
if (this.drpOrder.SelectedValue != "")
{
switch (this.drpOrder.SelectedValue)
{
case "awayasc":
order = "GameAwayTeam ASC";
break;
case "awaydesc":
order = "GameAwayTeam DESC";
break;
case "gameasc":
order = "GameDate ASC";
break;
case "gamedesc":
order = "GameDate DESC";
break;
}
}
if (where != null)
{
// Set where condition
this.WhereCondition = where;
}
if (order != "")
{
// Set orderBy condition
this.OrderBy = order;
}
// Filter changed event
this.RaiseOnFilterChanged();
}
As you can see, based on the selection, filter generates a WHERE condition and an ORDER BY statement which is then used to initialize the inherited
WhereCondition and
OrderBy base class members. Those members are consumed by the attached data source web part and used in the SQL query. The custom filter control allows data filtering by generating the WHERE condition and passing it to the data control.
Whenever the filter button is clicked post back occurs, control generates WHERE condition and ORDER BY statement and store values in the filter base class members. In the basic viewer web part
OnPreRender event the data source is forced to load the content using the WHERE condition retrieved from related filter control.
And that's the way it works. Thank you for your time!
K.J.