DIY: How to make the zone auto refresh
In this brief article, I will show you an example how you can very simply make yourselves the support for web part zones which content automatically refreshes with given period of time.
Hi there,
To make some part of the page auto refresh, you need to define the part that should do such thing, and provide a way to periodically query for the updated data.
Standard programming
In a standard ASPX programming, you typically take the AJAX update panel, and place the Timer control into it. The timer does postbacks on periodical basis, and the update panel refreshes itself.
Kentico CMS programming
With Kentico CMS, you can use the same approach, but make it component based. Here is the analogy we will use:
-
WebPartZone = Update panel (area)
-
WebPart timer = Timer
Area part
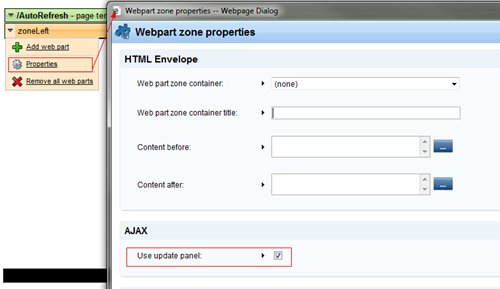
There already is a support how to make the zone an update panel, you just go to the zone properties, and check the box "Use update panel".

Timing part
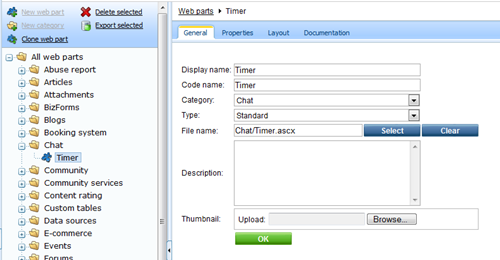
The second part is the timer control. We will make it a web part, so what we do is we just create a new web part, which will contain the Timer control. I created this under the Chat folder of CMSWebParts. So the ASCX code of it will be following:
<%@ Control Language="C#" AutoEventWireup="true" CodeFile="Timer.ascx.cs" Inherits="CMSWebParts_Chat_Timer" %>
<asp:Timer runat="server" ID="timElem" ontick="timElem_Tick" />
With code behind:
using System;
using System.Web.UI;
using System.Web.UI.WebControls;
using CMS.PortalControls;
using CMS.GlobalHelper;
using CMS.CMSHelper;
using CMS.PortalEngine;
public partial class CMSWebParts_Chat_Timer : CMSAbstractWebPart
{
/// <summary>
/// Refresh interval
/// </summary>
public int Interval
{
get
{
return ValidationHelper.GetInteger(GetValue("Interval"), 0);
}
set
{
SetValue("Interval", value);
}
}
/// <summary>
/// Loads the web part content
/// </summary>
public override void OnContentLoaded()
{
base.OnContentLoaded();
SetupControl();
}
/// <summary>
/// Set up the control
/// </summary>
protected void SetupControl()
{
if (this.StopProcessing)
{
// Do nothing
}
else
{
if (CMSContext.ViewMode == ViewModeEnum.LiveSite)
{
this.timElem.Interval = this.Interval;
}
}
}
protected void timElem_Tick(object sender, EventArgs e)
{
// Do nothing
}
}
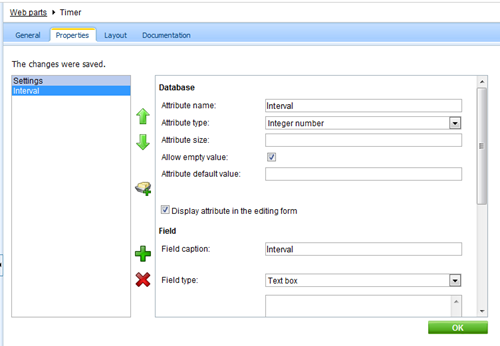
As you can see, the web part is defined with the property Interval tha basically says what is the refresh period.
What it does is basically is does a postback on itself, if you would want to handle something in the postback, you just put some code to the timElem_Tick method.
NOTE: The webpart checks the view mode and performs the action only on live site so it doesn't influence design mode with unwanted postbacks.
Then you just go to Site manager -> Development -> Web parts and register the web part as shown below:


Here is the web part import package for you in case you don't want to write the code: cms_webpart_Timer.zip
Making the zone autorefresh
So we have the web part prepared, let's go to implement auto refresh zone. Go to the design mode, web part zone properties, and set the zone to use update panel as shown above.
Now add the web part timer to the zone and set the interval to some value, e.g. 500 (those are miliseconds).
Anything more required? ... Not really! You just add some content (to have something that autorefreshes).
Here you go
We will just need to add something that will confirm us that the zone autorefreshes. That something will be a static text web part with text set to "{%CurrentDateTime%}" so we can see the time changing.
Here is how it will look like, the time will refresh itself (hard to show really, I didn't want to record a video):


Now, you can put anything you need to update on a periodical basis to your page. Just note, that each of such refreshes is a postback that needs to be processed by the server so it is probably not a good idea to use it on heavily loaded web sites, or use it with the period that your server can serve under peak load.
Enjoy!
P.S.: If you noticed that I put the web part to the Chat folder and category, look forward to one of my next posts where I will teach you how to make yourselves a simple chat module ... which will also use this web part