Configuring Salesforce integration |

|

|

|

|
|
Configuring Salesforce integration |

|

|

|

|
|
|
||
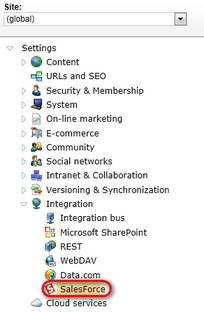
You can access the Salesforce integration configuration in Site Manager -> Settings -> Integration -> Salesforce.com. These settings allow you to authorize access to your Salesforce organization and modify how the system maps the attributes of Kentico CMS contacts to leads in Salesforce.

You need to authorize access of Kentico CMS to your organization on behalf of a specific Salesforce user. This process requires you to generate a Consumer key and Consumer secret in Salesforce itself.
|
Important!
To be able to configure the authorization, you need to have SSL set up on your web site in IIS. You can find the detailed steps described on the official IIS website.
|
1. Click Authorize next to the Organization access setting.

An authorization dialog opens.

2. Log on to Salesforce.com.
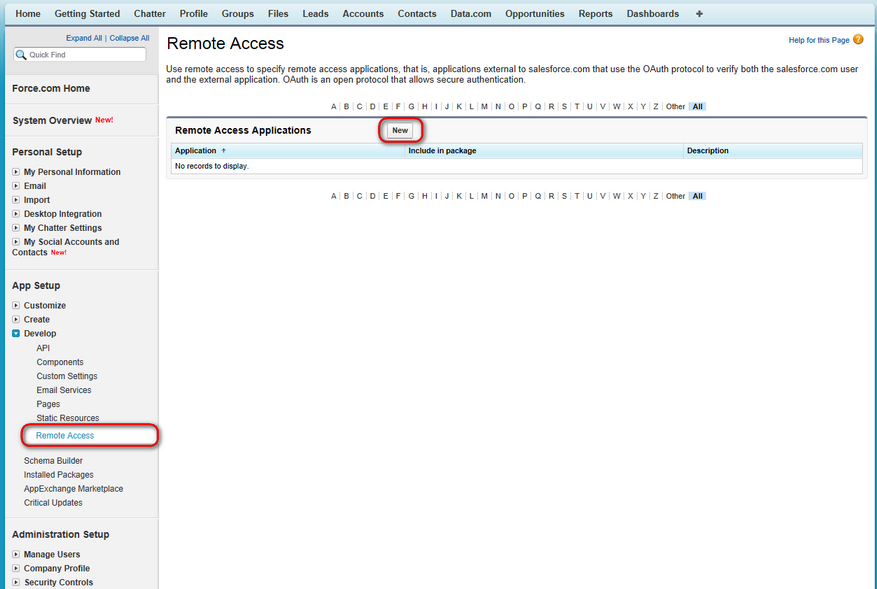
3. Create a new remote access application in App Setup -> Develop -> Remote access.

Creating a new remote access application in Salesforce
4. Enter the following values for the remote access application:
•Application: Type a name for the application. This name allows you to identify your application as the source of the request when authorizing access to your organization.
•Callback URL: Use the following format: https://www.example.com/CMSModules/ContactManagement/Pages/Tools/SalesForce/AuthorizationSetup.aspx
•Use digital signatures: Leave unchecked. The Salesforce integration does not use digital signatures for logging in.
5. Save the form and copy the Consumer Key and Consumer Secret provided by Salesforce for your remote access application.

6. Paste your consumer values into the corresponding fields in the Kentico CMS authorization dialog and click Authorize.
oA Salesforce login screen opens in the current window.
7. Log in and click Allow to grant permission to your Kentico CMS application.

|
Security
The system uses the OAuth 2.0 protocol to authorize access to Salesforce. Your Salesforce login and password are never disclosed to Kentico CMS. Access tokens are stored in encrypted format and the communication itself is encrypted using SSL.
|
8. ![]() Save the settings to finish the authorization process.
Save the settings to finish the authorization process.
The window will close and you will be asked to Save the changes to finish the authorization process.

The Organization access section now shows the user and company name that the application uses to authorize access to Salesforce.

Successfully configured Organization access
Once the authorization is complete, you need to configure how the system replicates contacts into Salesforce leads. You can edit the settings globally or for specific websites.
Replication of contacts into Salesforce leads |
|||
Enabled |
Enables or disables replication of contacts into Salesforce leads. |
||
Keep Salesforce leads updated |
If checked, the replication process includes contacts that have already been replicated before. This ensures that the system updates the corresponding Salesforce leads based on the current contact data.
If disabled, contacts are only replicated once. |
||
Mapping of contacts to SalesForce leads |
Determines how contact fields are mapped to the fields of Salesforce leads.
See the Mapping contacts to Salesforce leads section below for details. |
||
Batch size |
Applications can only make a limited number of API calls to Salesforce within a 24 hour window. To minimize the number of calls, the replication process handles contacts in batches. Each batch only requires one API call.
This setting specifies the maximum number of contacts that the system replicates in a single batch. |
||
Score |
Allows you to select the score that determines which contacts are replicated. The system only replicates contacts that reach a certain value in the given score (specified via the Minimum number of points for replication setting).
If you do not choose a score (None), the system replicates all contacts.
Note: The replication process is always performed separately for each website, so you can only select a score for individual sites, not globally.
To learn more about scoring, refer to the Scoring chapter. |
||
Minimum number of points for replication |
Specifies the amount of points that contacts must reach in the score selected through the Score setting. Once a contact reaches this value, the system marks it for replication as a Salesforce lead. |
||
Lead description |
Defines a custom description for replicated contacts. To map the description to a specific field of Salesforce leads, select the Generated lead description source in the field mappings.
You can insert the values of contact fields into the description using macro expressions.
The default description adds the Last name of the contact that is being replicated and the name of the current site:
For example, to use the Business phone value instead of the last name, enter the following expression:
|
||
Default company name |
All Salesforce leads require a company name value.
This setting allows you to specify a default company name, which the replication process uses for contacts who are not associated with any company.
The system attempts to retrieve the company name value from sources in Kentico CMS in the following order:
1.The value of the contact's Company name field 2.The name of the account in which the contact is listed as a primary contact 3.The account that lists the contact as a secondary contact 4.The first account that contains the contact as a regular contact 5.The value of the Default company name setting (if none of the above steps are successful) |
||
The replication process transfers data from Kentico CMS contacts to Salesforce leads based on field mapping settings.
Note: You need to authorize Organization access before you can adjust the field mappings.
Kentico CMS stores the bindings between Salesforce leads and contacts in a custom Salesforce field. You need to create a dedicated field for your Salesforce leads for this purpose.
1. Log on to Salesforce.com.
2. Navigate to App Setup -> Customize -> Leads -> Fields.
3. Click New in the Lead Custom Fields & Relationships section.
4. Choose Text as the field's data type and click Next.
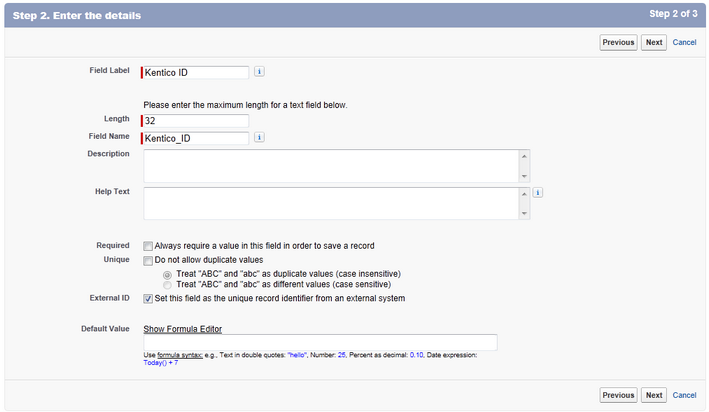
5. In the Enter the details step, fill in the following values:
•Field Label: type any label for the field, for example: Kentico ID
•Length: 32
•Field Name: type any name for the field, for example: Kentico_ID
•External ID: check the box

Adding a custom field to Salesforce leads
6. Go to Site Manager -> Settings -> Integration -> Salesforce.com in Kentico CMS and click Edit below the Mapping of contacts to Salesforce leads section.
7. Select your new Salesforce lead field as the External identifier field.
![]()
8. Click OK and ![]() Save the settings.
Save the settings.
You can now configure the mappings between the fields of Kentico CMS contacts and Salesforce leads.
To access the field mapping dialog, go to Site Manager -> Settings -> Integration -> Salesforce.com and click Edit below the Mapping of contacts to Salesforce leads section.
The mapping dialog offers a list of all standard and custom fields defined for your Salesforce leads. You can select sources for the fields from the following sections:
•Field - the fields of Kentico CMS contacts. Only fields containing relevant data are available (internal system fields of contacts are hidden).
•Custom - related values that cannot be loaded directly from contact fields, including the following:
oCompany name - ensures that each contact has a company name value. See the description of the Default company name setting for details about the process.
oGenerated lead description - loads the value of the website's Lead description setting.
oCountry - provides the name of the contact's country as a text value.
oState name - provides the name of the contact's state as a text value.
•Picklist entry - allows you to select from the values predefined in Salesforce for picklist type fields.
You can only select contact fields that fit the data type of the target Salesforce field. The following table shows which types of Kentico CMS fields are supported by the available Salesforce data types:
Salesforce Data type |
Supported Kentico CMS field types |
Checkbox |
Boolean (Yes/No) |
Currency |
Replication does not support the Currency data type at this time. |
Date |
Date and time |
Date/Time |
Date and time |
Text, Long text |
|
Number |
Decimal number, Integer number, Long integer number |
Percent |
Decimal number, Integer number, Long integer number |
Phone |
Text, Long text |
Picklist |
Text, Long text |
Picklist (Multi-Select) |
Text, Long text |
Text |
Text, Long text |
Text Area |
Text, Long text |
Text (Encrypted) |
Text, Long text |
URL |
Text, Long text |
|
Note
The system may modify values during the replication process according to the parameters of the target fields in Salesforce.
•Text values - the replication process may shorten long text values (strings) to fit the maximum length of the target field.
•Decimal numbers - the fractional part of decimal numbers may be truncated based on the data type settings of the target field. For example, the number 2.45397 could be shortened to 2.45.
•Large numbers - replication of large numbers may result in an error if the target field has an insufficient length. Such errors block the related contact from replication until either the contact's values are updated, or the field mappings change.
|
Once you configure all field mappings as required, you can start Running the Salesforce replication process.