|
|

Managing personalization variants |

|

|

|

|
|
Managing personalization variants |
|
|

|
|
|
|
Managing personalization variants |
|
|
|
|
|
Managing personalization variants |
|
|
|
|
|
|
||
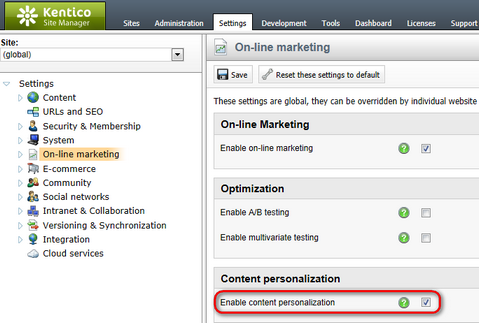
To start using content personalization on your website:
1.Go to Site Manager -> Settings -> On‑line marketing.
2.Select your Site (or enable content personalization globally).
3.Check Enable content personalization.
4.Click ![]() Save.
Save.
Users with the appropriate permissions can now create personalization variants of page components. When visitors view personalized pages on the live website, the system processes the variants and displays the corresponding content.
If you disable content personalization at a later time:
•Existing personalization variants on your website will not be deleted. However, the system does not process the conditions of variants on personalized pages and always displays the default content on the live website.
•Users will no longer be able to manage personalization variants or define new ones.
Once content personalization is enabled, you can create variants of page components through the CMS Desk -> Content -> Edit interface. There are three types of components that you can personalize:
|
Multivariate testing and Content personalization
It is not possible to create personalization variants of web parts, zones or widgets that already have included in a Multivariate test.
|
|
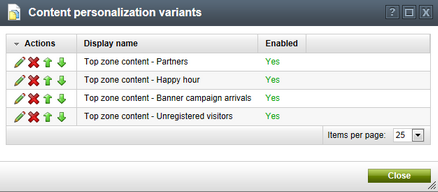
Variant overview
To access a list of all content personalization variants defined on a given page:
1.Select the document in the content tree in CMS Desk -> Content -> Edit. 2.Open the document's Properties -> Variants tab.
The list includes the variants of all three components types. |
Content personalization of web parts allows you to create different versions of web parts with different property settings. To add personalization variants for web parts:
1. Edit the page containing the web part in CMS Desk on the Design tab.
2. Right-click the header of the web part (or click the ![]() icon), hover over Personalization variants and click Add web part variant.
icon), hover over Personalization variants and click Add web part variant.
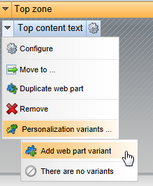
3. Fill in the display condition and other settings of the personalization variant.
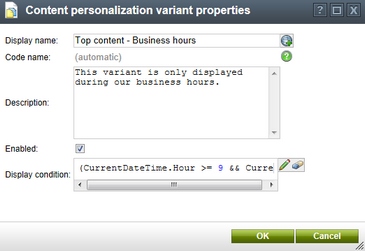
4. Click OK.
oThe standard web part configuration dialog opens — the variant is simply another instance of the original web part.
oBy default, the variant has the same values in its properties as are set for the original, but you can change them as required.
5. Click OK once you have configured the variant's web part properties as required.
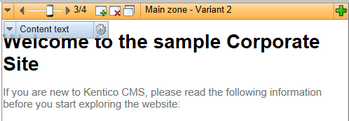
After you create the first variant, the Design tab shows a personalization slider in the header of the given web part. You can use the slider to switch between the web part's variants.
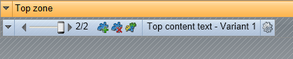
The buttons on the side of the slider allow you to:
•![]() Add new variants
Add new variants
•![]() Remove the currently selected variant
Remove the currently selected variant
•![]() Open a list of all variants defined for the given web part
Open a list of all variants defined for the given web part
You can Configure (![]() ) the properties of the web part variant currently selected in the slider:
) the properties of the web part variant currently selected in the slider:
•The configuration dialog has an additional Variant properties tab, where you can modify the settings of the personalization variant.
•You can specify a unique Web part layout for each variant on the Layout tab.
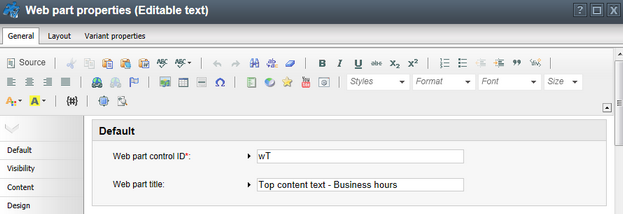
Configuring a web part personalization variant
The system stores the variants of personalized web parts on the given document's page template, so the variants are present on all pages that use the same template.
Note: If you delete (![]() ) a web part, all of its variants are removed along with it.
) a web part, all of its variants are removed along with it.
If you need to define personalized content that uses completely different web parts for each variant, create variants of entire web part zones. For each zone variant, you can:
•Add or remove child web parts
•Configure the properties of the web part zone
•Configure the properties of the child web parts
Each zone variant may contain any type or amount of web parts, regardless of what is placed inside other variants or the original zone.
Note: You cannot personalize zones that already contain personalized web parts. The same also applies in the opposite direction: You cannot add variants for individual web parts inside personalized zones. Moreover, personalization is only supported for standard web part zones and cannot be done for widget zones.
To add personalization variants for web part zones:
1. Edit the page in CMS Desk on the Design tab.
2. Right-click the header of the web part zone (or click the ![]() icon), hover over Personalization variants and click Add zone variant.
icon), hover over Personalization variants and click Add zone variant.
3. Fill in the display condition and other settings of the personalization variant.
4. Click OK.
oThe zone configuration dialog opens for the variant.
oBy default, the variant has the same values in its properties as are set for the original zone.
5. Click OK once you have configured the zone variant's properties as required.
When you create a new zone variant, the system automatically copies the content of the original zone. You do not have to rebuild the zone from scratch if you only need to make small modifications. The Design tab shows a personalization slider in the header of the given zone. You can use the slider to switch between the zone's variants. Use the buttons on the slider to manage the variants.
Tip: You can edit the zone variant currently selected on the slider by double-clicking the header of the zone.
The system stores the variants of personalized zones on the given document's page template, so the variants are present on all pages that use the same template.
If you are an editor without access to the Design tab, you can leverage content personalization on pages with editor widget zones. You can create different variants of widgets, each with different property settings and content.
To add personalization variants for editor widgets:
1. Edit the page in CMS Desk on the Page tab.
2. Hover over the widget and click Add content personalization variant (![]() ) in the pop-up menu.
) in the pop-up menu.
3. Fill in the display condition and other settings of the personalization variant.
4. Click OK.
oThe widget configuration dialog opens — the variant is simply another instance of the original widget.
oBy default, the variant has the same values in its properties as are set for the original, but you can change them as required.
5. Click OK once you have configured the widget variant's properties as required.
When you create a variant for a widget, a slider becomes available in the pop-up menu. You can use the slider to switch between the widget's variants.
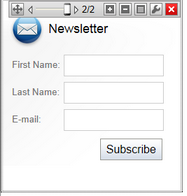
The personalization menu offers the following buttons:
•![]() Add new variant - creates a new variant for the given widget. If the page has a multivariate test, you need to select which type of variant to create.
Add new variant - creates a new variant for the given widget. If the page has a multivariate test, you need to select which type of variant to create.
•![]() Remove variant - removes the variant currently selected on the slider (not available for the original widget).
Remove variant - removes the variant currently selected on the slider (not available for the original widget).
•![]() Variant list - opens a dialog showing a list of all variants defined for the widget. You can also manage the variants.
Variant list - opens a dialog showing a list of all variants defined for the widget. You can also manage the variants.
You can Configure (![]() ) the properties of the widget variant currently selected in the slider. The configuration dialog has an additional Variant properties tab, where you can modify the settings of the personalization variant.
) the properties of the widget variant currently selected in the slider. The configuration dialog has an additional Variant properties tab, where you can modify the settings of the personalization variant.
|
Note
•Removing a widget ( •Using the Reset to default action provided by a Widget actions web part removes all widget variants from the page.
|
The system categorizes editor widgets as page content, so widget variants are bound to specific documents (they are not included on the page template).
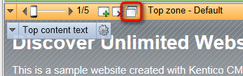
You can use the sliders of personalized page components to switch between individual variants (including the original). The page displays the content of the currently selected variants on the Design tab, Page tab and in Preview mode.
The system only resolves the display conditions of personalization variants on the actual live site. This allows you to check how the page looks with different active variants, without having to fulfill the required conditions. Simply set the sliders to the appropriate variants.
When viewing the content of variants while cycling through sliders on the Design tab, make sure that the Display web part content checkbox in the Edit mode header is checked.
On pages (documents) with personalized web parts that provide editable regions (Editable text or Editable image), you can enter unique content for each variant.
1. View the document on the Page tab in CMS Desk.
2. Hover over the personalized section of the page.
oA menu icon (![]() ) appears.
) appears.
3. Click ![]() and select the variant that you wish to edit or view.
and select the variant that you wish to edit or view.
The system reloads the page with the content of the chosen variant. You can edit and save the variant's content as required.
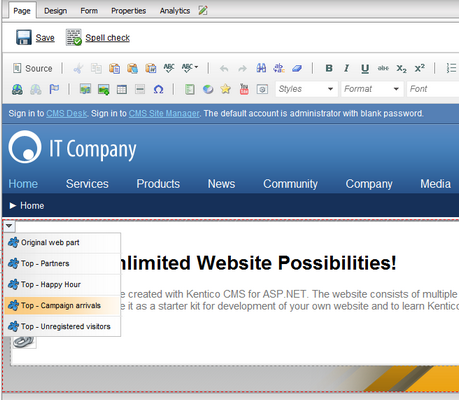
Switching between the variants of an editable text region on the Page tab
The following properties are available when creating or configuring personalization variants:
Display name |
The name displayed in lists of content personalization variants in the administration interface. |
Code name |
Serves as a unique identifier of the variant. |
Description |
To make the variant easier to use and maintain, you can add an explanation about the scenario for which the variant is intended, describe the differences from the original component, etc. |
Enabled |
Indicates if the variant is considered as a possible content option. When evaluating the variant conditions of a personalized component, the system skips disabled variants (even if the requirements set by the condition are fulfilled). |
Display condition |
Enter the condition that must be fulfilled for the page to display the variant. |
When setting up personalized pages, the most important part of the process is to properly define the conditions that indicate when the system displays individual variants. By utilizing macro expressions, you can write conditions for virtually any type of scenario according to your specific requirements. Keep in mind that the result of a condition's expression must be a logical (boolean) value.
For more information about the available macro options, refer to Internals and API -> On-line marketing macros.
Specify the condition of each variant in its Display condition property.
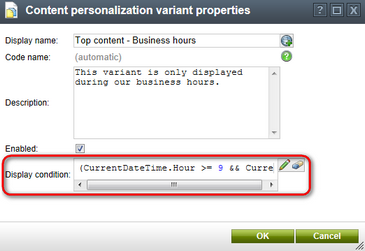
•Click edit (![]() ) to use the Macro condition editor, which allows non-technical users to create conditions based on predefined macro rules.
) to use the Macro condition editor, which allows non-technical users to create conditions based on predefined macro rules.
•The Clear condition (![]() ) action removes the current content of the condition field.
) action removes the current content of the condition field.
On the live site, the page displays only one variant for each personalized object. The system processes variants in the order of their priority and selects the first enabled variant whose condition is fulfilled in the given context. The page displays the original object in cases where the conditions of all variants are resolved as false.
By default, the priority of variants depends on the order in which they were created. You can see the current order on the personalization slider. Apart from the original object, which is always first, variants with a higher priority can be found further on the left of the slider.
To change the priority of a component's variants:
1. Click the Variant list button on the object's personalization slider.
oA dialog containing a list of the variants opens.
2. Reorganize the variants as necessary through the Up (![]() ) or Down (
) or Down (![]() ) actions.
) actions.
The system now evaluates the conditions of the component's variants according to the new order, starting from the top of the list.


