Customizing web part layout |

|

|

|

|
|
Customizing web part layout |

|

|

|

|
|
|
||
Layouts allow you to customize the appearance of web parts or add content. Web part layouts are custom skins that replace the HTML code and ASPX markup of the web part.
•Each web part has its own list of layouts.
•You can select a different layout for every instance of the web part.
To select the layout for specific web part instances:
1.Go to CMS Desk.
2.Edit the document containing the web part instance on the Design tab.
3.Configure (![]() ) the web part instance.
) the web part instance.
4.Switch to the Layout tab of the web part configuration dialog.
5.Select an existing layout or write a (New) layout.
oThe (Default) layout uses the markup of the web part's source file.
You can also manage the layouts of web parts in Site Manager -> Development -> Web parts by editing web parts on the Layout tab.
|
Requirement
The Control declaration in the markup of the web part's user control file must contain the full relative path to the code behind file in the CodeFile attribute (CodeBehind attribute on web application installations). For example:
|
|
Do not remove controls from the layout
Keep all of the default controls inside the code of web part layouts to ensure that web parts work correctly. If you need to hide any of the controls, add the Visible="False" attribute.
Note: Your custom web part layouts may not work after upgrading to a new version of Kentico CMS (if the controls in the web part's markup changed). Please test your website carefully after upgrading, and update your custom layouts according to the controls in the default layout if necessary. |
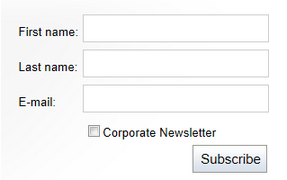
In this example, we will customize the newsletter subscription dialog layout. The standard layout looks like this (when no user is logged on):

Go to CMS Desk -> Content and navigate to the Examples -> Web parts -> Newsletters -> Newsletter subscription page (if you're using the sample Corporate Site).
Switch to the Design tab and configure (![]() ) the Newsletter subscription web part. Click the Layout tab and choose (New) from the drop-down list. Fill in the following values:
) the Newsletter subscription web part. Click the Layout tab and choose (New) from the drop-down list. Fill in the following values:
•Display name: Narrow layout
•Code name: NarrowLayout
Then enter the following Layout code:
Please note: If you installed the Kentico CMS project as a web application, you need to rename the CodeFile attribute on the first line to CodeBehind for the code example to be functional.
<%@ Control Language="C#" AutoEventWireup="true" Inherits="CMSWebParts_Newsletters_NewsletterSubscriptionWebPart" CodeFile="~/CMSWebParts/Newsletters/NewsletterSubscriptionWebPart.ascx.cs" %>
<%@ Register Src="~/CMSFormControls/Inputs/SecurityCode.ascx" TagName="SecurityCode" TagPrefix="cms" %>
<asp:Panel ID="pnlSubscription" runat="server" DefaultButton="btnSubmit" CssClass="Subscription"> Visible="false" /> Visible="false" /> EnableViewState="false" /> MaxLength="200" /> EnableViewState="false" /> MaxLength="200" /> EnableViewState="false" /> MaxLength="400" /> EnableViewState="false" /> CssClass="SubscriptionButton" EnableViewState="false" /> EnableViewState="false" /> |
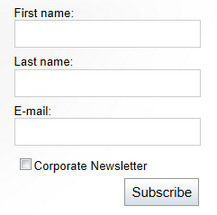
Click OK. When you look at the page now, you will see that the dialog looks like this (when no user is logged on):

You can define any CSS classes used within the layout code by clicking the Add CSS styles link below the layout editor and adding the styles into the CSS styles field. If the styles require additional files (such as images), you can add them on the Theme tab, which is available when editing the layout in Site Manager -> Development -> Web parts.
For more information about page component CSS styles, please see the Development -> CSS stylesheets and design -> CSS for page components topic.