If you already have a Kentico CMS website hosted on a traditional web server and have decided to move it to the Windows Azure platform, there are several tasks that need to be performed in order to prepare the site for deployment.
The recommended method is to install a new instance of Kentico CMS as an Azure project using the Web installer. Then, carry over all customizations from your original project into the CMSApp project of the new application. Remember to check the configuration options specified in your site's web.config file and transfer them into the web.config of the new project. It contains some additional sections needed to run on Windows Azure, so simply copying the file is not an option.
You can enter the connection string for your site's database either into the web.config file as usual, or the service configuration file under the application's CMSAzure project. Please note that your database must use the same version of Kentico CMS as the installed Azure project. If this is not the case, you will have to perform the appropriate upgrade procedure for your original website, which also upgrades the database. You can download the upgrade package from the Support section of the Kentico.com website. If you also wish to have your database hosted on Windows Azure, please see the section below to learn how this can be done.
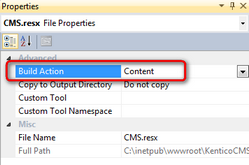
You will also need to copy any additional files required by the site (such as custom user controls or stylesheet design files). Once the files are present in the new application's directory, include them in the project. To do this in Visual Studio, enable the Show all files button at the top of the Solution Explorer, then right click the given files and select Include In Project. Also check the properties (Right click -> Properties) of all files that were included into the project and make sure that the value of their Build Action property is set to Content.
This is necessary to ensure that the files will be part of the application once it is deployed to Windows Azure.
Once all customizations and required files are included in the project, you can configure it as described in the Application structure and configuration topic and then follow the instructions in Deployment to the cloud to complete the deployment of the application.
Another possible approach is to manually convert your existing website to a Windows Azure application as described in the Converting a web site project to an Azure application topic. This is a relatively complicated process that should only be considered if your project is heavily customized and carrying over the changes is not a suitable option.
Deploying media libraries
Media files are organized into folders in the file system. If you have existing libraries on your website, you will have to include those media folders into the project, as mentioned previously. This approach ensures that your existing media libraries will be included in the package that will be deployed to the cloud. However, files that will be added while the website runs in Azure, will automatically be uploaded to the Blob storage. For this reason, it is recommended to move media files to the Blob storage at the time of deployment, so that both the existing files and the files that will be added in the future will share a common storage.
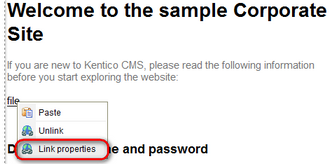
The move to Blob storage will, however, cause the files' URLs to change. You will have to manually go through your website's content and change links pointing to media files to the new, correct URLs. To do this, follow these steps:
1. Right-click the particular link.
2. Click Link properties.
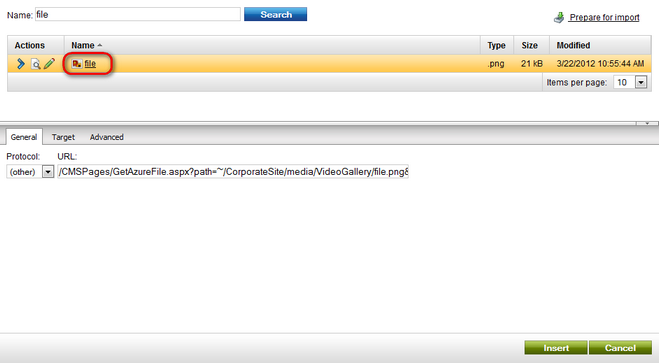
3. In the dialog that opens, search for the file you're linking and click it. This will regenerate the file's URL.
4. Save the changes by clicking Insert.
Migrating your database to SQL Azure
The SQL Azure service may be utilized to host your website's database on the Windows Azure platform along with the application. Transferring your database to SQL Azure is a possibility even if you wish to keep your Kentico CMS website hosted on a standard server.
The procedure requires your database to run on Microsoft SQL Server 2008 R2 SP1 or later. The Express edition is sufficient.
1. First, it is necessary to prepare the target SQL Azure database. If you do not have an available server and database yet, please see the Database setup topic to learn how you can set these up through the Windows Azure Management Portal.
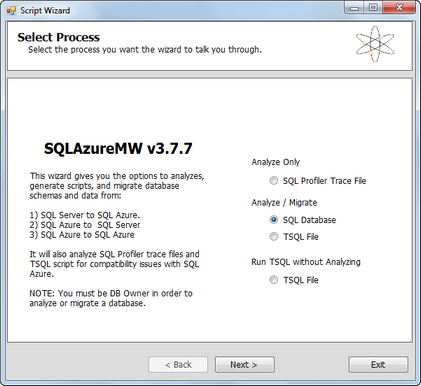
2. You can either migrate your database manually by executing a script on the SQL Azure database, or use an appropriate tool or integration service to make this process easier. We recommend the SQL Azure Migration Wizard, which is available free of charge at http://sqlazuremw.codeplex.com/.
3. Download the SQL Azure Migration Wizard tool and run it.
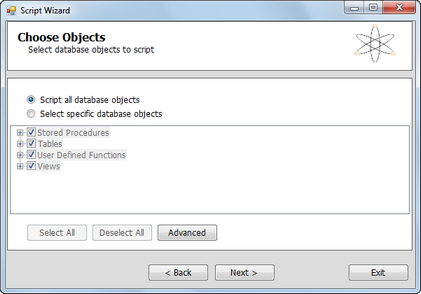
Select the Analyze / Migrate -> SQL Database option, click Next and choose the server where the database of your Kentico CMS website is located as the source. Select the specific database by double‑clicking on it and then the Script all database objects option.
Click Next and confirm that you wish to generate the required SQL script.
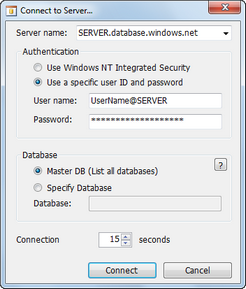
4. When the script is completed, continue to the next step where you can enter the required connection information for your SQL Azure server.
Connect to the server and specify the target database. The tool will then execute the generated script. If successful, your database will be migrated to the cloud.
5. Now that your database is hosted on SQL Azure, change your application's connection string to match the new database. If you have Kentico CMS installed (or converted) as a Windows Azure project, you can add the connection string as a setting into the <ConfigurationSettings> section of both roles in the appropriate service configuration file. With this approach, use the following format: