|
|

Application structure and configuration |

|

|

|

|
|
Application structure and configuration |
|
|

|
|
|
|
Application structure and configuration |
|
|
|
|
|
Application structure and configuration |
|
|
|
|
|
|
||
After you finish the installation of the Kentico CMS web application as an Azure project, open the solution in Visual Studio. You can either follow the link displayed in the final step of the Web Installer, or use the CMSAzure.sln file created in the project directory at any time.
The structure of the solution is slightly different than that of a standard Kentico CMS installation and some additional projects are included:

The first project (CMSApp) is Kentico CMS in the web application format. The second (CMSAzure) uses the Windows Azure Project template and is necessary to ensure that the application can be deployed as a hosted service on Windows Azure. It contains the service definition and service configuration files and has the other projects defined as roles. The CMSApp project is added as a Web role and the SmartSearchWorker, used to carry out tasks required by the Smart search module, is set up as a Worker role.
If you are certain that you will not need the Smart search module, you can remove the SmartSearchWorker project (and role) from the solution. This reduces the number of roles that need to be hosted, so the costs of running your application on Windows Azure will be lower. In this case, you can ignore any further instructions related to this project and role.
The application can be started on the local compute and storage emulator provided by the Azure SDK. This can be used to test the website during its development without actually hosting it in the cloud.
To run the website on the emulator you will need to have the appropriate service configuration file set up in a specific way. The following settings must be present in the <ConfigurationSettings> section of both roles:
<Setting name="CMSUrlPort" value="81" /> |
If you wish to use the Windows Azure diagnostics module and have it transfer data to the local development storage, you also need to use the following settings:
CMSApp role:
<Setting name="DiagnosticsConnectionString" value="UseDevelopmentStorage=true" /> |
SmartSearchWorker role:
<Setting name="Microsoft.WindowsAzure.Plugins.Diagnostics.ConnectionString" value="UseDevelopmentStorage=true" /> |
These settings are configured by default in the ServiceConfiguration.Local.cscfg file after a clean installation of the Azure project. The Local service configuration is used when running on the emulator. If necessary, you can specify a different configuration file by right clicking the CMSAzure project, selecting Properties and switching to the Development tab of the displayed dialog.
You can start the emulator from Visual Studio by selecting Debug -> Start Debugging (F5) or by pressing CTRL + F5 to run the application on the emulator without debugging. Once the project is successfully built and everything starts up, the website will be opened in your browser and you can start working with it as usual. The first step that the website will require is to perform the database installation (unless you entered a connection string manually). Please see the Database setup topic to learn more about the database installer and connection strings in a Windows Azure environment.
If you wish to debug the application on the emulator, it is first necessary to make a small modification in the web.config file of the CMSApp project. Find the <compilation> element under the <system.web> section and change the value of its debug attribute to true.
<system.web> |
Remember to set the debug attribute back to false when you are done debugging to make sure that it is disabled on your production deployments (for security and performance reasons).
Please note that you will have to restart the emulator deployment every time you make any changes to the configuration or perform customizations of the application's code. This ensures that the changes are reflected on the website.
|
Emulator performance and requirements
You may experience relatively slow loading times when running Kentico CMS on the local emulator. This is caused by the limited resources of the emulated environment. The performance of the website will be significantly better when it is actually deployed to Windows Azure.
Additionally, you may encounter memory‑related errors during the emulator startup when running on a low‑end machine. This is caused by the relatively high requirements of the emulator, not by a problem with Kentico CMS. |
If you want to move the application to the Azure cloud, you will first have to ensure that your Azure subscription contains the necessary accounts and services. The application must then be configured according to the specific details of your subscription. You can set up your subscription and also find the required information on the Windows Azure Management Portal, which you can access at https://manage.windowsazure.com/. Use your Windows Live ID credentials to sign in.
The following steps are required:
1. You will need an active Azure Blob Storage account to serve as the file system of your cloud‑based application. To create a new storage account, select Storage in the management portal, then click New and continue according to the instructions in the portal.
Once you have an existing storage account, click it in the list of accounts and click Manage keys.
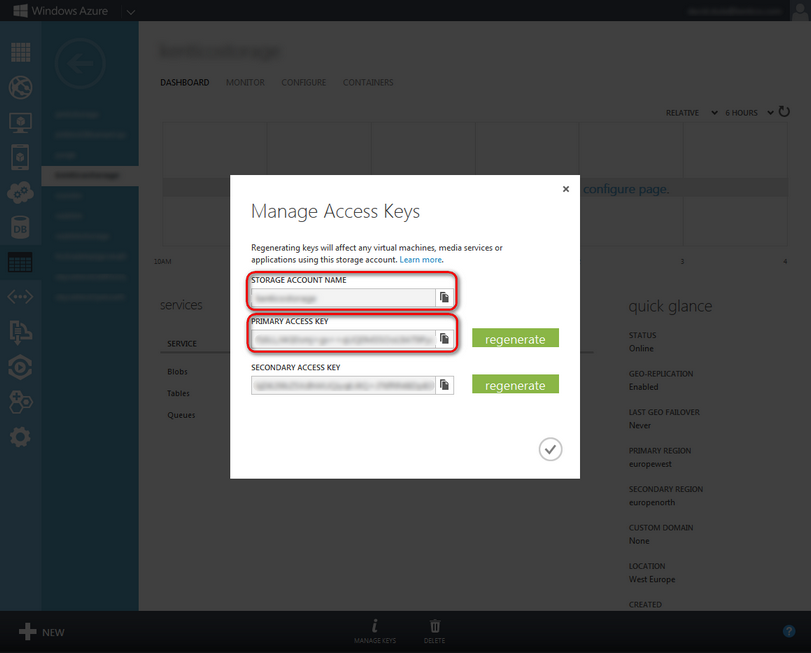
Copy your Storage account name and Primary access key, and enter them as the values of the CMSAzureAccountName and CMSAzureSharedKey settings in the <ConfigurationSettings> section of both the CMSApp and SmartSearchWorker roles in your application's service configuration file. You can use the default ServiceConfiguration.Cloud.cscfg file for this purpose, so you do not have to overwrite the local configuration for the emulator.
<Setting name="CMSAzureAccountName" value="AccountName"/> |
Additionally, if you wish to use the Windows Azure diagnostics module and log its output on the storage account, you must set the diagnostics connection string of both roles to use https and enter the name and access key of the given account:
<Setting name="DiagnosticsConnectionString" value="DefaultEndpointsProtocol=https;AccountName=AccountName;AccountKey=PrimaryAccessKey" /> |
2. If you want the storage account connection to use the default endpoints for its services (blob, table or queue), leave empty values for the CMSAzureQueueEndPoint, CMSAzureTableEndPoint, CMSAzureBlobEndPoint settings for both roles in the service configuration file. Otherwise, if you use a specific endpoint for any of the services (e.g. if you have registered a custom domain name for the blob service or wish to access a specific container), enter the given endpoint as the value of the appropriate setting.
3. Another thing that can be set up in the service configuration file is the number of instances used for the CMSApp role, which represents the Kentico CMS application. This determines how many virtual machines will be dedicated to the website, so its performance and load handling capacity will increase with each instance. Simply enter the required number of instances as the value of the count attribute of the role's <Instances> element.
<Role name="CMSApp"> <Instances count="4" /> <ConfigurationSettings> ... </ConfigurationSettings> </Role> |
Each instance will be represented by a separate web farm server within the Kentico CMS system. The creation and management of the servers is handled automatically, and it is not necessary to perform any further configuration.
|
Instance licensing
In order for the website to run, the Kentico CMS license used for your domain must allow at least as many servers as the amount of instances set for the role.
|
Do not increase the number of instances for the SmartSearchWorker role. Due to the way smart search indexes are processed, the required tasks must be performed by a single instance.
4. If you wish to use more than one instance for the application, you will also need a Windows Azure AppFabric Cache service namespace as part of your subscription. It is used to share the session state between multiple instances.
The Windows Azure portal does not support managing AppFabric services. It is possible only in the old version of the management portal. To switch to the old version, click your account name in the top right corner of the portal and click Previous portal.
In the old portal, you can manage AppFabric services for your Azure subscription in Service Bus, Access Control & Caching -> AppFabric -> Cache. Select your cache namespace and view its properties on the right.

Scroll down to the Authentication Token property, view it and copy it to your clipboard. Next, open the web.config file of the CMSApp project and locate its <dataCacheClients> section. Here, enter the Service URL of your AppFabric cache namespace into the name attribute of the <host> elements and copy your authentication token into the <messageSecurity> authorizationInfo attributes.
<!-- Azure AppFabric cache BEGIN --> <dataCacheClients> <dataCacheClient name="default"> <hosts> <host name="CacheNamespaceName.cache.windows.net" cachePort="22233" /> </hosts> <securityProperties mode="Message"> <messageSecurity authorizationInfo="AuthenticationToken"> </messageSecurity> </securityProperties> </dataCacheClient> <dataCacheClient name="SslEndpoint"> <hosts> <host name="CacheNamespaceName.cache.windows.net" cachePort="22243" /> </hosts> <securityProperties mode="Message" sslEnabled="true"> <messageSecurity authorizationInfo="AuthenticationToken"> </messageSecurity> </securityProperties> </dataCacheClient> </dataCacheClients> <!-- Azure AppFabric cache END --> |
Next, find the <sessionState> element under the <system.web> section, delete (or comment out) the default line of code and replace it with the version that uses the AppFabric cache that is included as a comment.
<system.web>
... ...
</system.web> |
Then, right click the CMSApp project, select Add reference, switch to the Browse tab and navigate to the dlls in the AppFabric SDK installation directory (typically in Program Files\Windows Azure AppFabric SDK\V1.0\Assemblies\NET4.0\Cache).
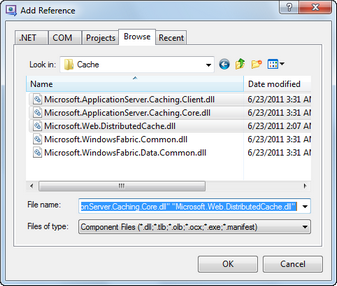
Choose the Microsoft.ApplicationServer.Caching.Client.dll, Microsoft.ApplicationServer.Caching.Core.dll and Microsoft.Web.DistributedCache.dll files and click OK.
|
Other types of session state providers
Alternatively, you can set up a Blob/table or SQL Azure provider to maintain the session state if you do not wish to use AppFabric cache.
Please see the article about Session State on Windows Azure published on our DevNet portal for more information. |
5. Set the value of the CMSURLPort setting in the service configuration file to 80.
<Setting name="CMSUrlPort" value="80" /> |
The value of this setting should always match the port attribute of the <InputEndpoint> element under the CMSApp role in your service definition file (ServiceDefinition.csdef). If you need to use a different port for some reason, adjust the values in both the service definition and configuration.
6. At this point, you can also choose if you wish to run the application in Full IIS mode or under Hosted Web Core (legacy mode). Full IIS mode is set by default and recommended, since it allows you to use the full range of IIS features, such as Windows Authentication. If you wish to use Hosted Web Core, you can do so by deleting or commenting out the <Sites> section of the CMSApp role in the service definition file. Also, edit the AzureInit.cs file in the Old_App_code/CMSModules/WindowsAzure folder and comment out the content of its ApplicationStartInit() and BeginRequestInit() methods.
Once everything is configured appropriately, save the changes to all files and you can perform the actual deployment of the application. Please continue reading in the Deployment to the cloud topic to learn how this can be done.


