|
|

Customers |

|

|

|

|
|
Customers |
|
|

|
|
|
|
Customers |
|
|
|
|
|
Customers |
|
|
|
|
|
|
||
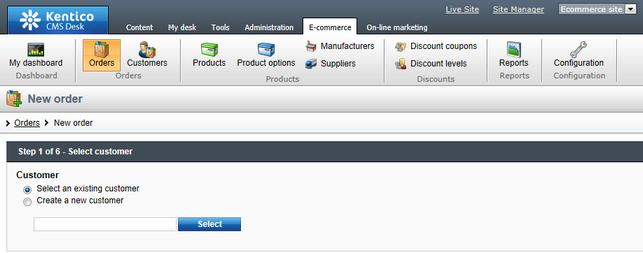
When making a new order you can either select an existing customer or create a new one. Please note that if you decide for the latter option, the form contains the same customer properties as if opened directly from the Customers section.
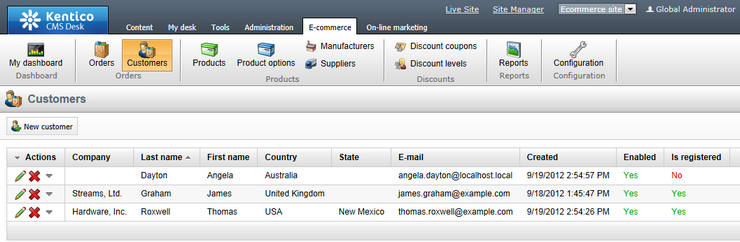
Customers can be managed in CMS Desk -> E-commerce -> Customers. In this section of the administration interface, you can see a list of all defined customers. New ones can be added to the list by clicking the ![]() New customer button above the list. Properties of already defined customers can be edited by clicking the Edit (
New customer button above the list. Properties of already defined customers can be edited by clicking the Edit (![]() ) icon in the Actions column. You can also delete a customer by clicking the Delete (
) icon in the Actions column. You can also delete a customer by clicking the Delete (![]() ) icon.
) icon.
When editing a customer, the following tabs are available to specify its properties:
•General tab
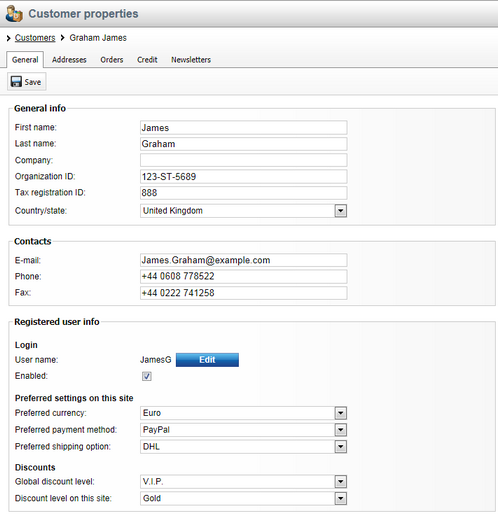
On this tab you can edit general properties of the selected customer.
General info:
•First name - sets the customer's first name.
•Last name - sets the customer's last name.
•Company - can be used to enter the name of the customer's company.
•Organization ID - allows you to enter a registration ID of the customer's company.
•Tax registration ID - allows you to enter a tax registration ID of the customer's company.
•Country/state - here you can select the customer's country. If the country has any states, another drop-down list is displayed allowing you to select a state.
Contacts:
•E-mail - can be used to enter the customer's e-mail address.
•Phone - here you can enter the customer's phone number.
•Fax - here you can enter the customer's fax number.
Registered user info:
•Create a login for this site - allows you to register the customer on the current website. Unless checked, other fields in this section are hidden.
•User name - sets the user name that they will use to log in to the current website.
•Password - sets the password that the customer will use to log in to the current website. The Password strength indicator below the field informs you about the strength of the entered password.
•Confirm password - allows you to confirm the entered password.
The following properties can be set in the Registered user info section of already registered customers:
Login:
•User name - the customer's user name that the customer uses to log in to the current website. Click the Edit button to edit properties of the registered user.
•Enabled - if checked, the customer is enabled for shopping, i.e. they are allowed to purchase on the current website.
Preferred settings on this site:
•Preferred currency - can be used to enter the currency in which the prices are displayed when the customer signs in to the current website (it is set automatically based on the customer's last purchase).
•Preferred payment method - here you can enter a payment method to be used when the customer makes a purchase on the current website (it is set automatically based on the customer's last purchase). A default value which may be changed as needed during the purchase process.
•Preferred shipping option - here you can enter a shipping option to be used when the customer makes a purchase on the current website (it is set automatically based on the customer's last purchase). A default value which may be changed as needed during the purchase process.
Discounts:
•Global discount level - specifies a global discount level applied to the customer's orders on the current website (if available). Please note that unless global discount levels are allowed on the site, the drop-down list is hidden.
•Discount level on this site - specifies a site-specific discount level applied to the customer's orders on the current website (if available).
On this tab you can edit custom fields that you added in Site Manager -> Development -> System tables -> Edit (![]() ) the Ecommerce - Customer table. If no such fields were added, the tab is hidden.
) the Ecommerce - Customer table. If no such fields were added, the tab is hidden.
Each customer can have multiple addresses for billing and shipping stored in their profile. On this tab you can see a list of all available addresses of the current customer. You can add a new address by clicking the ![]() New address button, Edit (
New address button, Edit (![]() ) or Delete (
) or Delete (![]() ) an existing item in the list and you can also
) an existing item in the list and you can also ![]() Clone an address if you click the
Clone an address if you click the ![]() Other actions icon on the selected address line.
Other actions icon on the selected address line.
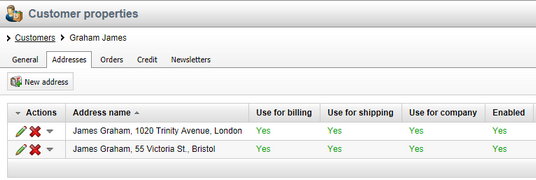
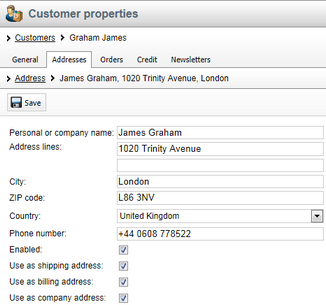
The following properties are available when creating or editing a customer address object:
•Personal or company name - here you can enter a name to be used in the customer's current address. The name can be either a personal name or a company name.
•Address lines - here you can enter lines of the address, e.g. a house number and street name.
•City - allows you to enter the city name.
•ZIP code - here you can enter the ZIP code of the city.
•Country - allows you to select a country to be used in the customer's current address. If the country has any states, another drop-down list is displayed.
•Phone number - can be used to enter a phone number.
•Enabled - indicates if the address should be offered in the CMS system. If you disable the address (i.e. uncheck this checkbox), it will no longer be displayed, but it will be kept in the database for your records and to keep the customer's purchase history.
•Use as shipping address - indicates if the address should be offered to the customer as a shipping address.
•Use as billing address - indicates if the address should be offered to the customer as a billing address.
•Use as company address - indicates if the address should be offered to the customer as a company address.
On this tab you can see a list of orders made by the current customer in your on-line store. You can add a new order by clicking the ![]() New order button and Edit (
New order button and Edit (![]() ) or Delete (
) or Delete (![]() ) an existing item in the list. You can also move the orders to the Next (
) an existing item in the list. You can also move the orders to the Next (![]() ) or Previous status (
) or Previous status (![]() ).
).
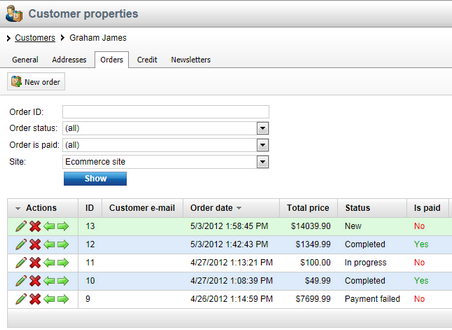
Please note that the listed orders can be filtered using the text boxes above the list.
On this tab you can see the total credit of a registered customer, along with a list of credit events during which this credit has been accumulated. Credit can be both added to and deducted from the total credit. However, only positive value credit can be used to pay for the purchased products.
You can add a new credit event by clicking the ![]() New credit event button and Edit (
New credit event button and Edit (![]() ) or Delete (
) or Delete (![]() ) an existing item in the list.
) an existing item in the list.
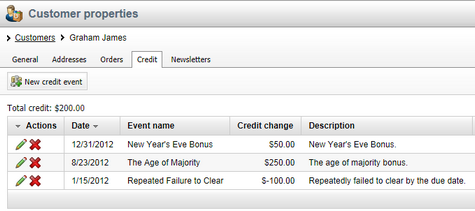
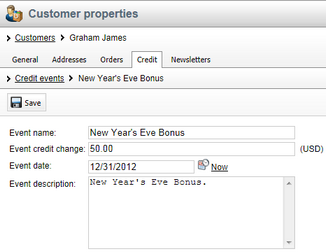
The following properties are available when creating or editing a customer credit object:
•Event name - here you can enter the name of the credit event.
•Event credit change - specifies a credit amount (in the main currency) by which the total credit amount should be changed. Please note that you can add a negative value if you want to decrease the customer's credit.
•Event date - specifies the date when the credit event occurs.
•Event description - can be used to enter a text description for the credit event in order to give further information.
Please note that for anonymous customers the tab is hidden.
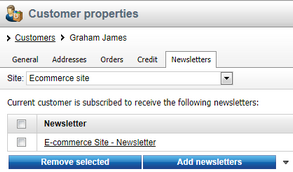
On this tab you can specify which newsletters the current customer is subscribed to receive. To add newsletters, click the Add newsletters button and check the boxes next to the appropriate newsletters in the displayed selection dialog. Newsletters can be removed from the list at any time using the checkboxes together with the Remove selected button. You can also remove all listed items at once by clicking the ![]() icon and performing the
icon and performing the ![]() Remove all action.
Remove all action.