|
|

Adding a new dashboard to the interface |

|

|

|

|
|
Adding a new dashboard to the interface |
|
|

|
|
|
|
Adding a new dashboard to the interface |
|
|
|
|
|
Adding a new dashboard to the interface |
|
|
|
|
|
|
||
If the dashboards built into the administration interface by default do not meet your specific requirements, it is possible to integrate new dashboard pages.
The following example demonstrates how a custom dashboard can be added to the Tools tab of the CMS Desk administration interface. The same principles can be applied when creating a dashboard in other locations.
1. First, create the page template that the dashboard page will be based on. Go to CMS Site Manager -> Development -> Page templates, select the Dashboard pages category from the tree and click ![]() New template. Enter the following values into the available fields:
New template. Enter the following values into the available fields:
•Template display name: Tools dashboard
•Template code name: ToolsDashboard
Click OK, select Dashboard page from the Template type drop‑down list of the new template and ![]() Save the change.
Save the change.

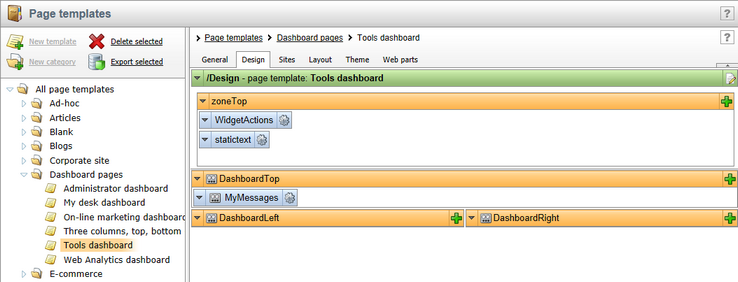
2. Switch to the Design tab and click the Edit layout (![]() ) button. Copy the following code into the layout to define some web part/widget zones for the template:
) button. Copy the following code into the layout to define some web part/widget zones for the template:
<table border="0" width="100%" cellspacing="0" cellpadding="0"> |
Click ![]() Save.
Save.
3. Now open the Design tab again, expand the menu (![]() ) of the DashboardTop zone and select the
) of the DashboardTop zone and select the ![]() Properties item. Switch the Widget zone type property from None to Dashboard and click OK. Repeat this step for the DashboardLeft and DashboardRight zones.
Properties item. Switch the Widget zone type property from None to Dashboard and click OK. Repeat this step for the DashboardLeft and DashboardRight zones.
4. Next, click the Add web part (![]() ) button of the ZoneTop zone, select Widgets -> Widget actions from the web part catalog and press OK. Configure the following properties of the web part:
) button of the ZoneTop zone, select Widgets -> Widget actions from the web part catalog and press OK. Configure the following properties of the web part:
•Widgets -> Widget zone type: Dashboard
•Widgets -> Widget zone ID: Leave empty; designates the zone where new widgets should be created when the Add widget button is clicked. By default, the first available zone will be used (DashboardTop in this case), but the ID of any other dashboard zone can be specified if required.
Leave the remaining properties in their default state and click OK.
5. Add another web part to the same zone. This time select Text & Images -> Static text and set the following properties:
•Content -> Text: This is a custom dashboard page.
•HTML Envelope -> Content before: <h2>
•HTML Envelope -> Content after: </h2>
Click OK.
6. Place a widget into the DashboardTop zone, for example Community -> My messages and leave the remaining two zones empty. This sets the default content of the dashboard that individual users can later configure and expand.
7. Switch to the Sites tab and assign the template to any websites that should carry over the new dashboard page when they are exported.
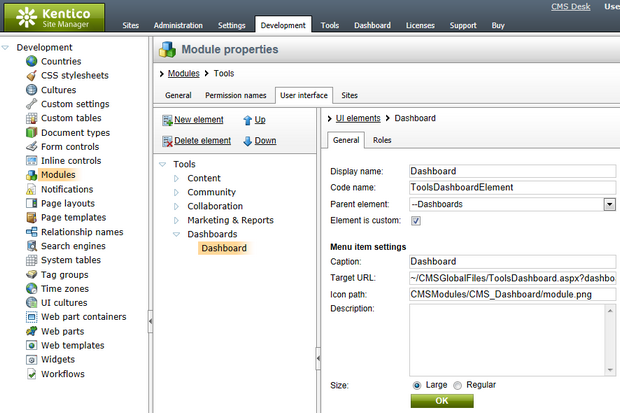
8. The CMS Desk -> Tools section where the new dashboard will be located utilizes User interface elements that can be managed via the CMS. Navigate to Site Manager -> Development -> Modules and edit (![]() ) the Tools module. On the General tab, notice that the Module code name is CMS.Tools. This will be used later in the example.
) the Tools module. On the General tab, notice that the Module code name is CMS.Tools. This will be used later in the example.
9. Switch to the User interface tab, add a ![]() New element under the root of the Tools tree and enter the values shown below:
New element under the root of the Tools tree and enter the values shown below:
•Display name: Dashboards
•Code name: Tools.Dashboards
•Element is custom: Yes (checked)
•Caption: Dashboards
Click OK. This element will only serve as a parent category in the tools menu, under which the actual dashboard will be placed. Now click ![]() New element again to add an item under the Dashboards element and fill in the form according to the following information:
New element again to add an item under the Dashboards element and fill in the form according to the following information:
•Display name: Dashboard
•Code name: ToolsDashboardElement
•Element is custom: Yes (checked)
•Caption: Dashboard; this sets the text caption displayed for the element in the actual interface. In real‑world scenarios, it may be preferable to specify the caption using a localization string in the appropriate macro expression format: {$<string key>$}
•Target URL: ~/CMSGlobalFiles/ToolsDashboard.aspx?dashboardName=Tools&templateName=ToolsDashboard&{hash}
Sets the URL of the page with the content of the UI element. The actual source file used in the URL above will be created later in this example. When creating links to dashboard pages, it is necessary to understand and correctly specify the query string parameters:
•dashboardName - sets a name for the dashboard to ensure uniqueness in cases where multiple dashboards use the same page template. The content of a dashboard is unique for every user and site (when located in CMS Desk). However, if two or more dashboards share a page template and the dashboardName parameters in the URLs used to access them have the same value, changes made to one of the dashboards will also be applied to the others (for the given user and site).
•templateName - sets the code name of the page template that the dashboard will be based on. The type of the assigned template must be Dashboard page. As you can see, this example uses the template created in the previous steps.
•hash - the hash code will be generated automatically by the used menu control.
•Icon path: CMSModules/CMS_Dashboard/module.png; sets the path to the image used to represent the element in the actual interface.
•Size: Large
Click OK to create the new UI element once all the fields are filled in correctly.
|
Adding dashboards without using UI elements
Not all sections of the administration interface can be modified via UI elements (please refer to UI personalization -> How does it work for more information). If you wish to add a dashboard page to these other locations, the code of the used navigation components must be modified manually. Keep in mind that the dashboard page needs to be accessed through a URL with the query string parameters mentioned above in the description of the Target URL property. |
10. Now the .aspx file of the dashboard page needs to be developed and added to your web project. Open your website in Visual Studio and create a New folder under the root called CMSGlobalFiles (if it doesn't already exist). Right‑click the folder and select Add New Item. Choose to create a Web Form and name it ToolsDashboard.aspx. As you can see, this is the file specified in the Target URL of the UI element created before. This location ensures that the file will be exported along with any site that includes global folders in its export package.
11. Modify the page code to match the following:
<%@ Page Language="C#" AutoEventWireup="true" CodeFile="ToolsDashboard.aspx.cs" Theme="Default" EnableEventValidation="false" Inherits="CMSGlobalFiles_ToolsDashboard" %> |
The Dashboard user control that you registered and placed onto the form handles the entire functionality of the dashboard. It processes the query string parameters from the URL used to access the page and displays the corresponding dashboard according to the specified dashboard name, page template and context‑related data such as the current site and user.
12. Switch to the code behind of the web form and add the following references to the beginning of the code:
[C#]
using CMS.UIControls; |
13. Next, set the CMSGlobalFiles_ToolsDashboard class to inherit from the DashboardPage class and modify it to contain the following code:
[C#]
public partial class CMSGlobalFiles_ToolsDashboard : DashboardPage ucDashboard.ResourceName = "CMS.Tools"; |
In the handler of the PreInit event, certain properties of the Dashboard user control are assigned and its SetupDashboard() method is called. Note that the values of the ResourceName and ElementName properties must be set according to the module and code name of the UI element created in previous steps of this example.
When adding a dashboard to the interface of an actual live website, the Page_Load method should contain code checking that the current user has the Read permission for the given part of the interface and that the UI element is not disabled via UI personalization settings.
14. Save both files. If your CMS project was installed as a web application, Build your web project.
|
Creating dashboards in the Site Manager interface
It is not necessary to create a new aspx file for dashboards located in the Site Manager administration interface. You can simply reuse the default ~/CMSSiteManager/Dashboard.aspx file, since there is no matching UI element to be configured and the security checks should always be the same.
When adding the link to the dashboard in Site Manager navigation components, remember to appropriately set the dashboardName and templateName query string parameters in the URL. |
15. If you now open CMS Desk and switch to the Tools tab, you will see that there is a new Dashboard item in the menu. If you select it, a fully functional dashboard page based on the created page template will be displayed.


