|
|

Managing dashboard content |

|

|

|

|
|
Managing dashboard content |
|
|

|
|
|
|
Managing dashboard content |
|
|
|
|
|
Managing dashboard content |
|
|
|
|
|
|
||
There are several levels on which dashboard content can be specified.
The general design and initial content of a dashboard is determined by the page template that it uses. Dashboard templates can be managed at Site Manager -> Development -> Page templates, like any other type of page templates. A dashboard template must have its Template type property set to Dashboard page on the General tab. Configuration of the actual template content can be performed on the Design tab.
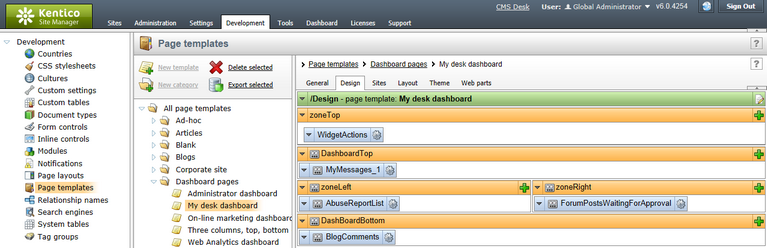
The placement, size and amount of zones on the template may be altered by editing the code of its page layout via the Edit layout (![]() ) button or on the Layout tab.
) button or on the Layout tab.
There are two possible types of zones that can be defined on a dashboard template:
•Web part zones - the content of zones of this type may only be managed here on the Design tab of the page template. Web parts located here function as fixed content on the dashboard page itself. The Widget zone type property of these zones must be set to None.
•Dashboard widget zones - zones of this type may only contain widgets. Any widgets added here on the Design tab serve as the default content of the zone. Individual users may change and configure the widget content of the zone for their own personalized version of the dashboard. The Widget zone type property of these zones must be set to Dashboard.
Every dashboard template should contain the Widget actions web part somewhere in its layout in order to allow users to add new widgets or reset the zones of the dashboard to their default widget content. The web part must also be configured (![]() ) to have its Widget zone type property set to Dashboard. The Widget zone ID property may be used to specify the dashboard zone to which new widgets will be added (the ID of the desired zone must be entered). Once created, users can drag the widget to another zone as required.
) to have its Widget zone type property set to Dashboard. The Widget zone ID property may be used to specify the dashboard zone to which new widgets will be added (the ID of the desired zone must be entered). Once created, users can drag the widget to another zone as required.
The settings made on the Sites tab of a dashboard page template do not affect on which websites dashboards with this template can be placed. They are only used to ensure that the page template will be exported/imported along with the assigned sites.
To learn about how a page template is assigned to a specific dashboard section, please read the Adding a new dashboard to the interface topic.
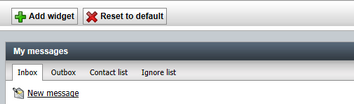
Users of the administration interface with access to a dashboard section can manipulate widgets in the available zones and thus create their own personalized version of the dashboard. Widgets are added using the ![]() Add widget button generated by the Widget actions web part. At any time, all the zones on the dashboard and the widgets they contain can be returned to their default state by clicking
Add widget button generated by the Widget actions web part. At any time, all the zones on the dashboard and the widgets they contain can be returned to their default state by clicking ![]() Reset to default.
Reset to default.
Individual widgets are enclosed in containers with a header and a set of action buttons. To manage the widgets on the dashboard, the appropriate actions must be used.
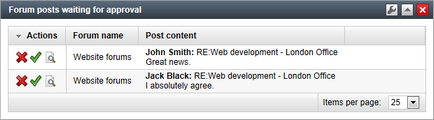
The simplest action available is provided by the Minimize widget (![]() ) button, which hides the content of a widget so that only its header is visible. The Maximize widget (
) button, which hides the content of a widget so that only its header is visible. The Maximize widget (![]() ) action can be used to restore the widget to its previous state.
) action can be used to restore the widget to its previous state.
Clicking the Configure widget (![]() ) button opens the Widget properties dialog where the widget's properties can be modified. Every widget has its own set of properties depending on its function (detailed information can be found in the Widgets reference guide). The Widget title property is present for all types of widgets, as it sets the text displayed in the header of the widget on the dashboard page.
) button opens the Widget properties dialog where the widget's properties can be modified. Every widget has its own set of properties depending on its function (detailed information can be found in the Widgets reference guide). The Widget title property is present for all types of widgets, as it sets the text displayed in the header of the widget on the dashboard page.
The location of a widget can be changed easily by using its drag‑and‑drop functionality. To pick up a widget, simply hover over its header, hold down the mouse button and then drag it to the desired position. This works both for modifying the order of widgets within a zone and moving them to a different zone.
The Remove widget (![]() ) action deletes the widget from the dashboard completely.
) action deletes the widget from the dashboard completely.
In order for a specific widget to be usable as a dashboard component, it must first be configured in Site Manager -> Development -> Widgets, specifically by checking the This widget can be used in dashboard zones option on its Security tab.
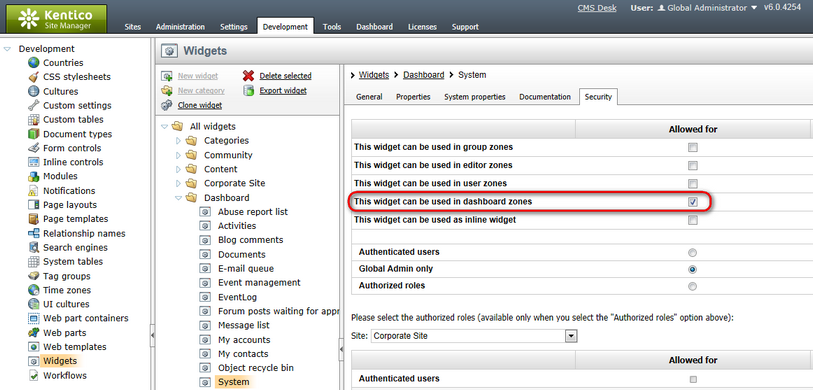
If a widget is also allowed in other types of zones, for example user zones on the live site, it may in certain cases be useful to set some of its properties to be available only when configuring the widget on a dashboard. This can be achieved on the Properties tab using the Display attribute only in the dashboard checkbox included among the settings of the given property.