Managing scores |

|

|

|

|
|
Managing scores |

|

|

|

|
|
|
||
User interface of the Scoring module is located in CMS Desk -> On-line marketing -> Scoring. On the initial screen of the interface, you can see a list of defined scores. New scores can be added using the ![]() New score link. Existing scores have the following actions available in the Actions column:
New score link. Existing scores have the following actions available in the Actions column:
•![]() Edit - opens the score's editing interface where properties of the score can be modified, score rules defined and score points that individual contacts received within the score can be viewed.
Edit - opens the score's editing interface where properties of the score can be modified, score rules defined and score points that individual contacts received within the score can be viewed.
•![]() Delete - deletes the score.
Delete - deletes the score.
It is also possible to ![]() Export,
Export, ![]() Backup and
Backup and ![]() Restore listed scores by choosing the respective action from the
Restore listed scores by choosing the respective action from the ![]() Other actions drop-down menu.
Other actions drop-down menu.
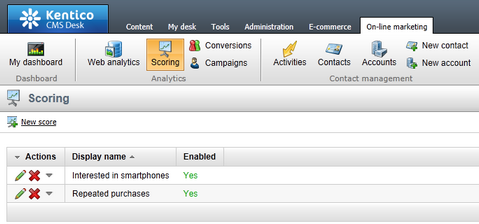
The editing interface of each score, displayed after clicking the Edit (![]() ) icon, is split into three tabs — General, Rules and Contacts.
) icon, is split into three tabs — General, Rules and Contacts.
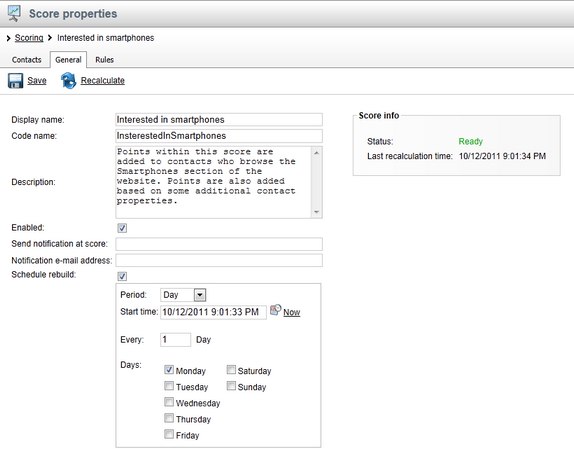
On the General tab, you can edit general properties of the score. The following of them are also available when creating a new score after clicking the ![]() New score link mentioned above:
New score link mentioned above:
•Display name - name of the score used in the system's administration interface.
•Code name - name of the score used in web project code.
•Description - text describing the score.
•Enabled - indicates if the score is enabled, i.e. if contacts are evaluated with score points within the score.
Other properties are only available when editing an already existing contact:
The two properties listed below enable you to set up e-mail notifications about contacts reaching a certain number of score points:
•Send notification at score - number of score points that a contact has to reach in order for the e-mail notification to be sent.
•Notification e-mail address - e-mail addresses to which the notification e-mails will be sent. You can enter multiple addresses separated by semicolons (;).
The e-mail notifications are based on the Scoring - Notification e-mail e-mail template.
When rules within the score are added or modified, it is necessary to recalculate score points previously reached by individual contacts with regards to the new rules. This can either be done manually by clicking the ![]() Recalculate link, or automatically by means of a dedicated scheduled task.
Recalculate link, or automatically by means of a dedicated scheduled task.
A scheduled task named Score '<score display name>' recalculation is created automatically in Site Manager -> Administration -> Scheduled tasks for every created score. It is disabled by default and can be enabled by the Schedule rebuild check-box. After doing so, a set of controls is displayed below the check-box, letting you specify the period after which recalculation will be regularly performed.
In the Score info box on the right, two values related to score recalculation are displayed:
•Status - when rules within the score were added or modified, the Recalculation needed status is displayed here. When the current score points reflect the currently defined rules, you should see the Ready status.
•Last recalculation time - date and time of last score points recalculation.
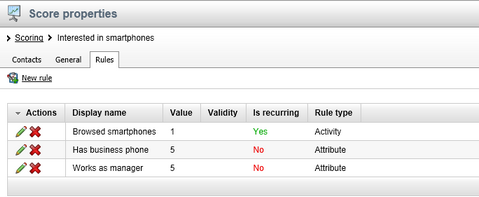
On the Rules tab, you can see a list of defined rules based on which score points are added to contacts within the current score. New rules can be defined after clicking the ![]() New rule link above the list. Listed rules can be Edited (
New rule link above the list. Listed rules can be Edited (![]() ) or Deleted (
) or Deleted (![]() ) by clicking the respective icons in the Actions column.
) by clicking the respective icons in the Actions column.
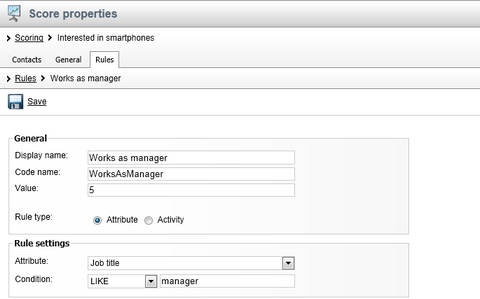
When defining a new rule or editing an existing one, the following properties can be specified:
•Display name - name of the rule used in the system's administration interface.
•Code name - name of the rule used in web project code.
•Value - number of score points that will be added to a contact for matching the rule.
•Rule type - you can choose from the following types of rules:
•Attribute - score points are added to contacts whose properties match a specified value.
•Activity - score points are added to contacts who perform a specified activity.
If you select the Attribute type, the following two fields can to used to define the rule:
•Attribute - contact property that has to match the condition specified below in order for contacts to receive the score points.
•Condition - condition that the attribute must match in order for contacts to receive the score points.
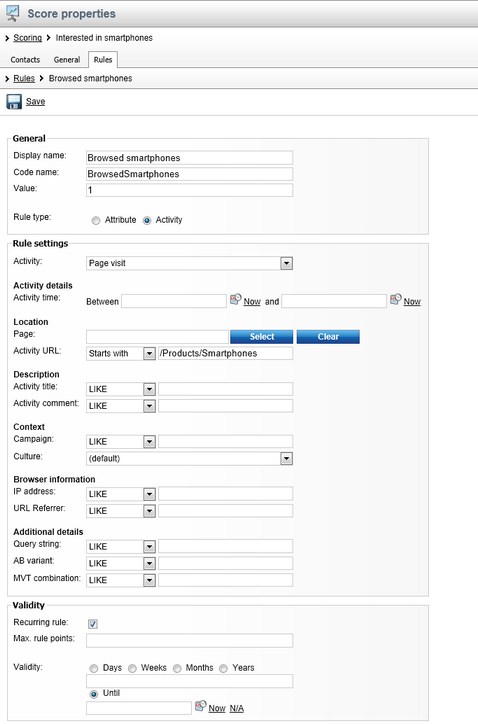
If you select the Activity type, the following fields can be used to specify the required activity:
•Activity - type of activity that the contact needs to perform in order to receive the score points.
•Activity time - time period within which contacts receive score points for performing the activity.
•Page - path to a page where the activity needs to be performed.
•Activity URL - URL where the activity needs to be performed.
•Activity title - title of the activity.
•Activity comment - text entered as comment of the activity.
•Campaign - web analytics campaign through which the user came to the website.
•Culture - cultural version of the website in which the activity needs to be performed.
•IP address - IP address from which the activity needs to be performed.
•URL referrer - URL from which the user needs to come to the page where they perform the activity.
•Recurring rule - indicates if score points can be added to contacts for performing the activity repeatedly. If disabled, score points are added only for the first time it is performed by each contact.
•Max. rule points - maximum number of points that can be added to a single contact for performing the activity
•Validity - indicates how long the score points will be added to a contact after performing the activity. After the specified time period, the score points will be subtracted from the user's total score points.
Depending on the selected type of activity, other specific properties can be displayed along with the ones listed above.
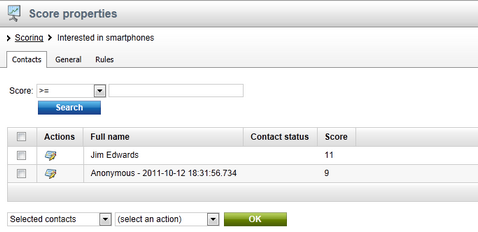
On the Contacts tab, you can see a list of contacts who received points within the current score and the actual numbers of score points that they received (the Score column). Please note that points received for matching activity rules are added about one minute after the activity is performed, unless the CMSLogActivityImmediatelyToDB key is added to the appSettings section of the project's web.config file and set to true. In this case, score points for activity rules are added almost immediately.
When large numbers of contacts are displayed, you can filter them by their score points value using the Score filter above the list. By clicking the View contact details (![]() ) icon next to a contact, the contact's editing interface identical to the one available in CMS Desk -> On-line marketing -> Contacts is displayed in a new pop-up window.
) icon next to a contact, the contact's editing interface identical to the one available in CMS Desk -> On-line marketing -> Contacts is displayed in a new pop-up window.
