Wrestling with GDPR and Data Protection Throughout Kentico 11 Editions – Newsletters, Users, Forms
In my previous article, I explored the challenges related to data flow mapping, storing the content of consents, and website tracking. In this second part of the three-part series, I am going to have a look at challenges related to newsletters, user registrations, and online form submissions. So, get yourself a cup of coffee, and let’s dive into it!
The rest of this article is going to target Kentico 11 editions that don’t wrestle with the Online Marketing features (Contacts, Activities, Personalization, etc.), and so require a different approach.
Newsletter Subscriptions
Sending newsletters used to be so easy! Getting a subscriber’s email and sending them a newsletter. Job done, right? Well, not anymore. These days, thanks to GDPR and various data protection regulations, you need to be sure that you have a valid consent from your subscribers before you can send them a newsletter.
Enabling a double opt-in for your newsletters is the first necessary step. This way you can ensure that you will not accidentally spam your subscribers if their email address was misused, or they have changed their mind.
Nevertheless, in some data protection cases, this may not be sufficient enough (check with your legal advisor), and you may need an even more robust way to deal with consent agreements. Such a solution would be applicable even to user (or customer) registrations and online form submissions.
Storing Consent Agreements
So, what would be the best approach to store the consent agreements? As with everything in Kentico (and life), there are many ways to achieve the same. But which direction is the best? Of course, this depends on many variables, and as every business (website) has different requirements, the rule one size fits all doesn’t apply here.
Nevertheless, the main requirements will stay the same in most cases:
- Allowing a visitor to give you a consent agreement during the submission of their data through a website form (user registration, newsletter subscription, online form, poll, etc.)
- Store the agreement in an easily accessible form in Kentico 11, so the agreement can be checked, and updated, if necessary
These requirements can be fulfilled by utilizing and combining the following Kentico 11 features:
- A dedicated Form Control that would display a checkbox, the text of a selected consent, and bind the consent agreement together with currently submitted data
- An Alternative Form to display the form control
- The Custom subscription form (or Custom registration form) web part for displaying the alternative form on the website
- A Custom Table for storing the consent agreement information
If you check the above list, you can see that everything pretty much depends on the custom form control. The form control would take care of the consent agreement saving by displaying the checkbox (so the visitor can select if they agree to the consent, or not), and the short version of the consent (with a link to a longer version, if needed). The form control would be added to an alternative form, and displayed on the website through the Custom Subscription Form web part (in case of a newsletter subscription), the Custom Registration Form web part (in case of a user registration), or directly as a part of the online form. When any of these forms are saved, the form control would save the consent agreement details into a custom table.
The steps are straightforward. However, we need to ensure that the consent agreement is bound to a proper data subject (visitor) through a unique identifier. I am sure you know which one it is going to be… Yes, the email address!
When anyone shares their personal data with you through a user registration, newsletter subscription, or form submission, they are asked for their email address in almost every case. Therefore, the email address is a suitable unique identifier.
This, however, requires you to ensure that every form always contains the “Email” field. Otherwise, the consent agreement can’t be properly bound to a visitor through their email address.
Custom Table
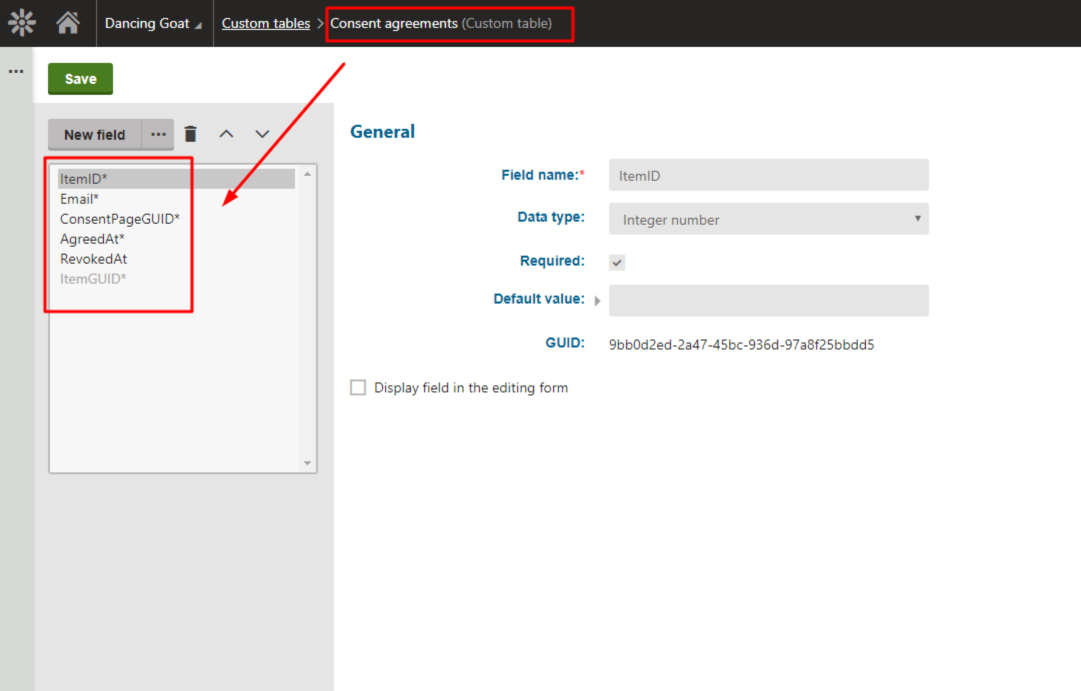
As it is much clearer now what needs to be done, let’s create a custom table that will store the details about the consent agreements. The custom table could have the following columns (make sure you check it with your legal advisor to be sure you track the information you need):
- ItemID – the primary key for the table
- Email – for storing the visitor’s email
- ConsentPageGUID – for storing the NodeGUID value of the consent’s page to keep track of all the localization variants of the page (so the text of the consent can be displayed according to the current culture of the visitor, if the language variant of the page exists)
- AgreedAt – for storing the date and time when the visitor agreed to the consent
- RevokedAt – for storing the date and time in case the consent is revoked
- ItemGUID – an automatically generated GUID value of the consent agreement
So, the structure could look like this:
Form Control
Now that we have the place defined for storing the consent agreements, it is time to create a custom form control that would take care of the consent agreement’s saving.
The form control is going to save the ItemGUID value of the consent agreement into the form’s field it is used for, when the form (e.g., a user registration form) is saved. Then this value can be used to check if a visitor has agreed to a consent or not.
The easiest way to create the form control is to clone the existing one called Consent agreement in the Form Controls app. The original form control is used for the EMS license as dealing with the online marketing contacts, activities, personas, and scoring is much more complex and would take a lot of effort to create, otherwise.
Once the form control is cloned and named accordingly (e.g., Consent agreement for Ultimate edition), it is time to open its code-behind file in Visual Studio, and adjust it a bit by replacing the original code with the following one:
using System;

using CMS.FormEngine.Web.UI;
using CMS.DataEngine;
using CMS.Helpers;
using CMS.DocumentEngine;
using CMS.Membership;
using CMS.Localization;

public partial class CMSModules_DataProtection_FormControls_ConsentAgreementLowerEditions : FormEngineUserControl
{
    private string SelectedConsent => FieldInfo?.Settings["Consent"] as string;


    public override object Value
    {
        get
        {
            return string.IsNullOrEmpty(hdnValueHolder.Value) ? null : hdnValueHolder.Value;
        }
        set
        {
            hdnValueHolder.Value = value?.ToString();
        }
    }


    public override bool Enabled
    {
        get
        {
            return chkConsent.Enabled;
        }
        set
        {
            base.Enabled = value;
            chkConsent.Enabled = value;
        }
    }


    protected override void OnInit(EventArgs e)
    {
        base.OnInit(e);

        if (Form != null)
        {
            Form.OnBeforeSave += Form_OnBeforeSave;
        }

        if (FieldInfo != null)
        {
            litConsentText.Text = GetConsentReferenceMarkup();
        }
    }


    private void Form_OnBeforeSave(object sender, EventArgs e)
    {
        var info = Form.Data as BaseInfo;

        if (info == null)
        {
            return;
        }

        Guid agreementGuid;

        if (chkConsent.Checked)
        {
            // create or update the consent agreement info in the custom table
            agreementGuid = Agreed(Guid.Parse(SelectedConsent));
        }
        else
        {
            // else revoke the consent agreement by updating the info in the custom table
            agreementGuid = Revoked(Guid.Parse(SelectedConsent));
        }

        // update the value of the form control
        StoreAgreementGuidInData(info, agreementGuid);
    }


    private void StoreAgreementGuidInData(BaseInfo info, Guid agreementGuid)
    {
        if (FieldInfo == null)
        {
            return;
        }

        info.SetValue(FieldInfo.Name, agreementGuid);

        Value = agreementGuid;
    }


    /// <summary>
    /// Method for agreeing to the consent
    /// </summary>
    /// <param name="selectedConsent"></param>
    /// <returns></returns>

    private Guid Agreed(Guid selectedConsent)
    {
        // your custom logic for saving the consent agreement into the custom table
        // needs to return Guid value of the consent agreement record
    }


    /// <summary>
    /// Method for revoking the consent
    /// </summary>
    /// <param name="selectedConsent"></param>
    /// <returns></returns>

    private Guid Revoked(Guid selectedConsent)
    {
        // your custom logic for revoking the consent in the custom table
        // needs to return Guid value of the consent agreement record
    }


    protected override void OnPreRender(EventArgs e)
    {
        base.OnPreRender(e);

        chkConsent.Text = GetConsentText();

        if (Value == null)
        {
            return;
        }

        chkConsent.Checked = IsConsentAgreed();
    }


    private bool IsConsentAgreed()
    {
        var agreementGuid = ValidationHelper.GetGuid(Value, Guid.Empty);

        if (agreementGuid == Guid.Empty)
        {
            return false;
        }

        bool isRevoked = // use your custom logic to check if the consent agreement is revoked in the custom table (using the Guid of the consent agreement record)

        return !isRevoked;
    }


    private string GetConsentText()
    {
        if (string.IsNullOrEmpty(SelectedConsent))
        {
            return string.Empty;
        }

        TreeProvider tree = new TreeProvider(MembershipContext.AuthenticatedUser);

        // select a correct language version of the consent page (according to the culture of the current request)
        // and display the text saved in the 'ShortConsent' field of the consent page
        return tree.SelectNodes("DancingGoat.Consent")
                   .Column("ShortConsent")
                   .Culture(LocalizationContext.CurrentCulture.CultureCode)
                   .OnCurrentSite()
                   .WhereEquals("NodeGUID", Guid.Parse(SelectedConsent))
                   .GetScalarResult<string>();
    }


    private string GetConsentReferenceMarkup()
    {
        var consentReferenceMarkupFieldName = "ConsentReferenceMarkup";

        if (FieldInfo.SettingIsMacro(consentReferenceMarkupFieldName))
        {
            return ContextResolver.ResolveMacros(FieldInfo.SettingsMacroTable[consentReferenceMarkupFieldName] as string);
        }

        return FieldInfo.Settings[consentReferenceMarkupFieldName] as string;
    }
}
The code above contains Agreed and Revoked methods which take care of the saving, updating, or revoking of the consent agreements. As every project has different requirements, it is up to you to decide what logic should be used for saving or revoking the consent agreements in the custom table (it is very important to check this with your legal advisor so you have all consent agreement data stored in an appropriate way).
Both methods need to be provided with the SelectedConsent parameter, which is the NodeGUID value of the consent page, and need to return the ItemGUID value of the created (or updated) consent agreement record in the custom table (so it can be saved into the form’s field containing the form control).
If the form field’s value is empty, then there is no consent agreement saved for the current record yet, and a new consent agreement record needs to be created in the custom table. In such a case, the consent agreement record would need to be bound to a valid visitor.
As I already mentioned, this could be done via their email address. So, you would check if the form that is being submitted contains a field named “Email”, and use it to create and bind it to the new consent agreement record in the custom table.
The “Email” field’s value of the current form could be loaded via the following code:
Form.GetFieldValue("Email");
As soon as you get the email address of the visitor, and the ConsentPageGUID value, the consent agreement record can be saved, updated, or revoked in the custom table.
The ConsentPageGUID value of the custom table record is the NodeGUID property of the consent page that is used for storing the short and long version of the consent (created in the Pages app). In other words, the SelectedConsent parameter of the Agreed and Revoked methods.
More details on setting up the consent pages in the Pages app can be found in my previous article here https://devnet.kentico.com/articles/wrestling-with-gdpr-and-data-protection-in-kentico-11-editions-consents-and-website-tracking
So, you will need to add the property to the form control, allowing you to select the consent page that should be saved alongside the email address in the custom table record.
Therefore, it’s time to save the code-behind file in Visual Studio and head over to Kentico 11’s administration interface.
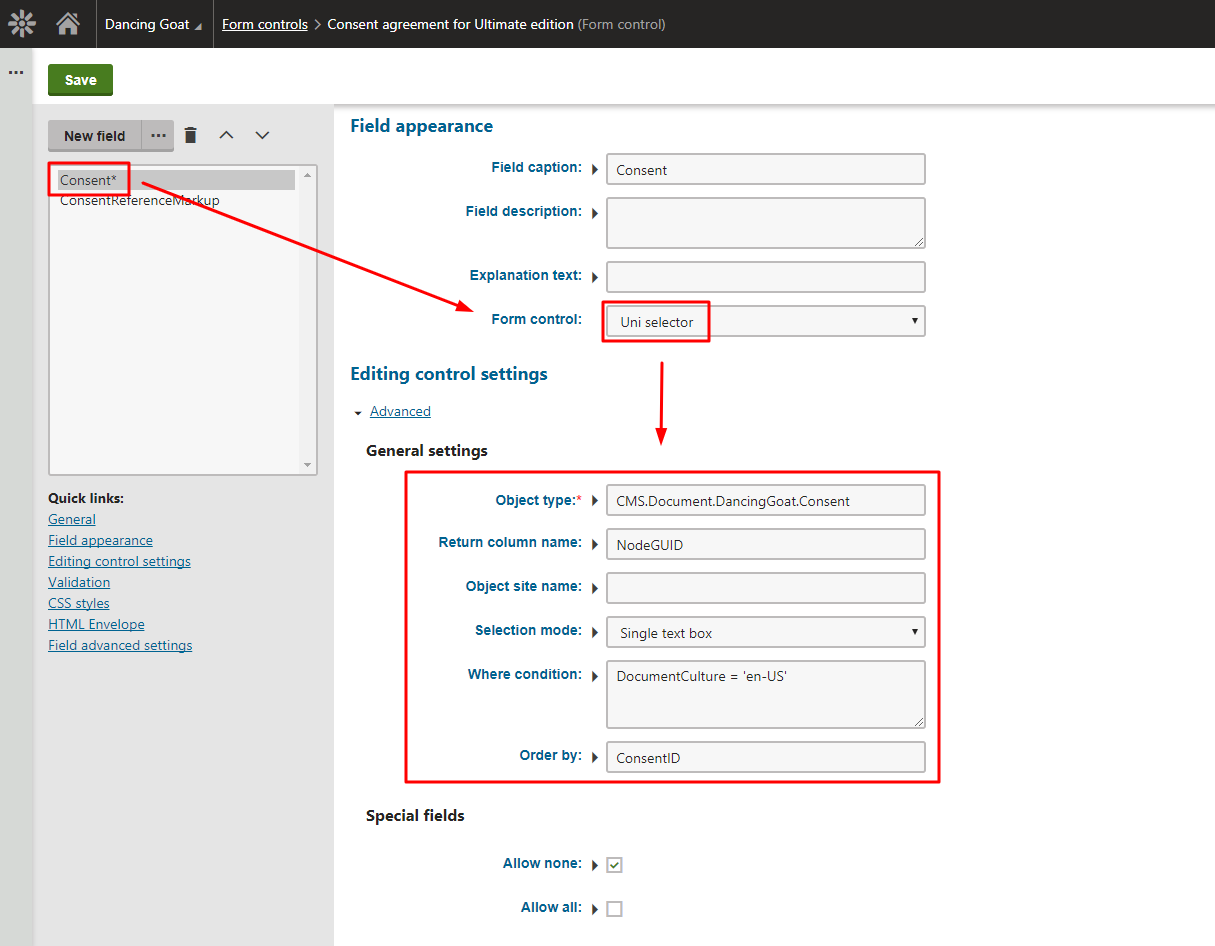
Open the Form controls app > edit the cloned form control > switch to the Properties tab > click the Consent field, and adjust its Uni selector form control, used for selecting the right consent page, to load the proper values:
- Object type: CMS.Document.CodeNameOfConsentPageType
- Return column name: NodeGUID
- Where condition: DocumentCulture = 'en-US'
- Order by: ConsentID
So, it could look like this:
This way, you can specify the consent page in the form control, and the relevant consent agreement can be saved into the custom table.
Please note the Where condition of the Uni selector. It limits the drop-down list to show only the consent pages of one particular culture, in this case, the English culture (DocumentCulture = 'en-US'). If you didn’t specify the where condition, and had more than one language version of the consent page in the Pages app, then the list of the available consent pages would list every single language version of the consent page, and it would be confusing for a person selecting the consent page when setting up the form control.
So, by limiting the selection to just one particular language version of the consent page, the list is very straightforward, and the relevant consent page can be easily selected, as the list returns the NodeGUID value of the page, which is the same for all language variants of the consent page.
Perfect! You can now use this form control in any of your alternative forms, and display them through the Custom subscription, Custom registration, or Online form web parts.
For example, this is what the configuration of the form control could look like when set for a form:
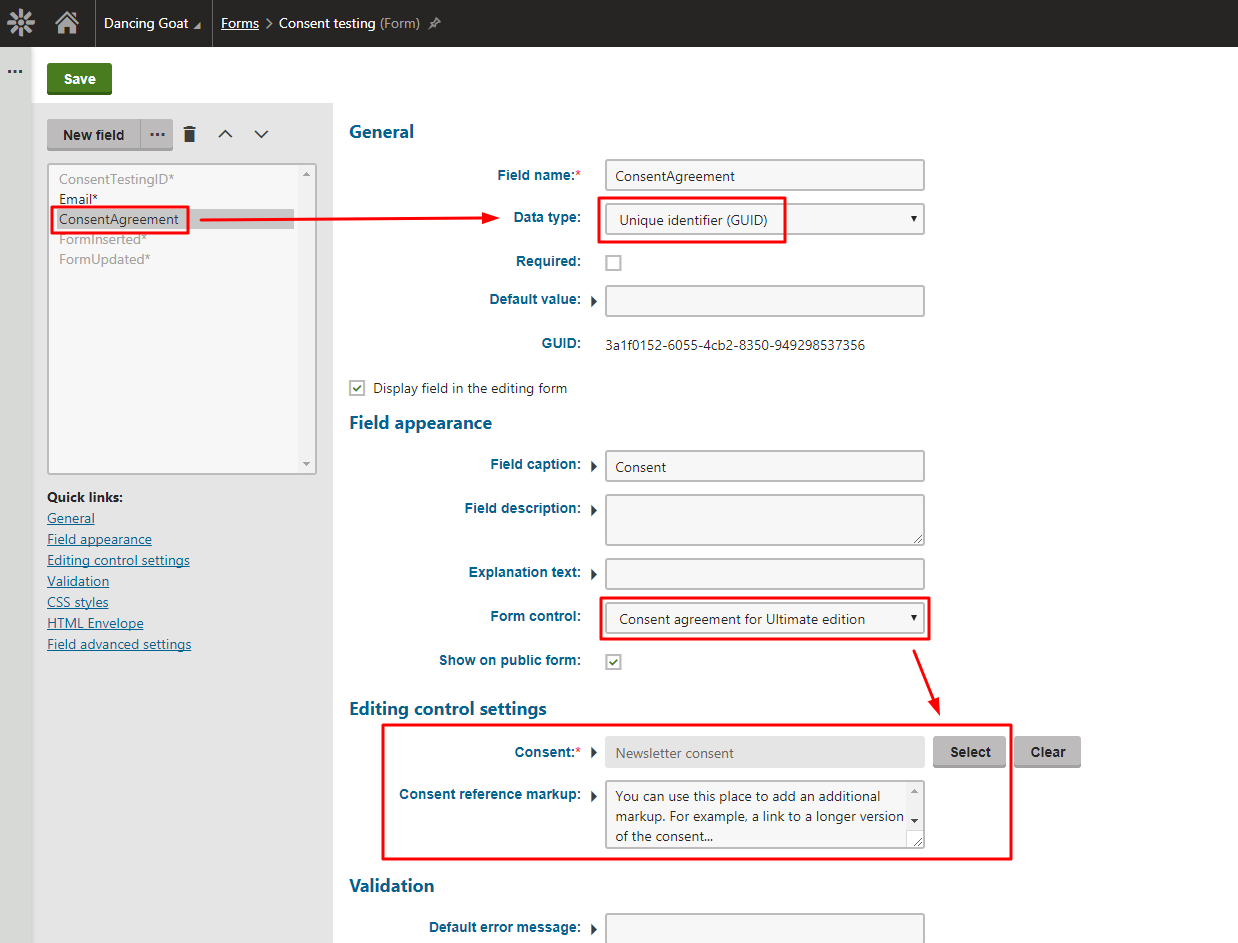
Notice that the form also contains a field named “Email” so that the consent agreement can be properly bound to it and saved for a visitor.
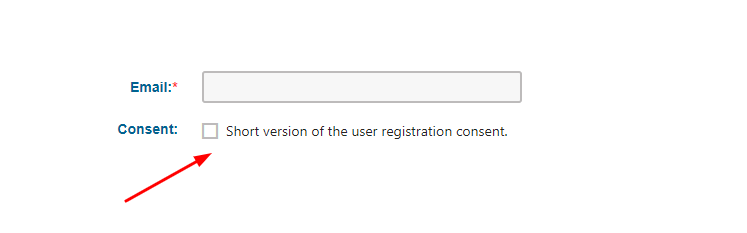
This is what the customized Consent agreement form control would look on the displayed form:
Additionally, you could also create a custom macro that would check if a consent agreement for a specified email address exists, and use it for decision making in Kentico 11. The macro could have the following format:
{% AgreedWithConsent("some@email.com", Documents["/consents/some-consent"].NodeGUID) %}
You would just provide it with an email address, and specify the URL of the consent page (as explained in my previous article). The macro would check the custom table for the consent agreement, and return either true or false.
Summary
The most important part in dealing with consent agreements is the form control that binds the agreements to a visitor’s email address. The easiest way is to customize the one that is already present for the Kentico 11 EMS edition and simplify it.
Then it is a matter of putting the puzzle pieces together through a combination of a custom table (for storing consent agreements), form control (used on an alternative form to bind the email address and consent agreements together), and a web part, which displays the alternative form.
It can be further expanded by creating a custom macro that can be used to check if exists a consent agreement exists for a given email address.
In my third article of this three-part article series, I am going to cover approaches to wrestle with GDPR’s right to access, data portability, and the right to be forgotten.
Disclaimer: Every business has unique requirements, and even though we did our best to make the GDPR compliance as easy as possible for you in Kentico 11, always discuss this topic with your legal advisor to ensure you are fully compliant.