Upgrade from Kentico 7 to Kentico 8
Are you planning your upgrade from Kentico 7 to Kentico 8 yet? Ever wondered how easy or hard that would be? Read this article to learn more about the upgrade process and how our tools can help you make the transition.
Hi There,
All versions of our upgrade process to Kentico 8 are now ready, as well as the first version of our new work-in-progress
code upgrade application, which is capable of automatically resolving issues. Now is the right time to give you some insight into the whole process, so that you are able to better prepare for the upgrade process to make it
as smooth as possible.
I’m going to be a completely honest with you, as we have seen many people underestimating this process in the past. Sometimes it just takes some pain to upgrade, but that is a natural process with any evolving product out there.
Do not rush when applying the upgrade!
No, no and no!
Don’t run the upgrade just yet! Take your time, and think about the upgrade process. Get well prepared for it… this saves you time and future headaches.
Read the instructions
Before you even start,
read the upgrade instructions. They are not there just for decoration. They are there for a reason. Many people just run the upgrade blindly. Often, they regret that they just wasted their time, and have to start over from the backup (in the fortunate event that a backup exists).
But if you are one of those brave adrenaline junkies, go ahead. Just make sure that you’ve
made a backup before performing any actions.
Backup your project
As I said, make sure that you’ve made
a backup of your project and database. Don’t make only one, and not at different times. Make a snapshot of both at a specific, given time. These are closely coupled, and the backup is your safe place to return when something goes wrong.
That is the single most important thing. If nothing else, remember this!
Before you ask, there is no chance that we (or any other vendor for that matter) could possibly cover every customization scenario in the upgrade process. So things can go wrong no matter how hard we work on preparing the upgrade (and we do work very hard on that with every version). Especially if you have
heavy customizations and don’t use best practices. Our support may provide you with additional steps that you have to take before you upgrade and re-run the upgrade. But that’s only if you can
start over from backup.
Don’t upgrade running live production environment
As I said, anything can go wrong in the process and “hope” is not your friend here. Unless there is an extremely good reason to apply an upgrade to a running environment (e.g. If nobody cares about your website, so there is no traffic at all; or, you don’t care whether it will be offline for a long period time if something goes wrong), and you have specific processes in place that allow you to take the website temporarily offline, including the ability to instantly revert to a backup. Don’t rely on the upgrade application to do all the work for you.
Our upgrade application takes the site offline with the
App_Offline file, but this may still be difficult if there are some complex open requests to the site, and may cause unexpected consequences. So consider that while planning the upgrade as well.
Professional upgrade process
We could probably write a book about best practices while upgrading, but I simply want to give you some high-level overviews of what we usually recommend for mission-critical projects.
Common pre-requisites
No matter which way you upgrade, there is one rule that you should always keep in mind:
“Keep the transition process on live site as short as possible”
For that matter, prepare well for the actual transition process of the live site to the new version. Ideally, it should be
just switching the IIS to the updated code base, which already points to a running updated instance with an updated database. If your website is somewhat static, it is quite simple to achieve this, as you can use snapshot of your database that is several hours or days old without losing any data.
But if there is a certain amount of continuous content creation in the game, this process may get more complicated. There are still things that you can do in advance such as
simulate the upgrade on a developer instance,
prepare your new code base, and then just execute the database upgrade in as short of an amount of time as possible.
No matter which scenario is yours,
make sure that you simulate the upgrade process on a copy of your real data and code base to make sure that there will be no errors, and to estimate how long the upgrade process will take. In general,
prepare as much as you can, especially with steps that are not time-constrained.
Regarding the data, there are basically two main scenarios that you can leverage based on your availability of taking all the new data out of the game:
Full control over the new data
If you have the ability to tell your editors to
stop adding and editing the content, do so in order to gain a large enough window for the upgrade, so that you can use a snapshot of the database for updating. Just make sure that the window covers enough time for you to prepare an upgraded instance to which you switch at the end of the process. And allocate enough reserves. Sometimes, the new data during the transition process may not be that necessary (e.g. web analytics data off-peak), so you can just make a snapshot of the data and expect that the new data won’t be included to make the overall process simpler.
Partial, or no control over the data
If there is
no way how to keep the data unchanged for the necessary period of time and you need it in your final database, you should first:
-
Identify the new data that you can’t control and minimize that set of data. Usually for some of the data, you can inform the authors about not making changes in that time, as in the previous case.
-
Prepare a SQL script (or other way) to synchronize the new data or the data that will change from the data structure of the old database to the data structure of the upgraded database. Test this process well. This is your investment into that particular project because you will be able to reuse the same process for the next upcoming upgrades as well.
Then within the crucial window for the database upgrade, perform the following steps in as short a time as possible:
-
Take the upgraded code base, and set up a running IIS site pointing to it
-
Make a copy of the database (point in time A)
-
Upgrade the database with the SQL script provided within the Kentico upgrade package
-
Start the updated version by opening it in a browser
-
Take the live site offline (point in time B)
-
Run your synchronization SQL script to add the new data that was created or changes between points A and B
-
Switch the IIS to the updated version of the application
-
Bring the live site back online
With the last four steps, you will be able to almost instantaneously (within seconds if you do it right) switch to the updated version, without losing any data created in the process.
Upgrading the code base
If you made any modifications to the code, or included some new code into your project, you need to upgrade your custom code within your code base. This also includes any transformations or other code you wrote within your project.
Again,
prepare well in advance on your development machine. At the end of the first round, you should have a running upgraded non-live copy of your project on which you prepare the new code base. The second round is then “just” transitioning the database as fast as possible and switching to the new code base as I described above.
Once again (even on your local machine), don’t run the upgrade just yet. Analyze first, then let our tools help you!
CodeUpgrade project
Now I finally get to tell you about the extras we have for you within the upgrade to Kentico 8 and how you can leverage them.
The project started in early March (and some prototypes even sooner) with the goal to simplify the transition process of your custom code to a new version. The project has two main outputs:
-
The database of changed API and resolutions for particular issues, which is provided within an application on DevNet. This one helps you once you start converting your code manually, or when you need to learn about replacements for the code you knew.
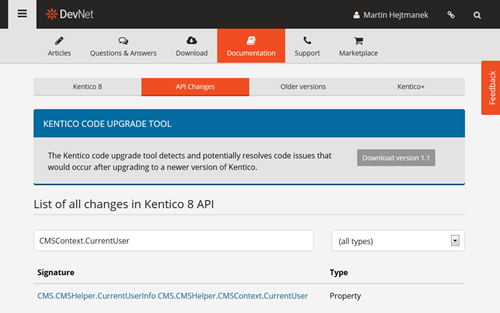

-
The CodeUpgrade application available from that same page that leverages this data allows you to get a report on all issues in your custom code, and resolve some of them for you automatically.
I believe the first part is clear, so let me now focus on the application itself …
How it works?
This application is using the
Microsoft .NET Compiler Platform project (known as project Roslyn) to analyze and convert the code. For this reason, you have to start with a
solution that can be compiled with Kentico 7 libraries, basically the original working project that you already have.
We leverage this framework to match our database of API changes to their real occurrences in your code.
Note that even
Roslyn is in its very early stages, and our tool is as well, so you may encounter some errors while running the tool with your project. We have tested it on a decent number of projects, but there may be scenarios that are not yet covered. Let us know if you encounter any problems.
One of the issues we are aware of is that Roslyn can’t properly load a website project that has URL set as its path in the solution file. The format of the path in the solution file has to be this way (relative file system path to the SLN file):
Project("{E24C65DC-7377-472B-9ABA-BC803B73C61A}") = "Kentico7_Final", "..\Kentico7_Final", "{420F4FED-2F28-4BE5-8CEA-9A6B9A57558B}"
Rather than this (URL to a local IIS):
Project("{E24C65DC-7377-472B-9ABA-BC803B73C61A}") = "Kentico7_Final", "http://localhost:1234", "{420F4FED-2F28-4BE5-8CEA-9A6B9A57558B}"
We are not sure how such a particular URL format path gets there, but we have noticed that with several projects already.
Processing of markup
The Roslyn project can currently work with C# code files only, so it does not work by default with web files and ASPX markup. Our tool is capable of extracting the C# code from the ASPX markup, running the detection and migration process on the extracted class, and then synchronizing the changes back to the markup.
While writing regular UI pages or controls, using C# expressions in markup is not as common, but there is one crucial location where markup is the key: In the code of transformations within the database.
As you know, transformations are stored in the database as virtual objects by default, so if you want the tool to analyze and convert your transformations as well, you may want to deploy them to a file system through the
Virtual objects tab in the System application.
Reporting issues
Once you run this console application with the path parameter to your solution file, it runs through all the custom code, and outputs all found issues to a CSV file.
>CodeUpgrade.exe c:\UpgradeTests\Kentico7_Final\WebProject.sln
Here is an output from one of our internal projects:

In addition to the location of the issue, and the instructions on how to resolve it (which you can see also in the DevNet API changes report), notice the first column called
Status. Within the detection phase, it gives you one of these values:
-
Detected – The issue is in your code, and you need to resolve it manually.
-
CanBeResolved – The issue is in your code, and the application is able to resolve it for you automatically.
So you can immediately tell how many of your issues we will be able to resolve for you. In general, I recommend you to immediately
enable filters once you open the CSV file
in Excel, so that you can easily see the number of issues that can be resolved, and the ones detected, including grouping based on the nature and location of the issues.
Note that the number of issues does not necessarily mean the number of manual steps you will need to do. Especially for the transition of classes to other namespaces you may get a
number of detected issues reported within one code file, but the resolution for all of them may be just
adding a single using statement to the file.
Anyway, getting and analyzing this report may give you a much better idea of what you can expect from your upgrade process, which is something that was not available for you in previous versions of Kentico.
Resolving issues
During the development of this project we have acquired several sample projects from our clients, on which we have tested the tool. So far it seems to us that the tool is capable of
resolving the majority of the issues in custom code, which will save you a lot of time.
Just to give you an idea, one of our largest clients with a lot of customizations (including copies of Kentico pages that are considered custom pages by the tool), has a report that includes:
-
Total 4605 found issues
-
4139 issues can be resolved automatically
-
466 issues to be resolved manually
So for their project, the tool solves a
good deal of 90% of their code, and maybe even more, as some of the issues found are in copies of Kentico pages, and therefore include Kentico code for which we provide the updated version.
As I mentioned, this is a huge project. But in reality, based on conversations with our partners, a
typical project doesn’t have more than 200 custom API calls, so the number of issues should be significantly lower as well, and the amount of unresolved issues should be around several tens.
Processing of custom code in system files
While I mentioned processing of custom code, there are two types of custom code you may have:
-
A new file within the project, including copies of Kentico files
-
Smaller customizations in Kentico files
The first one is clear. We consider that you are a complete owner of such code, because we don’t know whether it’s a modification of our UI, or a completely new UI of your module.
For the second one, if we would process the whole code, there would be a lot of false positives from the old Kentico code. In fact the large project mentioned above would actually have to report 9655 issues, which almost doubles the number with
false positives.
For this reason, we have established a new best practice that we have seen with many of your projects anyway. The general rule is:
“Wrap any custom code to a region with your unique name”. Let me show you what I mean. Let’s say that you have selected
“Acme” as your unique identifier. If you make some customizations to any of the Kentico code make sure to wrap your code this way:
#region "Acme"
// Custom code
#endregion
You can use this same concept if you customize markup, just wrap these directives to ASPX comments:
<%-- #region "Acme" --%>
<strong>Custom code</strong>
<%-- #endregion --%>
You can choose whether to use quotes for the region names or not. Now that there is a clear way how to identify your custom code within system files, you can run the code upgrade tool with one extra parameter named
“customregion”:
>CodeUpgrade.exe c:\UpgradeTests\Kentico7_Final\WebProject.sln –customregion=Acme
The tool will only detect within the scope of these regions in Kentico system files. Needless to say, these regions will also help you to identify your changes in general. No matter if you use this parameter or not, all your completely custom files will always be fully processed.
Make sure you mark your custom code in system files before you run the tool to avoid false positives.
Getting the new code
So now you are ready to run the tool in the resolving mode. To do that, just add one more parameter to the tool, named
“resolve”:
>CodeUpgrade.exe c:\UpgradeTests\Kentico7_Final\WebProject.sln –customregion=Acme –resolve
If you use this parameter, the tool will automatically resolve all issues that can be resolved. We don’t want to make modifications directly in your project, so you will find the converted code in the subfolder called
“Converted”, located in the tool folder:

You can leverage this to compare your original code to the converted one. If you take some application capable of comparing code, you can easily see the changes. I am using a tool called
Beyond Compare for such things and I definitely recommend it; it is a great application. You can see an example of such a comparison in the following screenshot:

The next step is to run the upgrade process itself. Don’t forget to backup and read the instructions carefully before you do so. After you apply the upgrade, you have a project ready to get your custom code.
Applying the converted code
Now that you have the database upgraded, as well as the Kentico code files, it is time to update your code. You have several choices for how to do that:
-
For completely custom files, you can just copy them to the project directory
-
For customized Kentico files, you can leverage the comparison tool and transfer only the changed custom code
After you transfer the updated code, open Visual Studio, and try to compile your project. If you have some issues that were only detected but not resolved, you now need to fix them manually, until your whole project can be compiled.
Finishing upgrade
Once you have the code base ready and compiled, it is time to start the new version of your application for the first time. But first, make sure that you have done all the steps described in the upgrade instructions, such as modifications to the web.config file etc. You can then open the application in a browser.
When you run the updated application for the first time, it does some additional manipulation to the data to adjust things that need to be adjusted by C# code, as opposed to the SQL script that the upgrade process executed. For this reason, it takes slightly longer for the application to start for the first time after the upgrade.
When the application reaches the point when starts responding, all data is consistent and upgraded to a new version. Now is the time to perform all remaining upgrade instructions, which at this point refer mainly to adjustments to your data in order to be able to start leveraging the new features. Most of these steps are typically optional.
Testing phase
So now you have a working updated copy of your project, and it’s time to
validate that everything is working. Take your time, and make sure that all your customizations are working as expected, that your data is set up as you expect, and that the site works as well. The more time you spend on this, the higher probability of success you have on your production.
After you perform all the necessary testing, you can run the scenario outlined above to apply the same upgrade to the production environment in
as short a window as possible. Having the updated code base ready, as well as having verified the overall upgrade process makes your life easier at that point.
Make sure that you verify that everything works on production as well. Do not simply rely on your simulation succeeding.
Wrap up
And, that is all! As I said several times already, prepare well for the upgrade and leave minimum risk for upgrading production. Especially, keep the following in mind:
-
Backup properly before you start
-
Follow the upgrade instructions and execute them in the given order
-
Leverage the code upgrade application to estimate costs and simplify the transition of your custom code to the updated API. Run the code upgrade tool before the actual upgrade.
-
Simulate the upgrade on development servers to prepare everything
-
Prepare scripts for synchronizing potentially missing live data if necessary
-
Upgrade production in as short window as possible
With all of this in mind, you should be able to perform the upgrade no matter how complex your project is. If you struggle with anything related to the upgrade, let us know and we will be happy to help you.
Have a great time upgrading, and enjoy all of the new features of Kentico 8!