Kentico 8 Technology - Test Automation
Kentico 8 brings highly improved automated test writing possibilities for your custom code – we believe that these improvements will save you time and be genuinely helpful for you.
Test automation is an important part of each development project and is essential when talking about agile projects. Test automation helps you improve productivity, reduce the testing period of the development cycle, and increase predictability and quality. In the past versions of Kentico, test automation was not denoted sufficient importance. However, this has changed thanks to
your feedback.
Let’s look at all test automation features in Kentico 8 one by one.
CMS.Tests
CMS.Tests is a library that covers general functionality for writing tests used in custom Kentico code. It contains base classes for unit/integration tests, or helper classes for faking info/provider objects. You can find it in the Lib directory of your web project along with other libraries delivered in Kentico 8.
Sample Test Project
Kentico 8 comes with a sample test project for you to write unit and integration tests right-first-time. The following example demonstrates
how to add a CustomTests project to your solution.
-
Open the solution file in Visual Studio from your web project directory.
-
Copy the CustomTests project from your Kentico installation directory (typically C:\Program Files (x86)\Kentico\<version>\CodeSamples\CustomTests) to the web project directory.
-
Include the CustomTests project into the solution.
-
Unfold the References section of the CustomTests project and remove all invalid references.
-
Add references to the following libraries located in the Lib folder:
-
CMS.Tests
-
CMS.Base
-
CMS.Core
-
CMS.DataEngine
-
CMS.Helpers
-
Add Sample.testsettings located in the web project folder to the solution (via right-click -> Add -> Existing Item…).
-
Select Sample.testsettings as your test settings (via Test -> Test Settings -> Select Test Settings File).
Note: The Sample.testsettings file defines a sample test’s settings for automated tests within Kentico installation. It automatically deploys DataProviderSQL and FileSystemStorage assemblies, which are not directly referenced, but loaded dynamically in run-time.
-
Run all the tests via Test -> Run -> All Tests
At this point, some of the sample tests will give the message “failed” – this is because they require additional configuration, which will be discussed in further detail when we look at each specific type of test. Let’s have a look at these various test types.
Unit Tests with Fake Info and InfoProvider Objects
A
unit test is a test that is
able to run without external resources. If your project is lacking configuration of such resources, you can easily tell the difference between a unit and an integration test because such unavailable resources will typically throw an exception upon trial to access them. The typical situation is that your test will need to connect to the database, either directly or indirectly through external dependencies. You can easily identify it because upon execution it will throw an exception: "System.InvalidOperationException: The ConnectionString property has not been initialized".
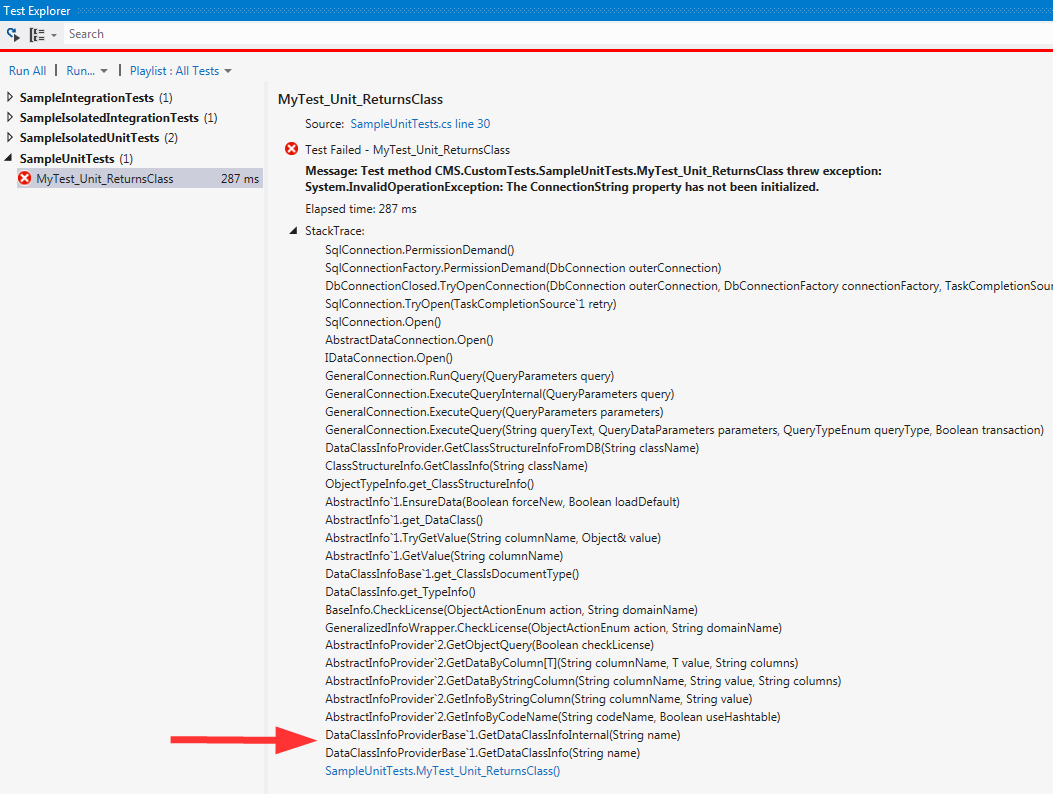
By looking at the stack trace on the picture above, you can tell that the test failed because DataClassInfoProvider tried to get data from the database. The code of a failed test reads as follows:
[TestMethod]
public void MyTest_Unit_ReturnsClass()
{
    // Try to get the faked data
    var cls = DataClassInfoProvider.GetDataClassInfo("MyTest.MyClass");

    Assert.IsNotNull(cls);
    Assert.AreEqual(1, cls.ClassID);
}
To avoid having to access the database upon test execution in this example, you need to
fake both the Info (DataClassInfo)
and Provider (DataClassInfoProvider)
with specific data and metadata
using the Fake method from CMS.Tests.UnitTests base class.
[TestClass]
public class SampleUnitTests : UnitTests
{
    [TestInitialize]
    public void Init()
    {
        // Fake the data of a particular provider
        Fake<DataClassInfo, DataClassInfoProvider>().WithData(
            DataClassInfo.New(dc =>
            {
                dc.ClassID = 1;
                dc.ClassName = "MyTest.MyClass";
            })
        );
    }
}
Note: In the example above you can see an instance of creating a new object through the method called “New”. It’s because DataClassInfo represents multiple types of objects (document type / custom table / system class). For the majority of Kentico object types you would use their constructor.
There is no need to clean up the fakes before/after the test. Tests inherited from UnitTests base class automatically reset all fakes upon init and cleanup.
A subset of the above example is
faking info metadata, so that you can use code such as
"new ABTestInfo()
" in your test code or dependent code. This operation itself doesn't access the database for ABTestInfo source data. However, since our engine is driven and has metadata stored in the database, even an operation that is as simple as this needs to access the database. If you fake both the info and the provider you can use the example above, but, if you want to fake the info only, you can use the following code:
[TestClass]
public class ConstructorTests : UnitTests
{
    [TestInitialize]
    public void Init()
    {
        Fake<ABTestInfo>();
    }
    …
}
Note: To be able to completely fake a provider object it must run all involved operations via the
GetObjectQuery method – see
the list of all providers whose all read methods can be used in a faked provider. Every provider method that uses ObjectQuery for reading data can be used in the unit test with a particular provider faked. If you miss the possibility to fake any particular provider, please let us know.
Integration Tests
If none of the above helps you run your test as a unit test, then you can execute it as an
integration test. This means that it is able to
connect to external resources, as well as modify them; therefore, you should either run a test of this sort in a sand-box, or be very well aware of what your test is doing. All the changes you make during the test remain in the database after the test is finished. If you modified any object during test execution you should change it back to its previous state by using a cleanup method.
Integration tests require additional configuration: in the
App.config file you need to specify what database will be used by tests. To make sure that we can properly tell the difference between unit and integration tests, we don't put CMSConnectionString to the test app.config. Instead, we put the
CMSTestConnectionString.
<connectionStrings>
    <clear/>
    <add name="CMSTestConnectionString" connectionString="Persist Security Info=False;database=..."/>
</connectionStrings>
Test class used for integration tests must be inherited from
CMS.Tests.IntegrationTests base class
, which ensures proper initialization and cleanup.
Please let us know if there are other scenarios you would like to cover with unit tests, but currently you can use only integration tests for them.
Isolated Integration Tests
Another way to write a test that works with database objects is to write it as an
isolated integration test, which runs using its own database. The database (ie. master and instance database) for the test is created ad-hoc using the default installation scripts. The new clean instance
database is created for each test and it is deleted after the test run.
To use the isolated integration test it is required to have Microsoft SQL Server 2012 Express LocalDB v11 (or newer) installed. It is part of Visual Studio 2012 or Microsoft SQL Server 2012.
Test class must inherit from
CMS.Tests.IsolatedIntegrationTests base class, which automatically performs database initialization before the test and cleanup thereafter.
[TestClass]
public class SampleIsolatedIntegrationTests : IsolatedIntegrationTests
{
    [TestInitialize]
    public void Init()
    {
        // Create data in the isolated empty database
        DataClassInfo.New(dc =>
            {
            dc.ClassName = "MyTest.MyClass";
                dc.ClassDisplayName = "My test class";
            })
        .Insert();
    }


    [TestMethod]
    public void MyTest_IsolatedIntegration_ReturnsClass()
    {
        // Get the data to verify it was created in the isolated database
        var cls = DataClassInfoProvider.GetDataClassInfo("MyTest.MyClass");

        Assert.IsNotNull(cls);
        Assert.AreEqual("My test class", cls.ClassDisplayName);
    }
}
The following keys can be placed under
configuration/appsettings in the App.config file to affect your isolated integration tests:
-
CMSTestDatabaseScriptFolderPath – The path to the folder with files required for database creation. The folder must contain SQL.zip file or SQL subfolder. In default, the Kentico installation scripts are located in ~\App_Data\Install.
-
CMSTestDatabaseFolderPath –The path to the folder that will contain test databases. If not specified, they are stored in the TestDatabases folder under your solution.
-
CMSTestDatabaseInstanceName – This is the name of the SQL server instance that will be used to run tests. Its default value is “(LocalDB)\v11.0”.
When to use which type of test
Here are some quick guidelines to help you determine when you should consider using one of the previously mentioned tests.
Unit test
Try to write most of your tests as unit tests since they are used for examining a relatively small piece of code. In this manner they will be easier to write and also quicker to execute.
Integration test
Use integration tests when you need to read the data from the database (unless you are absolutely sure you cleanup everything properly after the test). They are significantly slower than the unit tests.
Isolated integration test
Isolated integration tests should be used for complex testing which requires writing to the database. If the cleanup after the integration test is difficult then use the isolated integration test instead. They are the slowest of these three types of tests.
NUnit? MSTest? Choose the one you like the most
All the test examples in this article are written in the
Visual Studio Unit Testing framework (commonly known as MSTest). Don’t worry if your favorite unit testing framework is NUnit as we support both of these frameworks. All of the functionality in the
CMS.Tests library is fully compatible with both the
NUnit framework and the
Visual Studio Testing framework. If you want to use NUnit for your tests, simply add a reference to the nunit.framework.dll and start the writing tests using
NUnit syntax.
CMSAssert
CMSAssert is a class of CMS.Tests namaspace that contains specific assertion methods that can be used in your tests.
CMSAssert.QueryEquals asserts whether two SQL queries are equal when ignoring extra whitespaces and comments.
CMSAssert.QueryEquals(q.ToString(), "SELECT UserID FROM CMS_User");
If the MSTest/NUnit test contains multiple assertions; any assertion that follows the one that failed will not be executed. Therefore, it is recommended to use one assertion per unit test. But what if you need multiple assertions in your tests?
CMSAssert.All allows you to execute multiple assertions in a single test (eg. integration test, test with time consuming set up). If any assertion (executed within CMSAsser.All) fails then all remaining assertions will be executed as well. Assertion exception (containing messages from all failed assertions) is thrown after the execution of the last assertion.
// Both assertions are executed even if first one fails
CMSAssert.All(
    () => Assert.AreEqual(null, result.Result),
    () => Assert.IsTrue(result.Match));
What’s next?
We want to continuously improve Kentico test automation possibilities. Please let us know how you like to write automated tests for your Kentico 8 projects and tell us about anything that would further improve your test automation. You can leave us a comment below or make a suggestion on
ideas.kentico.com.