Predictive smart search without postbacks
A lot of modern websites today feature a predictive search in the header of each page. I would bet that your website too has a search box at the top of every page. This gives the visitor a convenient way on how to search your website from anywhere. This functionality comes with a price tag of course, as any feature you add to your website. In this case the price tag is quite high, since when using our build in search you cause postbacks, so you can't use output caching. Let's fix that.
In Kentico, if you cause a postback on a page, the output cache of the given page is removed. Our built-in search web parts use postbacks for predictive search and for the search itself. This means that for each search, the output cache is removed and the page is cached again on the next visit. This isn’t, of course, desired behavior, as you have two options; to disable output caching (and face a big performance hit on your servers), or to build a custom search box. In this article I’ll guide you through a modification of the built-in Smart search box web part, which will enable you to use most of the standard functionality without causing any postbacks. If you are not interested in the inner workings, you can jump straight to the Instructions section, however some additional configuration may be required, so please make sure you check the Additional tasks too.
Best practices
Before giving you the code, let’s talk a bit about best practices. We will try to make our task as easy as possible by re-using as much code as we can. Because of upgrades and hotfixes it’s always a bad idea to customize built-in components and objects directly; you should clone them instead and then modify the clone.
If you want to include any additional files into an export package (if using our export module), please place them into the correct folders according to
our documentation. You can use, for example, the
CMSGlobalFiles folder. Please check the mentioned documentation for more information.
When developing custom functionality, keep performance in mind. Make sure you minimize the number of SQL queries by simply reusing objects in your code and by utilizing caching. Always think about the performance/used memory for caching ratio.
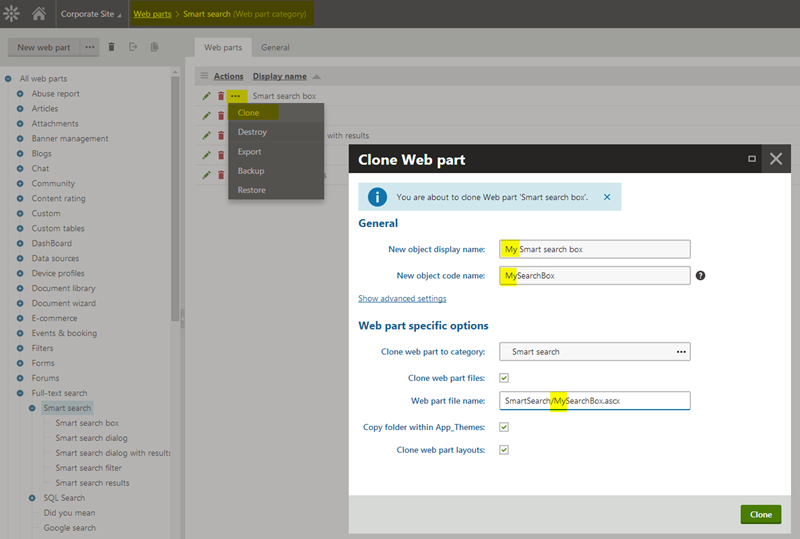
As mentioned, we will try to re-use as much of the existing code as possible. We’ll use the smart search box web part as we want to use the predictive search functionality. Firstly, we clone the web part (using a custom prefix for the clone, such as your company name.)

After inspecting the code, you can see that the web part uses quite a lot of server calls, which is to be expected as the search needs to be performed by the server. This means that the code needs to be executed in a different place, without causing postbacks. So we can place the server-side code in a web service. The search results of the server-side code are conveniently returned as HTML, so we don’t have to modify the output, only attach it with JavaScript into our HTML. We can identify the methods, which can then be placed into the web service. (I found the following ones: RenderResults, PredictiveSearch, RenderResults.)
After some closer inspection, I discovered some server-side logging going on, which needs to be placed into the web service as well (LogPredictiveSearch). There will, of course, be some other helper methods required, but these can be reused with some modifications. The JavaScript file included with the web part will have to extend to be able to also handle the general search and it will have to call our newly created web service. Again, let’s also think about caching during our implementation.
JavaScript modifications
After you’ve cloned the web part, Kentico created also a copy of the JavaScript files in the <web part code name>_files folder. You will have to update the link to this file in your web part code files. The JavaScript already contains most of the required code. You will however have to call our web service instead of the web part methods, so the method “KeyChanged” has to be modified to perform a web service method call, e.g.:
jQuery.ajax(
{
Type: "POST",
contentType: "application/json; charset=utf-8",
url: myDomain + "/MyPredictiveSearch.asmx/MyPredictiveSearchExecute?searchText='" + query + "'" + additionalParams,
dataType: "json",
success: function (msg) {
me.RecieveSearchResults(msg.d, query);
}
});
You basically replace this code:
me.CallPredictiveSearch(query, query)
You also have to get the search text from the TextBox and implement a JavaScript method to call the logging methods for the Search event. These are the most noteworthy JavaScript changes.
Web part code modifications
There are quite a few additional parameters to be passed to the web service so, to simplify things, I’ve created an AdditionalParams variable to store them as a string and to pass them to the JavaScript methods and also to the web service. (Not all parameters have to be passed all the time, so this can be improved in the supplied code.)
You have to disable postbacks for all server-side controls so the Search button/Image has to use a JavaScript call to redirect the user. The predictive search already uses a JavaScript method which is called for every key press, as you can see in the JavaScript file. Once you remove all unnecessary code, you will have to register/call the additional JavaScript method for the logging of the search activity. This will also make you pass additional parameters to the web service (DocumentID and UserID) to identify the current document and user, since that context isn’t available in the web service.
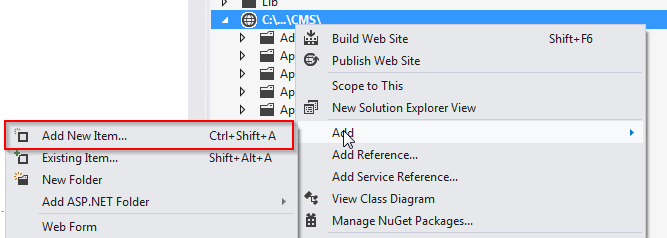
Creating a web service
Creating a web service is quite straight forward:


You can copy over the mentioned methods and make them accessible as a WebMethod and ScriptMethod. You will have to extend them to pass all necessary parameters to them in order to perform
or required server calls. You may want to rename the parameters since the default names are quite long and I ended up with 20 passed parameters in the end. The web service should also implement caching. As I mentioned previously, I ended up passing the DocumentID and UserID to the web service as the context for these objects wasn’t available. This meant executing a few additional SQL queries to the database. I got around this issue by caching the required object (the Current Document) in the server memory. However, there is one issue with this approach; a TreeNode is quite a big object (up to a few KB) and caching them all for each requested page/user combination could cause issues. That’s why I implemented a simple caching mechanism that caches the last N requested combinations and removes the others from the memory. So it uses the last 10 TreeNodes and caches them for 60 minutes. (This implementation is discussed in a
separate blog post.) (Check our consulting RSS feed for more information.)
After you’ve setup the service you can test it according to
this guide.
Limitations
The newly created web part has most of the functionality of the original one. In this version, however, error text isn’t supported for a missing search term. Also, since the context of the current page isn’t available, you can’t use an ASPX transformation for predictive search results; you have to use a macro-based one, e.g.:
<a style="display: block; color: black" href='{% SearchResultUrl() %}'>
{%Title%}
</a>
Additional limitations may apply.
Notes
Please note, that this is only a proof of concept and the example isn’t supported by our support team. It should be used as a starting point for your own customization. There may be bugs and not-supported scenarios for this setup. Hotfixes and upgrades aren’t applied to these files and/or objects and they may break this customization. The code hasn’t been fully tested, so please be aware of possible SQL injections. I would also suggest extending the example and adding a hashing (or encryption) to the URL parameters.
There is always room for improvement, so if you find anything, please share it with us via the comments section.
Additional tasks
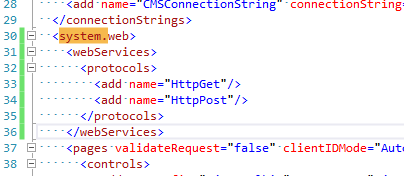
To enable web service calls for GET/POST http calls you have to modify the web.config file:

Instructions
Please copy the content of
the zip file into your project folder. (This zip file was created for a website installation. If you are using a web application installation, please place the web service into the correct folder). Import the cms_webpart_MySearchBox file from the Sites > Import application. Modify the web.config file according to the instructions in the Additional tasks section. If you encounter any issues, please go through the whole article or check Google for more information. This code was tested on version 8 HF 11.