Module development – Introduction
Each web project nowadays is very different and has different requirements. No software out there has all the necessary features out of the box, so when it comes to special client requirements, you may need to develop your own module. These may be simple or complex depending on the situation. Join this series of module development articles to learn how easy it is to develop a new module with Kentico.
Hi there,
Kentico 8 comes with a whole new way of developing modules that allows you to be productive and focus on more important things than spending time on coding basic listings and editing forms. Today, I would like to give you a basic introduction to module development as a summary of the information that you can find in Kentico documentation at this moment. I will continue with several more articles on more advanced topics. Most of them will show you how to implement features similar to the ones Kentico provides.
Documentation
Let me start with a link to the Kentico documentation:
Creating custom modules
This is a basic guide to developing a simple module. Note that the link leads to the documentation of Kentico 8.1. If you read this article and a newer version is available, refer to the newer version of the documentation. We continuously improve both the product and documentation, so you can find more information and even better ways of doing things in the latest version.
I will lead you through the basics in a high-level way to provide a baseline for my article series. If you want to know more details, see the documentation. Note that if you attended my session on Module development during any of
Kentico Connections 2014, you learned most of these basics already.
The article assumes that you already know how to set up custom page types or custom tables, and build live site pages using the Portal engine and web parts.
Registering a module
I want you to always think about your customizations as a module that can be separated from the project at any time. Treating your code and data this way will help you lower maintenance and also provide better options for reusability and deployment of the customizations.
As the first thing, register the module within the system. Kentico 8 combined most of the module development tools into a single application called
Modules, so you don’t need to switch back and forth between parts of the admin UI.
The most important property of your module is the
code name. You will use it when following proper naming conventions, so think about it carefully just like you would about a namespace. In an ideal situation, you should use a unique prefix for all your module code names. Consider a format like “<company>.<functionality>”, where the company part is something that identifies you in a sufficiently unique way. Let’s imagine I own a company called
Martin Hejtmanek Marketing, so I will be using the
MHM prefix in all my modules. My first module will mostly just extend the Contact management application with some extra properties. I am not feeling creative enough right now to come up with a nicer name, so I will just use the
MHM.ContactManagement code name.
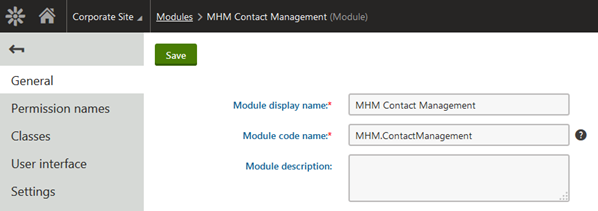
You will be using the code name on several occasions:
- When placing code files into your project’s file system so that you can properly export and deploy them, see Export folder structure
- As a root namespace in code
- To query module specific objects through the API so that the code is readable
Note: Don’t forget to also assign the module to your site, so that it is properly available.
Permissions
I suggest that you give your module the default Read and Modify permissions. This gives you the power to allow regular users to access the module. When the module’s UI is developed according to the instructions in this article, it automatically checks the permissions. Adding the permissions is a simple task described in the documentation.
Data and API
A module typically has some data. Preparing the data structure is not rocket science, and in fact it works the same way as defining page types or custom table
s. Notice the Classes tab on the screenshot above. Using it, you define the data structure through the field editor just like you would with page types or custom tables.
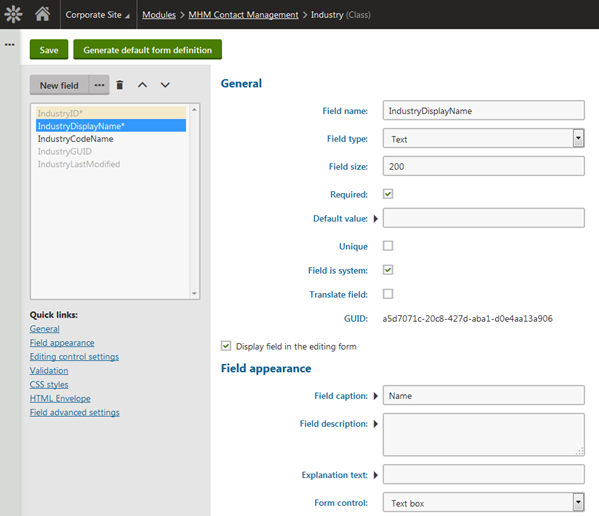
I am going to extend contacts with an extra Industry field to learn more about the site visitors, so I have created a class called Industry with the following fields:
- IndustryID – Integer, default PK, not visible on the editing form
- IndustryDisplayName – Text (200), required, Text box form control
- IndustryCodeName – Text (200), Code name form control
- IndustryGUID – Unique identifier, not visible on the form
- IndustryLastModified – Date and time, not visible on the form
I am using the prefix “Industry” in all fields. This is the current standard that we use to avoid potential collisions of field names on various levels of data access, such as database views, access to macro fields, etc.
Note that the wizard properly picked up my company namespace part to make the class name unique.
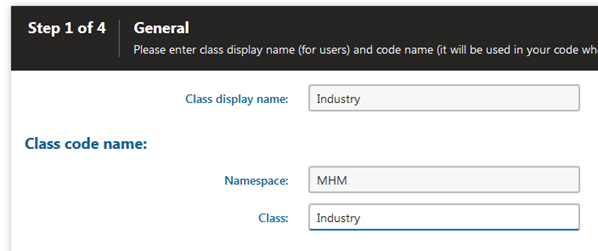
I am also using specific suffixes for column names (such as “DisplayName”) that have a general meaning. This helps the system automatically recognize the purpose of the fields in your data structure, and couple some of them with the general data model.
Both of these field naming conventions are optional, but we consider them a best practice that you should also use.
I am also using two hidden system fields for the GUID and LastModified time stamp to support some of the general system features. I will comment on that later in this article.
Just for reference, here is my view of the field editor:
We now have the data definition, but we also want the API. To get some base code for the API, navigate to the
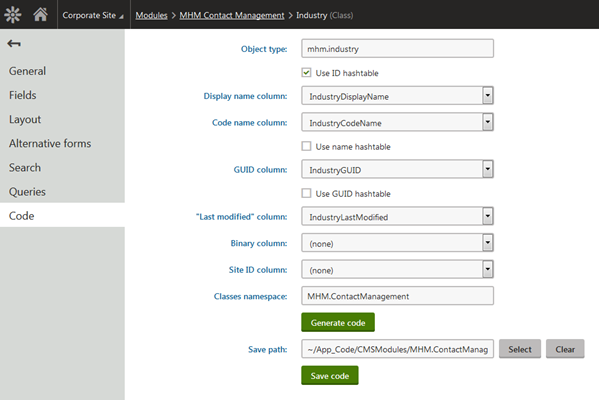
Code tab of the class. Set up the parameters as you wish, and let the system generate the code for you.
I only selected the checkbox “Use ID hashtable” to let the provider cache items queried by ID. This helps make
Object transformation more efficient if I use it with my custom object type. The field naming conventions shown above allowed me to leave everything else in the default state.
Notice:
- Proper detection of general columns
- Proper namespaces and the location in the file system
The system generates the code into the App_Code directory by default. If you have a web application, you will need to compile the project at this point. You can also save the code directly to a location within a new class library. I will tell you more about that in a later article.
Now just briefly look at the generated code, especially the
IndustryInfo.cs file. The code contains an initial definition of TYPEINFO, which is metadata for the given object type that the system uses to automatically support certain general features. This includes the specifically named columns from the above configuration. You can also leverage more general columns of this type. All of them are set up through either the constructor parameters or properties of
ObjectTypeInfo, mostly the properties with the “Column” suffix, such as “OrderColumn”. My future articles will show you how to leverage some of these columns to quickly implement specific behavior.
I haven’t provided a Site ID column yet, so my object type provides only globally available objects. I will cover site specific objects in one of the next articles.
Also notice a couple other aspects of the code:
- OBJECT_TYPE constant – the Object type is a string that uniquely identifies your data type within the general data model of Kentico. It is typically just the class name in lower case. Use IndustryInfo.OBJECT_TYPE to refer to the object type in code. You can do the same with all other Info classes in the system.
- [assembly: RegisterObjectType(typeof(IndustryInfo), IndustryInfo.OBJECT_TYPE)] attribute – This piece of code lets the system know that you introduced a new data type to the system and API, so that the general features are able to automatically pull it up.
- [DatabaseField] attributes – You may also have some non-database fields in your code. This attribute helps our LINQ provider for DataQuery and support for Unit tests differentiate between these two field types. There are more features that you can leverage to better support LINQ in your custom info code, but I don’t want to go into too much detail in this article. I will explain the LINQ support within the Kentico API in more detail in another article. For now, just use this attribute on all properties with a name and type that matches a database field.
There is nothing special to explain in the class’s provider code. It just mirrors the default provider functionality using static methods with class-specific names to make things simpler for the coder. By default, the provider gives you methods for getting, setting (insert, update), and deleting objects. Feel free to remove any methods that you don’t want to make public, or override any of the base methods called inside with your own extra functionality. For example, you can perform extra steps before the object data is saved. A provider is an instance of a class with a singleton behind it. You can access that singleton through the
ProviderObject property. Any
customization of the providers / faking data within automated tests is done through this singleton.
If you set up hashtable caching for the custom class, you can see that it is configured in the constructor of the provider. The system also offers more provider caching options that I will cover in another article.
At this point, you have a working API for your data.
Admin UI
You will almost always need some sort of admin UI for your data, at least to provide basic service operations such as entering / managing / reviewing / fixing the data you have. We wanted to make this task simple for you, and due to the fact that admin UI follows quite repetitive patterns, we leveraged the template system of the Kentico Portal engine.
Creating a basic management UI for a class is as simple as just a few clicks on the
User interface tab of the module and providing an XML file for the listing configuration. I’ll just quickly summarize what I did, and you can find more details in the documentation on
Developing custom modules.
First, I created a new UI element for listing in the location where I wanted it to appear. In my case, it is under the On-line marketing > Contact management > Configuration UI Element.
I used the basic
Object listing page template.
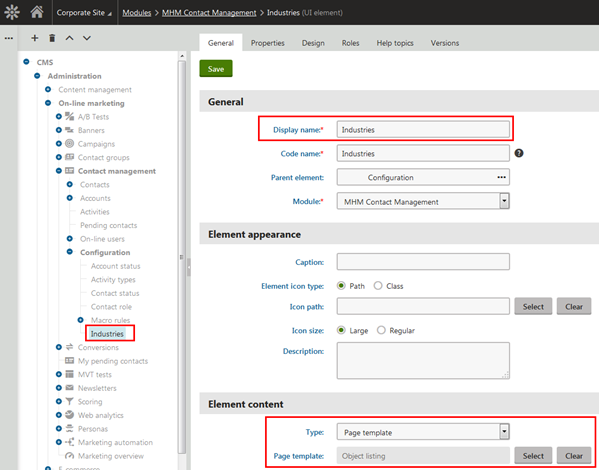
Note that this UI element is placed under an element using the
Vertical tabs template. The tabs template automatically displays the child element in the UI.
I also set the object type property to my new object type “mhm.industry”. Note that if you don’t create a more presentable resource string within the Localization application, the object type name appears this way:

For localization, create a resource string with the key “ObjectType.mhm_industry” (the dot in the object type is replaced with an underscore), and use the singular version of the object name “Industry”.
My grid XML file content is the following:
<?xml version="1.0" encoding="utf-8" ?>
<grid>
  <actions>
    <action name="edit" caption="$General.edit$" fonticonclass="icon-edit" fonticonstyle="allow" />
    <action name="#delete" caption="$General.delete$" fonticonclass="icon-bin" fonticonstyle="critical" confirmation="$General.ConfirmDelete$" />
  </actions>
  <columns>
    <column source="IndustryDisplayName" caption="$general.displayname$" wrap="false" localize="true">
      <filter type="text" />
    </column>
    <column source="IndustryCodeName" caption="$general.codename$" wrap="false" />
    <column width="100%">
    </column>
  </columns>
  <options>
    <key name="DisplayFilter" value="true" />
  </options>
</grid>
It provides two basic actions for editing and deleting, and columns for the display name (with the ability to filter) and code name of the industry. You can find more information about grid configuration options
here.
I also created two additional UI elements for
New and
Edit using the
New/Edit object page template (with corresponding prefixes in the element code name so the system automatically picks them up for the given actions).
I also recommend enabling “Display breadcrumbs” in the properties of the New and Edit elements to get the full-featured navigation within the main application breadcrumbs, as well as support for the “Back” arrow above tabs. The need for this property depends on the context into which you place your admin UI, but a general rule of thumb is to enable it.
Now I am able to manage my Industries as any other objects in the system:
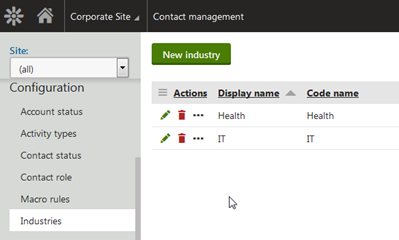

Note, that the Edit and New UI elements are always separated. The reason for this is to standardize the system’s behavior and simplify customization options (yes, even your module can be customized by someone else).
Macros
As you registered your object type within the system, it is also automatically recognized by the macro engine. If you navigate to System > Macros > Console, you can easily try this out as shown below:
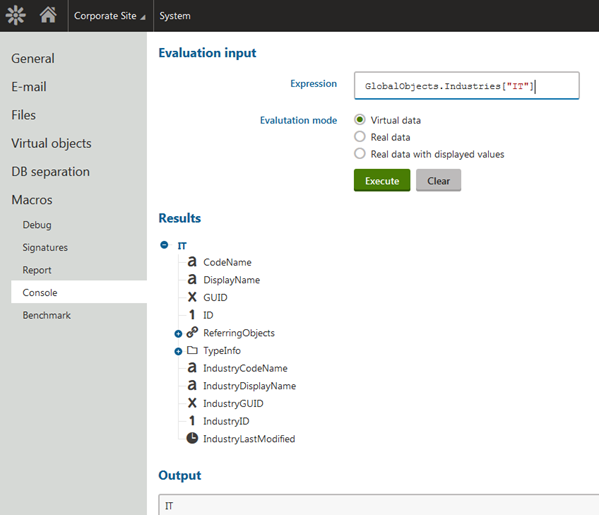
Unlike other locations in the UI where the name is localized, the name of the object collection in macros is derived automatically from the last part of the class name and pluralized (in English). In my case the name is
Industries, and was derived this way:
MHM.Industry >
Industry >
Industries. If that doesn’t work for you, you can override the default name through the
Name property of the ObjectTypeInfo metadata.
Note that in my case the macro collection is available under
GlobalObjects. The location depends on the setup of your class. If it had a site ID column, it would be under
SiteObjects, if it was a child of another object, it would be accessible through the parent object instance, etc. I will cover macro availability in each of the related articles.
Support for Staging and Export/Import
To support your object type in general system features such as
Staging and
Import/Export, you need to provide some extra configuration within the object metadata.
Modify IndustryInfo.cs to include the following properties in TYPEINFO:
public static ObjectTypeInfo TYPEINFO = new ObjectTypeInfo(...)
{
  ...
  ImportExportSettings =
  {
    IsExportable = true,
    LogExport = true,
    ObjectTreeLocations = new List<ObjectTreeLocation>
    {
      new ObjectTreeLocation(GLOBAL, CONFIGURATION)
    }
  },
  LogSynchronization = SynchronizationTypeEnum.LogSynchronization,
  SynchronizationObjectTreeLocations = new List<ObjectTreeLocation>()
  {
    new ObjectTreeLocation(GLOBAL, CONFIGURATION)
  }
};
This is how you can read the above configuration:
Import export – This object is exportable, logs export tasks (support for delete operation within incremental deployment export), and this type will be located under the node Global objects > Configuration within the export/import object tree. Here is what you will see in the export/import UI:
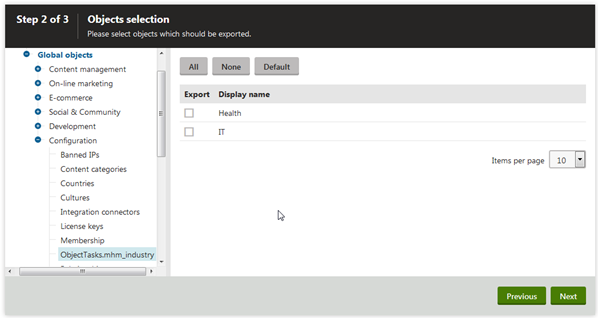
Note that in this case you also need to prepare a resource string. For localization, create a resource string with the key “ObjectTasks.mhm_industry” (the dot in the object type is replaced with an underscore), and use the plural version of the object name “Industries”.
Staging – This object is synchronizable (the system logs staging tasks), and will be located under the node Global objects > Configuration within the staging object tree. Here is what you will see in the staging UI:
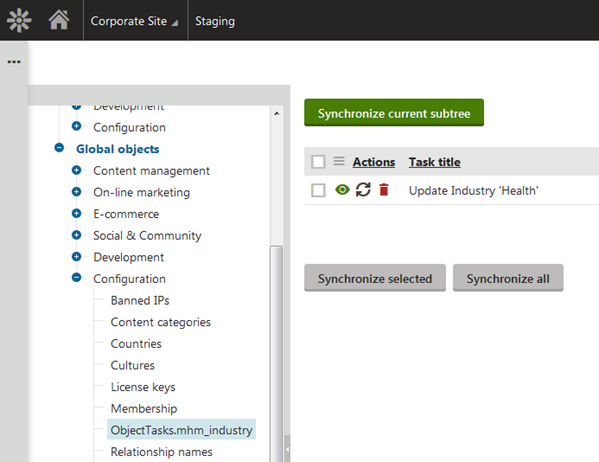
The system logs staging tasks after you make changes to the objects or create new ones. For this reason, to ensure that all objects are transferred to the target instances, you can configure the staging TYPEINFO settings before you start adding data, re-save all objects, or just let the whole list synchronize through the
Synchronize current subtree button.
That is all you need to do to support Staging and Import/Export.
Integration bus support is provided automatically, as it depends on particular subscriptions, not general object configuration.
Wrap up
Today, you learned the basics of module development with Kentico. We performed the following steps to create a manageable listing of Industries:
- Create a module
- Create a class for the data
- Generate the API for that data
- Create a listing UI element using the grid XML
- Create new and edit UI elements for management
This created a baseline for further articles through which I am going to show you more advanced scenarios.
If anything described here wasn’t clear, please refer to the documentation on
Developing custom modules for further details.
In the next article, I will show you how to leverage this new object type in other parts of the system as a foreign key, as well as how to properly handle foreign keys in your own object types