Migration: Re-Potting Your Site
When using Kentico, you may need to migrate your database, your website, or both to a different environment. If you’re feeling lost on where to start with this kind of project, this article should help.
Before starting, make sure both the source and target environments meet the system requirements for your version of Kentico. Then, you can begin.
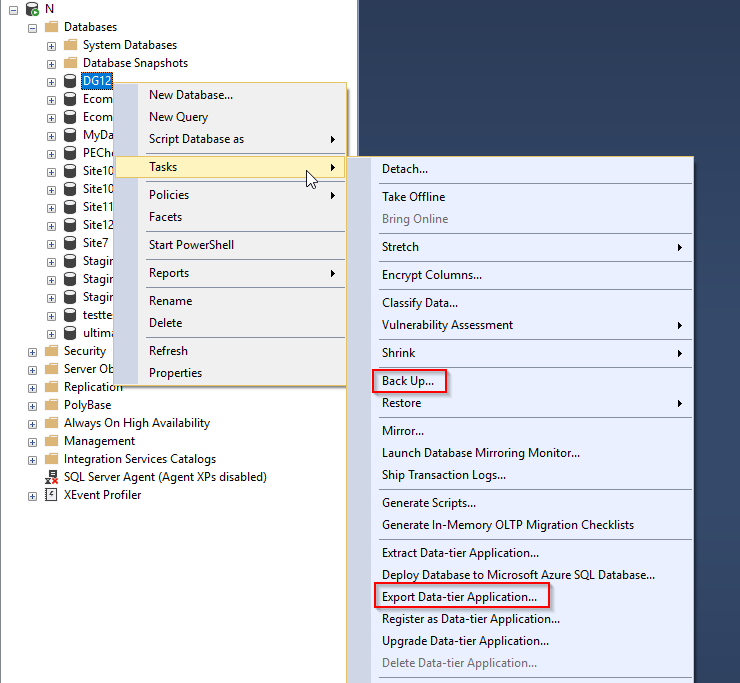
First, open SQL Server Management Studio and create a backup of the database. Depending on whether you’re using AzureSQL or a standard SQL Server installation, this process may differ. For a standard installation, there is a Backup option in the Tasks menu that will create a .bak file, useful for moving databases between SQL servers. If you’re exporting from or importing to an AzureSQL instance, you can choose the Export data-tier application option instead.

Now, copy the filesystem of your Kentico application into a zip file. (“Filesystem” includes the CMS directory, as well as all of its siblings, such as the Lib folder and the Solution file.) If you’re using the MVC development model, copy your MVC application to a zip file as well. Now you can move your zip file(s), along with the database backup to the new environment(s).
Once the database backup has been copied over, open SQL Server Management Studio.
- If you have a .bak file,
- Right click on the Databases folder.
- Choose Restore Database.
- Tick the radio button for Device and click the … button.
- Click Add, and then select your backup file.
- Click OK in the selection dialog, and again in the restore dialog.
- If you have a .bacpac file,
- Right click on the Databases folder
- Chose Import Data-tier Application
- Go through the wizard.
Now you can unzip the filesystem(s) onto the new environment. In the web.config of each application, change the connection string to point to the newly copied database.
Once the connection string has been updated, the applications are ready to talk to the database. They just need to be set up in IIS, which can vary depending on your desired setup. A few of the common setups are described below:
- If you want to set up a virtual application beneath an existing IIS site,
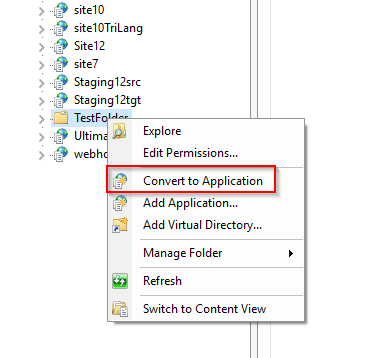
- Unzip the filesystem into that site’s directory, right click on the folder in IIS Manager, and choose “Convert to application.”

- If you want to set up a web site instead,
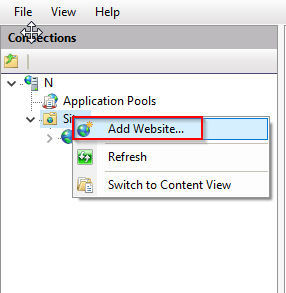
- right click on the Sites folder in IIS manager, and choose “Add Website.”

Then in either case,
- Set the application pool that you want it to use, and save the changes.
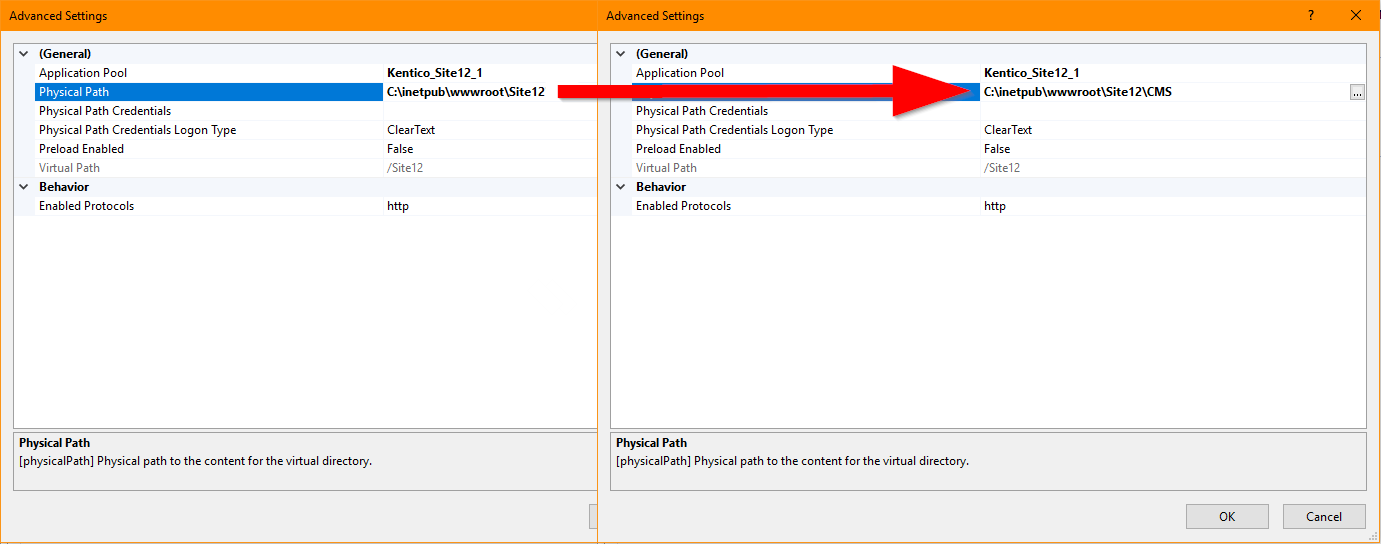
- In the Advanced settings of the Kentico application, change the physical path to point to the CMS directory, rather than its parent.

- If your Kentico instance is a web application project, open the solution in Visual Studio and run a Clean and Build.
- If you have an MVC application, open its solution in Visual Studio and run a Clean and Build.
Now the application should run, so you can log into Kentico and configure the settings. In particular, you may need to alter the domain settings, considering the DNS settings of the server you’ve moved to, as well as settings related to things like staging and external integrations relating to your environment.
This process will allow you to move your site to a new server, or make copies of your site for sandbox environments and testing. For example, it can be particularly useful if you’re trying to set up identical Kentico instances to configure staging. It can also come in handy when upgrading, as it allows you to perform the upgrade in a separate environment, then copy the upgraded project back to the original server afterwards.
I hope this helps! If you run into any Kentico issues during this process, you can reach Kentico Support here.